Build Arch Doorway Using Plywood and String
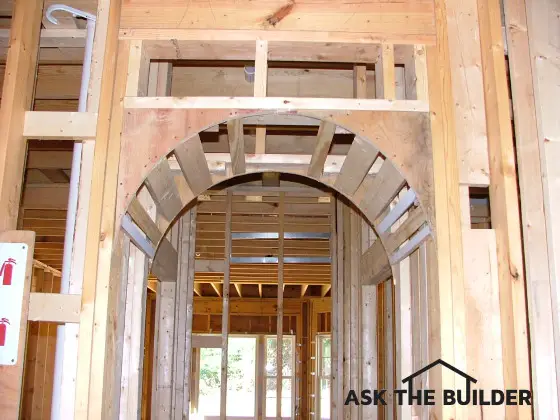
Build Arch Doorway | This arch doorway is more circular than elliptical, but the method to create any curved opening is fairly standard. Note the flat 2x blocking between the pieces of cut plywood.
DEAR TIM: I have quite a few square openings between rooms in my home. These openings do not have any doors but do have finished wood jambs and wood trim as if there was once a door in each opening. I would like to transform these openings so they have gentle curves and are smooth-finished drywall or plaster. How can this be done? - Maria G., Tuscon, AZ.
DEAR MARIA: It's easy to build an arch doorway, especially if it's new construction. I outline the steps below.
This task is so simple you'll be astonished once you are halfway through it. The best part is that it does not require any fancy tools to speak of. If I were invited to help, I would only bring my wide pry bar, a standard circular saw, a small jig saw, a hammer, some string, a pencil and my drywall finishing tools. Many homeowners already own most of these tools. If you don't, I'll bet a friend or neighbor has the tools you need.
How Do You Salvage Wood Trim?
The first step in the process is to remove the existing trim and wood jambs. Try to salvage these if possible, as the trim may come in handy down the road if you damage another piece of door casing somewhere else in the house. Carefully tap the flat blade of the pry bar under the edge of the casing trim and try to pry it away from the wall.
Once you've pried the trim off the wall, do not hammer the nails backwards through it. Doing this often causes large chunks of wood to pop off the face of the trim. Instead, use a linesman's pliers to pull the nails through the wood trim from the back side. This is not as difficult as you might think, unless the trim is made of a hardwood.
Watch this video to see how to best remove finish nails:
Why is Wall Width Important?
With the wood jambs out of the way, you should now be able to tell how thick the wall is all around the opening, and to see how the wall was built. Check the wall width at several points around the opening and find the narrowest dimension. If your home is less than 30 years old, the wall might be 4-1/2 inches or 4-5/8 inches thick. If it's an older home with real plaster, the wall could easily exceed five inches in width.
How Do You Create the Outline of the Arch?
The frame for the archway is going to be prefabricated on the ground or a workbench. It will consist of two pieces of plywood, cut in the shape of your arch, spaced apart by framing lumber. If you are going to cover this arch frame with half-inch drywall on each side, the arch frame needs to be one inch narrower than the narrowest point of the current wall opening. If your current wall thickness measures 4-1/2 inches, you are in luck. You will be able to use two-by-three framing lumber and half-inch plywood to construct the arch frame.
Use Plywood or OSB
The first step is to cut blanks - rectangular pieces of plywood - which will be re-cut to create the sides of the arch. If the wall opening is six feet wide, and if your planned arch has a curve one foot deep (i.e., the lower tips of your arch come down one foot from each corner of the existing opening), then you need two pieces of plywood one foot by six feet.
How Tall Should the Arch Be?
The hardest part is next. You need to create the arch shape you desire on one of the pieces of plywood. It's critical that the apex of your curve come no closer than 1-1/2 inches to the top edge of the plywood blank. This spacing allows you to place a continuous two-by-three along the top of the arch frame between the two pieces of curved plywood. You can substitute thinner wood spacing material if you desire, but it will still need to be the same width as the two-by-three.
How Do You Create the Arch Template?
You can create an arch template by bending a thin, flexible piece of wood into the desired shape and then tracing along its edge onto the blank. Or you can use a trick you may recall from high school geometry for drawing an ellipse. Drive two nails into a separate piece of lumber or the remainder of the plywood sheet. Make sure the nails match the width of the arch frame. With a piece of mason's string, tie a loop that is big enough to place around the two nails with a bit of slack.
If you put a pencil inside the loop and push it away from the nails until the string is taut, then move the pencil in a clockwise motion, allowing the taut loop to guide the pencil, you will trace the shape of an ellipse. For your arch, you will trace only a segment of an ellipse, but the principle is the same.
CLICK or TAP HERE to get FREE quotes from local carpenters who can build an arch doorway.
Orient one of the plywood blanks so its edges are touching the nails. Depending upon how much slack is in the loop, you can create oval shapes with different radiuses. Place a pencil inside the loop and push the string away from the nails, keeping the string taut. Trace a graceful arch.
What Saw Should I Use?
Once you have created the arch shape, use the jigsaw to cut the pattern. Then nail small pieces of two-by-three between the two pieces of plywood on the three straight sides and at six-inch intervals along the bottom of the curve of the arch. When complete, the sturdy arch frame is rigid and one inch narrower than the current finished opening. A helper holds the arch frame in place as you toenail it to the existing rough walls studs. Cover the arch with drywall and finish it to a texture to match the existing walls.
Circle or Oval - Which is Better?
True circular arches are rare. Almost all arches are oval shaped, and these are not hard to do with the string jig method. The key is determining the amount of slack in the string to create the apex of the oval from the bottom spring line. The spring line is the invisible or imaginary straight line that connects the bottom tips of the arch.
To ensure the arch is centered and consistent in shape, you can also create a grid on the plywood of equally spaced lines. When the shape is perfect, each half of the arch is a mirror image of the other. You can see the curved line pass through the same part of each square or rectangle created by the grid lines.
Tim built custom homes and did ultra-custom remodeling for 20+ years before launching his Ask the Builder media presence. He was selected as one of the Big 50 by Remodeling magazine in 1993. This award gave birth to Ask the Builder in October 1993. Tim also operates https://DrawPlumbingPlans.com. His @askthebuilder YouTube channel was the first home improvement channel on YouTube.