Firewood Rack
DEAR TIM: My husband says we must have a firewood rack, but I say it’s not going to work. The only place available at our home for the firewood storage is a sloping hillside. All the storage racks I’ve seen are made for level ground. Do you have any suggestions for an outdoor firewood rack that might have adjustable legs? Money is really tight right now, and if there is another way to solve this firewood storage rack inexpensively, I’d be grateful. Melissa T., Stowe, VT
DEAR MELISSA: I have to agree with you, as I’ve done pretty exhaustive searches and the photos of each firewood log rack I’ve seen show the rack on level ground or a driveway. That’s not to say firewood racks can’t be modified, but that could take some work.
I’m also sensitive to your budget issue, as undoubtedly are many other homeowners in these challenging financial times. Just this past weekend, I solved my own firewood outdoor storage problem by building three outdoor firewood racks in one using the actual split firewood and salvaged oak 4x6’s that came in a shipping crate. This project only cost me my time, with no out-of-pocket expenses.
A firewood rack may not be necessary if you creatively stack your split firewood. How NOT to stack firewood is shown in the upper right corner. Previous homeowner just scattered cut links on the ground. PHOTO CREDIT: Tim Carter
Salvaged wood beams for a project like this can often be found at trucking companies or businesses that ship and receive granite, stone or marble. You can also purchase these strong materials at a lumber yard. Be sure to get treated lumber if at all possible.
Frequently homeowners underestimate the weight of firewood, especially if it’s a dense hardwood like oak or locust. This is why you frequently see the firewood rack glamor shot with the rack resting on a concrete, brick or blacktop surface. If the rack was placed on soil, the weight of the wood very likely would drive the legs of the rack into wet or damp soil.
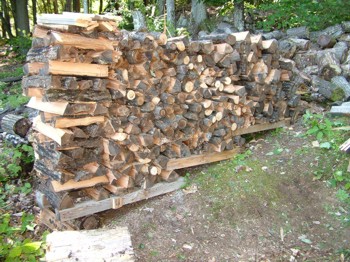
The ground surrounding my outdoor fire pit is also sloped like yours. I used 4-foot-long 4x6’s to make level, or nearly level, stacking platforms for my firewood. The advantage to using shorter lengths of the wood beams becomes clear when you see how little you have to lift the downhill end to make it level. Often a medium-sized piece of split wood that is placed perpendicular across the end of the first step of the wood beams is enough height to set the next step of the homemade firewood storage platform.
The primary purpose of the firewood racks I’ve seen is to create support at the ends of the pile and a level surface off the ground so the wood doesn’t contact the soil. The short wood beams in my homemade firewood rack provide plenty of space for air circulation at the base of the pile of wood. I use the actual split firewood at the ends of the pile to provide the necessary support so gravity doesn’t cause the wood to tumble off the pile as it gets higher.
My homemade firewood rack works best with split firewood. I’ve discovered over the years that fires seem to burn best when you throw on pieces of wood that are not too much larger than the diameter of the fat end of a baseball bat. Split wood also dries and cures faster, so you might as well split the wood before you stack it so it’s ready to use when you want to burn it.
I take similar-sized split pieces of firewood and use them at each end of the pile to create a stacked structure that retains the weight of the wood next to it. All you have to do is place the first row of the wood perpendicular across the large flat 4x6’s that are set parallel and spaced about 14 inches on center. This tight spacing allows the beams’ outer edges to be about 18 inches apart. This is typically the ideal length for pieces of firewood. This spacing of the wood beams provides the most amount of stability as you stack the wood.
The next layer of wood at each end of the pile is set perpendicular to the row beneath it. Use three or four pieces of wood at each row, not just two. You’ll discover quickly that this stacking method is very stable. Always stand at the end of the rack and look at the pile as you build it to make sure the wood is always centered over the wood beams. The firewood that is placed between these two end structures can be all stacked the same direction perpendicular to the run of the wood beams.
Once the firewood is stacked, you need to cover it. But you can make a big mistake if you cover it completely with the pile wrapped up like a Christmas present. If you drape a large waterproof cover over the wood pile, you’ll trap water vapor and liquid water in the pile. You just need to cover the top and the top 25 percent of the sides of the wood pile. This allows air to readily pass through the stacked wood to dry it rapidly when it does get slightly wet from a rainstorm.
If you do decide to purchase a firewood rack, be sure you can adequately support the legs. The weight of the firewood can bend the bottom supports of the factory-made firewood racks if they don’t have solid support. Keep in mind that soil strength changes significantly when soil becomes wet. You may think the soil is plenty strong when dry, but after a rainfall your firewood rack and all the wood in it may be scattered on the ground after it collapses.
Column 795
Tim built custom homes and did ultra-custom remodeling for 20+ years before launching his Ask the Builder media presence. He was selected as one of the Big 50 by Remodeling magazine in 1993. This award gave birth to Ask the Builder in October 1993. Tim also operates https://DrawPlumbingPlans.com. His @askthebuilder YouTube channel was the first home improvement channel on YouTube.