Artificial Stone Veneer Installation Tips
Quick Column Summary:
- Artificial stone install DIY friendly
- Read all installation instructions
- Create a surface for rock to adhere to
- Use cement paint
DEAR TIM: I was at a spring home show and saw a few displays that featured beautiful stone. When I asked about what type of stone it was, the man said it was colored and textured concrete. I wasn’t prepared for that answer! Are these products durable and DIY friendly? This stone would be a perfect material for a small low wall in a grotto area in my screened-in porch and outside in a corner of my patio. Tell the truth, do you really think a 65-year-old woman can do a job like this? Connie S., Richmond, VA
DEAR CONNIE: That artificial stone you saw has been around for decades and each year it gets better and better with respect to how realistic it is. There are styles and brands out there that can fool a trained geologist at a distance. Upon close inspection, a person intimately familiar with rock and stone can tell the precast concete is an imposter, but realize there are very very few of us that have such training.
At the end of the day, all that’s important is if you love the look of the product and if it will stand the test of time. It sounds like you already have satisfied the first requirement, and you may even be happier if you see all of the many colors and styles of this magical artificial stone. As for durability, you’ve got nothing to worry about. The name-brand artificial stones are manufactured in nearly ideal conditions with top-grade materials.
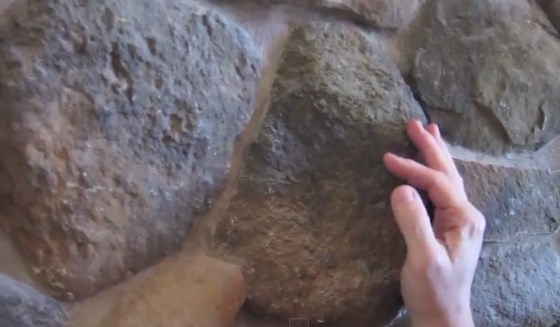
These stones are really just precast concrete, but they can fool the average person. Photo Credit: Tim Carter
I’m a truth teller. My kids will tell you it’s a flaw in my character. I often tell too much of the truth if that’s possible. The good news is that just about anyone who has the physical strength to lift the small stones, mix up small batches of mortar and has enough mobility and dexterity to glide a trowel across a surface can install these wonderful artificial stones.
The first thing to do is just read the instructions that come with the stones. You’ll probably discover you can attach the stones to both wood and masonry surfaces. I would absolutely consider building a sturdy plywood covered wall in your screened-in porch as the support for your stone grotto. Your outdoor wall should probably be made with concrete block as the backer wall.
The lumber should be dry. Use screws to fasten the small studs together and to fasten the plywood to the studs. Screws take a little more time to install, but they hold so much better.
The next step is to cover the plywood with regular roofing felt paper and some wire mesh. You may be able to use standard chicken wire instead of the expanded wire lath. Wear work gloves working with these metal products to avoid cuts.
Once the wire mesh is securely fastened to the wood wall, you need to coat it with a thin layer of cement-based mortar. Your goal is to make this rough stucco base coat as flat as possible so there are few humps or dips. The rougher this surface is the better. You don’t want to rub it so it’s smooth like glass. A rougher surface will help the stones bond better.
You’ve now passed the hardest part of the job in my opinion. If you can create this rough stucco surface, you’re 80 percent of the way to a successful completion!
The instructions should say it’s best to wait 24 hours before you try to apply the stones to this rough mortar surface. Before you do this, take the stones and lay them out on the floor with the correct spacing between the stones as you might want to view them on the wall. Now is the time to see if you have to trim any stones. It’s best to do as much of this fitting as possible before you mix up the mortar that will hold the stones to the cement stucco on the wall.
The task of putting the stones on the wall is simple. You apply fresh mortar to the back of the stones like you might butter a biscuit. If you want the stones to bond permanently, make sure the back of the stone is free of all dust and wipe it with a damp sponge to make the surface just slightly wet. To really improve the bond between the stones and stucco, I’d apply a thin coat of cement paint to the back of the stone and the area of the stucco where you intend to put the stone.
Cement paint is just a mixture of pure Portland cement and water. Mix it to the consistency of regular paint. Brush on a thin layer on the back of the damp stone then immediately apply some of the mortar to the stone. Paint some cement on the stucco and press the stone onto the wall. It should stick quite well!
You may have to tool the mortar between stones to get the look you want. Before attempting to build the walls, visit the showrooms where this artificial stone is sold and study the sample panels you see. Take photos if necessary to remind you of the look you like.
Realize the mortar in between the stones looks quite different up close as it does when you stand back 10 feet. Small flaws in the mortar joints may not be visible when you stand back. Don’t forget you may have plants or something else in front of the stone walls, so they don’t have to be perfect. Have a blast building your new stone walls!
Column 1032