Brick Paver Repair Tips
DEAR TIM: I have a 15-year-old colored brick paver sidewalk that’s in need of repair. I’ve got several cracked brick, and a few that are humped up and collapsed. Luckily I saved some of the original brick and have them stored in my garage. It doesn’t seem like it would be too hard to make these repairs, but I’m stumped at how to get the cracked brick out of the sidewalk without chipping adjacent brick. What’s the secret? What other tips do you have when you have to replace several and want the final surface to be perfectly smooth? Anna K., Memphis, TN
DEAR ANNA: You’re correct. The repairs to this brick sidewalk are pretty simple. The best part is that you don't need too many tools to get professional results. If you don't have the exact tools, you can rent them affordably.
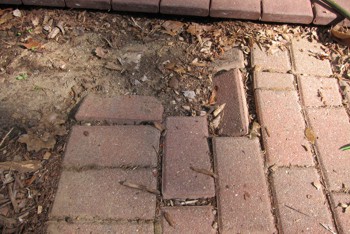
This corner of a brick paver sidewalk has collapsed. The repair is not as hard as you might think. PHOTO CREDIT: Tim Carter
Let's start with the crack paver brick as they are the easiest ones to deal with. It's important to note that there's more than one right way to deal with all of these repairs. I'll just describe the methods I'd use.
I want you to first be aware of one unintended consequence before you get started. You may think you're being a good steward by making your sidewalk look like the day it was installed, but you could create a secondary problem that may leave you distressed.
Your paver sidewalk is middle aged. You may not believe this, but it probably looks much different today than it did the day it was installed. To prove this, take one of those original brick that's been in the cozy confines of your garage the past 15 years. You'll see that the color of the paver brick is undoubtedly much deeper and richer than the others that have been out in the weather.
When the brick pavers are made, pigments are added to the cement paste. This fine paste coats all the aggregate and sand used to make the brick. The top surface is usually monochromatic as everything has a fine coating of the colored cement paste.
Over time, Mother Nature wears away this paste and you start to see the actual color of the small sand and rock particles. If you had left outdoors all your extra brick so they would also weather, you'd not have a problem. But now, if you replace the cracked brick with a brand-new brick, the difference in color may be so striking as to look worse than the tiny crack. Just keep this in mind.
If you do have brick that will match, then you're good to go. To replace one brick that's in the center of many others, one method is to use a hammer drill with a 3/8-inch bit. You start at the center of the brick and drill many holes next to one another until you can take a chisel and hammer to remove the brick material working your way to the edges.
Never angle the chisel towards the edges. Try to always chip the brick towards the center of the brick. This directs all pressure towards the brick you're trying to remove.
Once all of the brick is removed, smooth the sand under the brick. Tamp it with a small piece of 2x4 wood so that the sand is compacted and is at the same level as the bottom of the adjacent brick.
Place the new brick in position and start to tap it in place with a rubber mallet. You only get one chance to do this correctly. If you have too much sand in the space, the brick will sit high. If you have too little, the new brick may sit lower or will crack again if there is a hollow spot.
The areas of the sidewalk that are high need to have sand removed to make them flush again with the rest of the sidewalk. Once the high bricks are lifted out of place, the trick is to use a flat board that smooths the sand so that it's in the same plane as the rest of the sidewalk. But the uncompacted sand needs to be about 1/4 or 3/8 inch higher than the bottom of the adjacent brick that are at the right height.
You can test to see if you can tap the brick down to the correct height with the rubber mallet. Be careful so you don't beat the brick and cause it to crack. Use a straight piece of wood or a level to constantly check to make sure the brick are not too high or low by sliding it across the existing brick that are perfect and then onto the brick on which you're working.
For the areas of the sidewalk that are low, you just have to carefully salvage the brick and then add more sand. Usually the sand is a medium grade. You have to make sure the sand is smooth, and you carefully set the brick back into position.
After they are set, you can tap them with the rubber mallet. Test this to make sure you can get the brick into position so they are flush with surrounding brick. The original installer used a heavy machine plate compacter to drive the brick into the uncompacted sand. If you don't use this machine, you must experiment with the amount of sand needed to be able to get the brick flush with those next to it.
It's not hard to do, it just takes time and some trial and error.
Column 894
2 Responses to Brick Paver Repair Tips