Caulk Installation Tips
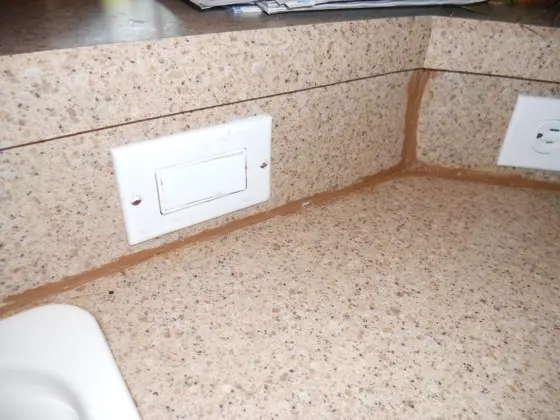
This caulking job is horrible. It's easy to achieve pro results with a little practice and the right tools. Photo Credit: Amy Fox, Clermont, FL
Caulk Installation Tips
DEAR TIM: My son tried to do me a favor while I was out of town by caulking my kitchen backsplash. Although his intentions were wonderful, his skill level leaves much to be desired as he made a mess of things. How do I remove the dried caulk and how can we re-caulk and get really professional results? Amy F., Clermont, FL
DEAR AMY: Ouch! I know the pain you're feeling. I've had that happen to me and on the flip side I used to deliver that discomfort to my parents when I was experimenting in home improvement. I would sharpen my skills on their house. My mother had the patience of Job as I'm sure you do.
There are all sorts of techniques to remove caulk. Some involve the use of chemicals and other methods require you to use sharp tools. Both carry risks to you and the material that was caulked.
Let's talk about using simple tools. Based on the photograph you sent me I can see that the material that was caulked has a very hard and smooth finish. It appears to be a faux stone countertop and backsplash. These usually contain very dense hard stones and a tough binder epoxy.
I would purchase a simple straight-edge razor blade scrapper tool at your local hardware store. These are used by painters to remove paint from glass. If you use new razor blades that are sharp, and remove all grit from the surface being scraped you rarely will scratch the surface. You can even add a little water to lubricate the backsplash and countertop.
I always hold the razor tool at a low angle and push gently. The razor blade almost always cuts cleanly like a snow plow plows snow. The trick is to hold the razor blade tool at an angle as it cuts into the caulk just like a snow plow blade is canted on the front of a plow truck. Don't ram the entire blade into the caulk as it will offer too much resistance, and the blade can jump over the caulk.
If the caulk was recently applied and is non-acrylic, you may be able to soften it with just water-soaked rags. Try that. If the caulk contains acrylic it can sometimes be softened with isopropyl alcohol. But TEST this on a small part of the countertop to ensure the alcohol does not harm the gloss finish of the material!
Be careful when using isopropyl alcohol as it's highly flammable. Beware of standing pilot lights, cigarettes, candles, etc. Alcohol also doesn't burn with a colorful flame, so things could be on fire and you not know it.
If the caulk is silicone, it's very hard to soften it. Sodium or potassium hydroxide can sometimes soften silicone caulk, but there's a good chance these highly alkaline chemicals could harm your countertop. You can usually scrape off silicone, but it takes great skill and magic to do it without scratching the countertop and backsplash.
Once the caulk is removed, you can re-caulk and get pro results. But you're not going to start caulking in your kitchen. You're going to set up a practice area.
I would simply nail together several piece of wood at a 90-degree angle to mimic your backsplash detail as it contacts your countertop. Practice caulking this joint until you get pro results. Then move on into your kitchen.
The easiest caulk to use to get great results is one that's pure acrylic and color matched to your countertop. These caulks can be cleaned up immediately with water. Silicon caulk requires a deft touch and great skills and magic for pro results. Don't use silicone unless you really know what you're doing.
One of the primary tricks to pro caulking is cutting the tip of the tube so that it delivers the correct amount of caulk to match the size of the crack being caulked. I would make the hole no larger than one-eighth inch in your case.
You also have to use a pro caulk gun. These usually cost four times what a cheap gun costs, but they deliver precision pressure. You can get one now for less than $20 in 2013 dollars.
Apply a smooth bead of caulk and tool the joint with your finger. Only caulk two linear feet at once. Take a grouting sponge with rounded corners, get it wet, squeeze out all excess water and rub the sponge across the caulk several times to really smooth the joint, Use the sponge to remove excess caulk from the smooth parts of the backsplash and countertop. Rinse the sponge frequently to prevent caulk film from fouling the finished surfaces.
Read my opens in a new windowCaulking Doesn't Have To Be Hard column for another reader's question on messy caulk.
Column 989
2 Responses to Caulk Installation Tips