DIY Acrylic Shower Walls
Installing do-it-yourself acrylic shower walls can be easy so long as you select the right acrylic shower set! (C) Copyright 2017 Tim Carter
DIY Acrylic Shower Walls TIPS
-
- Many different models and types to choose from
- Some acrylic showers have thin walls that need lots of work to install
- Wall studs must be plumb and not bowed
- Shower base must be level and installed in wet setting compound
- opens in a new windowCLICK HERE to Get Tim's FREE & FUNNY Newsletter!
DEAR TIM: I’ve had it with ceramic tile in my shower. It’s hard to clean and I love the sleek look of some of the modern acrylic shower units.
I want to do this job myself so the install needs to be DIY friendly. What’s been your experience with these easy-care shower units?
Would you be kind enough to share some installation tips so I don’t goof this up? Alice W., Xenia, OH
DEAR ALICE: I can hear you loud and clear about ceramic tile care.
Stain Solver Cleans Tile
opens in a new window
Stain Solver is MADE in the USA with USA ingredients that are food-grade quality. CLICK THE IMAGE to order some NOW.
When I was younger I seemed to have plenty of energy to wrestle with cleaning tile and grout.
I did discover years ago that using Stain Solver certified organic powdered oxygen bleach made the job easier and less smelly.
You mix the Stain Solver with warm or hot water, stir until the powder is dissolved and put the solution into a spray bottle.
I'd just spritz the dry tile and grout every 15 minutes and at the end of an hour I'd scrub. The Stain Solver has no odor like nasty toxic chlorine bleach.
But I no longer have to deal with cleaning tile because I just switched out all the showers in my home to acrylic with the last install just days ago.
I've Installed Many
As you might expect, I’ve installed countless acrylic tub and shower units over the years as I’ve been a master plumber since before I was 30 years old. I’ve discovered much to say the least.
The best news in my opinion is the overall quality and design of some units have come a very long way.
Free & Fast Bids
Old Hum Drum Acrylic Showers
Years ago many of the units were tough to install and those made for remodeling were humdrum. Just last year I installed a stunning acrylic alcove shower in my basement bathroom that was 60 inches wide and had simulated ceramic tile patterning formed into the side panels. I loved the built-in molded shelves for soap, shampoo and razors. This unit was very easy to install.
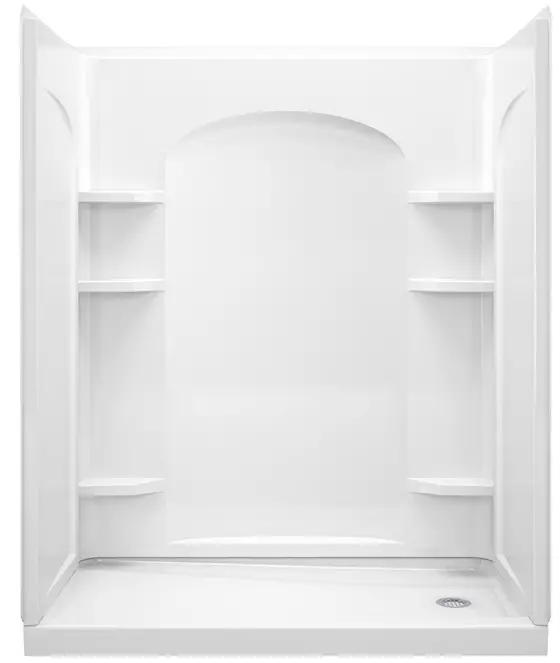
This is the shower unit I installed in my basement bathroom. It was very easy to do. Very DIY friendly!
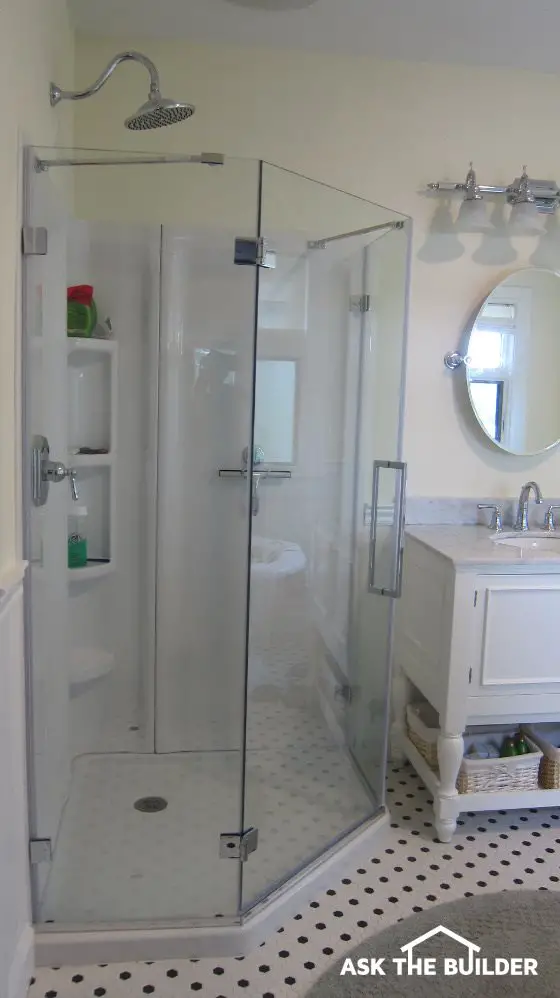
Many of the available acrylic units come with their own sleek shower doors that are built to fit perfectly if you follow all the instructions. Just last week I installed a frameless clear tempered glass shower door on a corner shower unit in my own master bathroom. You’d think it would be hard to work with glass panels, but it wasn’t at all.
Read Install Instructions Before Buying
There’s a big big difference between the actual acrylic shower systems in the marketplace. While they may all look the same or similar in the showroom, you need to compare the plastic materials and look behind the panels to tell the difference.
The unit I installed last year in my basement bathroom featured a proprietary solid composite material made with resins, fiberglass and filler. It’s extremely durable and is much stiffer than the acrylic material I installed in the past two weeks in my master bathroom.
Some Need More Studs
My basement bath alcove shower unit didn’t require any extra wall studs because on the back of the composite fiberglass walls there were reinforcing fins that acted like miniature I-beams. Believe me, the walls are very rigid and don’t flex at all.
On the other hand, the three-piece corner acrylic shower I just installed for my wife in our master bathroom was made with a thinner acrylic that had no fins and required quite a few strategically placed wall studs to support the walls. This unit also required you to use a special tub-surround adhesive to help hold the wall panels to the studs so they don’t flex back and forth like the bottom of an old oilcan.
opens in a new window
Here's the tub surround adhesive I had to use in my master bathroom. CLICK THE PHOTO NOW TO HAVE THIS DELIVERED TO YOUR HOME. NO TRAFFIC HASSLES!
Avoid These Mistakes
Here’s a list of the top things I feel you need to consider when working with acrylic shower units. You can’t afford to make a mistake at any stage. Some mistakes can cost you lots of extra money if you have to purchase new panels.
Before you buy a shower unit, download and carefully read the written installation instructions. Judge for yourself if you possess the skills and tools to install that particular unit. Pay close attention to the requirements for wall framing and think about how you’ll ensure all the wall studs are where they need to be for the side nailing fins and faucet location.
Shower Base Support
Most DIYrs make a grave mistake installing the shower base. Pay extremely close attention to this part in the written instructions. Almost all units require that the base be set in some sort of wet plaster or mortar. What’s more, it’s absolutely mission critical the shower base be perfectly level in all directions if you’re installing the factory-provided shower door kits.
The reason the bases must be set in a wet plaster is so the bottom of the shower doesn’t move when you stand in it. If the acrylic flexes at all it will eventually crack and you’ll get leaks. I’ve discovered over the years that I get the best results using a dry-setting joint compound that sets up in 90 minutes. I mix it so it’s the consistency of warm cake icing.
opens in a new window
This is the dry setting joint compound I prefer. It mixes easily with water. Use COLD water to slow set time. Mix until it's like warm cake icing. CLICK THE PHOTO NOW TO HAVE THIS DELIVERED TO YOUR HOME. NO NEED TO FIGHT TRAFFIC AND RUDE SHOPPERS.
The wall studs on the edges where the shower doors are to be installed must be perfectly plumb. Don’t overlook this step because you’ll pay the price when you go to install the shower door at the end of the job. You can’t grind, trim or change the size of a piece of tempered glass!
Rookies often ruin acrylic wall panels when cutting the hole for the shower faucet. The error may be based in poor measuring skills. Just remember that you can enlarge a hole but you can’t make one smaller.
I’ve found that it’s best to cut the hole with a high-speed spiral saw. This is an affordable tool that drywall installers have used for decades to cut holes in drywall for electrical boxes.
opens in a new window
This is an amazing tool invented decades ago. It cuts holes in drywall accurately and FAST. CLICK THE IMAGE NOW TO ORDER ONE. Get EXTRA spiral bits.
The bits that come with these tools have cutting edges on the sides of the bit. You drill a small 1/4-inch hole in the acrylic panel, insert the bit, turn on the saw and slowly cut in a counterclockwise movement.
Rain Head Shower Head
I think another tip you should consider is using a rain head shower head. I installed one in each of my new showers and LOVE them. My wife loves it too. That's the best part.
opens in a new window
This is just one type of rain head shower head. There are many models and diameters. You may have to pipe with 3/4-inch pipe if you get one 10 inches or more in diameter. CLICK THE PHOTO NOW TO HAVE ONE OF THESE BAD BOYS DELIVERED TO YOUR HOME BY NEXT WEEK. NO TRAFFIC HASSLE OR DEALING WITH RUDE AND SMELLY CUSTOMERS.
In my basement shower, I actually hung it from the ceiling! So if your ceiling height in your shower is about 7-feet tall, consider having it come straight down instead of using the special shepherd's crook shower arm that comes out of the wall.
Column 1197