How to Remove a Piece of Wood SubFloor
Quick Column Summary:
- How to remove piece of OSB in floor
- Cut line between sheets of subflooring
- Remove fasteners
- Pry up the subfloor
DEAR TIM: I'm carving out a small space in my garage attic transforming it into a man cave. The walls and ceiling in the attic are already drywalled. I have to get electric cables into the new partition wall. It appears the easiest way to do this is through the floor. The trouble is the subfloor in the attic is tongue and groove oriented strand board (OSB). Removing a piece in the middle of the room will allow me all the access I need. How do you do this without ruining the existing subflooring? Are there other added benefits to doing the job this way? Perry B., Providence, RI
DEAR PERRY: Each job is different and presents its own set of pros and cons with respect to how to best get from point A to point B. Yes, this sounds like I'm dodging you but I'm not.
In your case, you may have the electric cables coming up from the garage ceiling below into the floor cavity. The floor joists of the garage attic may run at a 90-degree angle to the direction you need to extend the cables. If this is the case, then it makes sense to remove a piece of the subfloor.
There are many electricians who have great skills and magic fishing cables from one point to another in a house. If you know of one, it may pay to ask them for advice before you go to all the effort to remove the OSB. Always keep in mind it's a trade off of time and effort. You may discover it only takes 15 minutes of total time to remove and reinstall the piece of OSB.
A second method of making numerous small holes in the finished drywall walls and ceilings to run the cables may create an hour or two of repair and refinish work. What's more, your drywall repair skills may be not as refined as your rough carpentry talents.
 opens IMAGE file
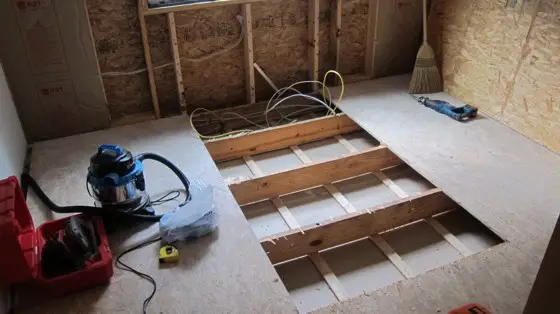
 An intermediate piece of tongue and groove wood subfloor has been removed without damage to it or the abutting pieces. Photo Credit: Tim Carter
I've removed many sheets of subflooring in my career. The degree of difficulty depends on how the sheet was installed in the first place. I discovered many years ago it was a good idea to screw, not nail, sheets of attic subflooring. Some carpenters prefer to nail and glue the pieces of subflooring. Nails and glue are huge obstacles when you need to remove a piece of subflooring. Screws and no glue allow you to remove a piece in short order. The screws also allow future trades easy access to the underside of the attic floor.
To remove a piece of tongue and groove OSB subflooring, the first step is to determine the thickness of the material. The tongue edge of the subflooring can be found on the long edge of the OSB. One edge has a tongue and the other a groove. The tongue of one piece of OSB slides into the groove as the material is installed so the long edges don't sag in between the floor joists. You need to make a cut line down the long edge between sheets of subflooring to disengage the pieces of subflooring from one another.
I cut the tongue with a circular saw. I adjust the cut depth to one-eighth inch less than the thickness of the OSB subflooring. You never want to cut into the top of the attic floor joist or attic truss bottom chord. This will weaken the wood framing member.
Once the tongue has been cut on the two long edges, the next step is to remove fasteners. I'm hoping the carpenter who installed your OSB used just a few nails and didn't use a nail gun. Nail guns tend to countersink the nail heads below the surface of the OSB. This makes it difficult to pull the nails.
Use a wet-dry vacuum to remove all sawdust from the surface of the OSB after cutting away the tongues. Sweep the entire piece with care. This will help you see the fastener heads used to attach the subflooring to the floor joists.
I've had great success with two demolition tools when removing nails from wood. The first tool is called a cat's paw. The tip of this tool has a V groove you drive with a hammer under the head of the nail. Once the nailhead is engaged you apply sideways pressure on the tool to extract the nail from the subflooring. The tool pulls the nail out far enough so you can finish the job with a traditional claw on a hammer.
When all the fasteners have been removed, it's time to pry up the subfloor panel from the floor joists. If you're lucky and no glue was used between the subflooring and the floor joists, the panel should pop right up.
I use a flat demolition pry bar to help start this lifting job. Drive one end of the tool into the open seam between two floor joists and use the tool as a lever to lift up on the piece of OSB you want to remove. If you meet resistance, it means you missed a fastener or two or glue could be your next obstacle. If it's glue and the glue has a great bond, you may have to cut out each rectangle of OSB in between the floor joists and do a creative job of patching the floor.
Assuming there's no glue, the piece of OSB should lift out with no problems. When it comes time to reinstall it, you'll have to cut and nail pieces of 2x wood blocking under the long edge of all the pieces of subflooring. This blocking takes the place of the tongue you cut away. Remember, you need to slide it under the other pieces of subflooring you didn't remove but are adjacent to the piece you removed.
You'll discover a great benefit to removing the subfloor. You can now easily add insulation to the floor to help save energy in your man cave should you decide to put heat and air conditioning in this space. Happy grunting in your new cavern!
Column 1009