How to Repair Drywall Like a Pro
DEAR TIM: I’ve got several drywall defects in my home that must be repaired. A doorknob punched a hole in one spot, rough housing children created another hole, and my husband stepped through the ceiling while in the attic. What are some tips you can share about repairing these holes. Is this really a do-it-yourself task or should I call in a pro? Surely you have some secrets. Susie P., Orlando, FL
DEAR SUSIE: You and tens of thousands of others have drywall defects. Drywall is a great building material, but it’s not a durable substitute for plaster as plaster is basically a thin coating of rock on your walls. This is why drywall was affectionately given the name sheetrock years ago. Too bad it’s an impostor as drywall is more like stiff clay in hardness.
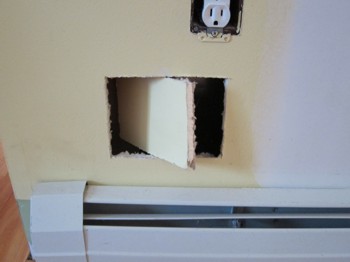
This hole had to be cut to repair a water leak. It’s easy to patch the hole since the piece of cut drywall was saved. PHOTO CREDIT: Tim Carter
There are countless right ways to make these repairs to your walls and ceilings. I’ve seen many inventions over the years at trade shows. All were created to aid in the repair of drywall. Some are ingenious, like the thin piece of aluminum that had holes in it and self-adhesive on one side. This would work perfectly for your doorknob hole.
You simply put the metal patch on the wall and then coat it with premixed drywall compound out of a bucket. The patching compound passes through the small holes and locks the repair material to the metal.
One method that’s worked great for me over the years is to just take a few minutes and cut a square or rectangular hole using a plunge saw removing the jagged drywall at the hole locations. Be sure you look behind and around the hole for any wires, pipes or cables. You don’t want to cut these with your saw causing more problems.
Once you have the square hole cut, cut a slightly smaller piece of drywall. I suggest you make the repair piece one-quarter inch less in width and height. This will give you a manageable gap of just an eighth inch between the repair piece and the existing wallboard.
The trick is to fasten this repair piece as there is rarely a wall stud where the hole was created. I like to take a piece of wood no thicker than 3/4-inch to use for the next step. I cut the piece of wood so it’s 1 inch less in width of the hole and 6 inches longer than the height of the hole. Let’s say the hole to be repaired is 3 inches square. This means I'd cut a piece of wood 2 inches wide by 9 inches long. Plywood works great for this job as it's not prone to splitting.
You'll need a screw gun or a drill with a Phillips bit in it. You'll also need about ten 1 and 1/4-inch coarse-thread drywall screws assuming the drywall is 1/2-inch thick. The first thing is to screw one screw into the exact center of the piece of wood so that about 7/8-inch of the screw is still sticking out. You'll use this as a finger hold.
The trick is to slide the piece of wood into the wall cavity through the hole making sure you don't drop it in the cavity. You can tie a string to the screw as a safety device in case you do drop it. Step on the string until such time as you have the wood secured.
Once the wood is in the cavity, center it in the hole using the screw as your guide. Pull on the screw so the wood it tight against the back of the drywall at the hole. Use the screw gun or drill to drive drywall screws through the drywall and into the strip of wood as if it were a wall stud. Pull tight against the screw as you do this so the wood pulls tight against the drywall. Use at least two screws top and bottom of the hole to secure the wood strip.
Remove the center screw you were using to hold the wood in place and then screw the small repair piece to the wood. For a small piece of drywall similar to our example of 3 x 3 inches, you'll only need two screws.
Now all you have to do is tape and finish the patch. The best way to get proficient at this is to practice on a piece of drywall out in your garage. Once you get the hang of it, move indoors.
The biggest mistakes rookies make when taping and finishing drywall is putting on too much or too little of the joint compound. They also tend to use it straight from the container without adding a slight amount of water to make it creamy like warm cake icing.
You want about one sixteenth of an inch of joint compound under and over the tape to make a lasting repair. If you drag too much mud from under the tape, there will be no compound to bond the tape to the drywall.
Too much mud makes a giant hump. The key is to practice taping on a scrap piece of drywall. When the mud is the right consistency, it's easy to draw the taping knife across the tape and pull out the correct amount of mud.
Column 893
Tim built custom homes and did ultra-custom remodeling for 20+ years before launching his Ask the Builder media presence. He was selected as one of the Big 50 by Remodeling magazine in 1993. This award gave birth to Ask the Builder in October 1993. Tim also operates https://DrawPlumbingPlans.com. His @askthebuilder YouTube channel was the first home improvement channel on YouTube.