Interior Wall Framing
DEAR TIM: I'm doing some remodeling work and I have to construct some interior wood walls. I've not done this before and don't want to make mistakes. It doesn't see too hard, actually it appears to be cave-man simple. Can you share tips on how you might do this? Can I frame the wall on the floor and tilt it up, or should I just build it in place? Randall R., Staten Island, NY
DEAR RANDALL: I'm chuckling right now because all too often people jump into a remodeling project or any job around the home thinking ‚"can't be that hard to do", and quickly get in over their heads. As simple as wall framing is, there are plenty of things you can do wrong.
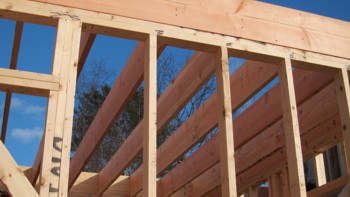
This is an interior wall that's load bearing. See how the floor joists above rest on the wall? Photo Credit: Tim Carter
The first thing I need to say is that it's absolutely impossible for me to tell you everything I know about this topic in this space. Sorry about that. I'll try to hit the high spots and hope that all turns out well.
The basics stipulate that the wall needs to be plumb and in the same plane. You can start this by chalking a line on the subfloor where you want one side of the wall to be. Snapping a crisp chalk line creates a straight line.
The top and bottom plate of the wall should be perfectly straight lumber if you can get it. It's absolutely possible to persuade a crowned top or bottom plate into a straight line, but avoiding this is preferred.
My guess is the walls you're building, since they're new, are not load bearing. If this is the case, it means you don't need structural headers above any doorways or pass-through openings in the wall.
You still should attempt to stack the wall studs on top of any floor joists below the wall that run parallel with the wall studs. Plumbers, HVAC men, and electricians will appreciate this. Stacking framing lumber is a best practice that should always be followed when possible.
The spacing of the wall studs is usually 16 inches on center. However, if you do decide to stack the new wall studs on top of floor joists below, your spacing will mimic that of the floor joists. The 16-inch spacing prevents waste of finished wall materials since the length of drywall and paneling is almost always a multiple of 16 inches.
The wall studs need to be crowned in the same direction. A crown is a hump in the stud when you look down the length of the stud along the narrow 1.5-inch face. If you don't do this and have some crowned studs facing one side and the others facing the other side, the wall will look twisted once covered with drywall or paneling.
The wall studs at door openings should be absolutely straight with no crowns or bows. Using perfectly straight studs at door openings will pay enormous dividends when you go to hang the door in the opening at a later date.
When you attempt to plumb the wall, don't make the infamous rookie mistake of placing a 4-foot level on the face of the wall stud. If the stud has a crown, and most do, the reading will not be accurate. You plumb a wall by placing a perfectly straight straightedge from the top plate to the bottom plate. This is the method one uses if the wall is framed on the floor and tilted up into position.
This straightedge is placed between wall studs so it only is touching the plates. You need to have the bottom plate nailed into position before you start to plumb the wall. Check the wall for plumb every 4 feet and nail the top plate securely once the wall is plumb at each position.
You can frame the wall in place or build it flat on the floor and tilt it up into position. Walls built with 2x6‘s are harder to tilt up because they create a longer diagonal than a 2x4 wall.
If you decide to frame the wall one stud at a time with the top and bottom plate in position, be sure the top and bottom plates are in the same plane before you start. You can use an old-fashioned plumb bob to achieve this goal. Fancy laser levels that do shoot a plumb line are nice, but they can be expensive.
Framing the wall on the floor instead of in position also makes it easier to connect the wall studs to the plates. When the wall is flat on the floor, you can hammer in two 16d sinker nails through the plates up into the ends of the studs. This makes for a better connection rather than toenailing the studs as you will be forced to do if you build the wall in position.
You can watch a several videos about framing. Just type Framing Video in the AsktheBuilder.com search engine.
Column 915
One Response to Interior Wall Framing