Slate
DEAR TIM: Slate was used in the house I grew up in. The slate tile seemed to be a random mix of squares and rectangles. I'd like to install this material in my own home. Is slate flooring a job that can be tackled successfully by a beginner? What are the top things you need to watch for when you choose and install a slate floor? Steve R., Sarasota, FL
DEAR STEVE: The slate tiles you saw as a child did a great job of fooling you. Although they appeared random in size and placement, they were not. If you were to go back to your childhood home and study that slate flooring closely, you'd discover quickly that there is a pattern that repeats going both side to side in the room and front to back. This pattern oddly enough is called random Ashlar, because the intention is to make it appear the slate tile are placed willy nilly.
It's my feeling you can install slate tile if you are a person that pays attention to detail. There are several mission-critical steps that done wrong, will doom the job to failure. You need the same tools you would use to install ceramic-tile flooring, but in addition, you absolutely need a diamond wet saw or an angle grinder to cut the slate. Ceramic tile can be scored and snapped producing amazingly straight cuts. Try this with slate and you end up with shattered pieces with irregular edges.
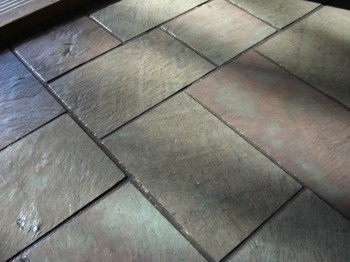
Slate is an attractive and durable flooring material. There are many other uses for it as well around the house. PHOTO CREDIT: Tim Carter
Natural slate is set in a mixture of silica sand and Portland cement. This dry material is called thinset, and is mixed with water to the consistency of cake or pancake batter. It's important the thinset is applied evenly to the floor, and the tool that professionals use is a notched trowel. This tool creates a corduroy texture so that as you push the slate tiles into the adhesive it doesn't ooze out along the edges.
To prevent cracking after the slate floor is complete, it's important to ensure the subfloor has no flex. You can install slate on a wood subfloor system, but the floor must have no bounce to it and be as stiff as whiskey served at a Western saloon. It's also a great idea to install a crack-isolation fabric between the slate and the subfloor. This membrane prevents cracks that might transfer to the slate and grout in the event the subfloor moves due to seasonal humidity changes or minor settlement.
Slate floors also require great skills when you first lay out the pattern. It's really imperative that you maintain a consistent spacing between the pieces of slate. The joints between individual pieces is often 3/8 inch, but in some instances it may be slightly less. If you don't pay attention to this spacing, the different pieces in your pattern will not interlock well.
It's actually easy to maintain the spacing if you take the time and chalk lines that the slate follow during the installation. The primary line you start with should be parallel with the most visible wall in the room. If you make a mistake, the random pattern is very forgiving.
The slate tile flooring needs to cure in the thinset for at least 24, and preferably 48, hours. Without the grout between the slate, you can easily dislodge slate as you walk or kneel on them. Once the slate is ready to grout, be sure to apply a grout-release liquid on the top of the slate tiles. This material interferes with the bond between the slate and the grout, so make sure it doesn't drip onto the edges of the slate.
Grouting the slate floor tile is perhaps the hardest part of the job. By this time, you may have grown impatient to get the work finished. If you cut corners here, you'll regret it. The uneven cleft texture that imparts much of the beauty of slate is a demon when it comes to grouting. The sanded grout and grout paste sticks to these micro ridges in the slate like bubble gum in your hair.
Sanded grout is used because the joints between the slate is larger than 1/8 inch. The silica sand in the grout creates a miniature concrete mix. You can ruin the strength of the grout if you add too much water when you blend it, and if you use too much water as you sponge the grout off the top of the slate.
Before you decide on which slate to use, look at all the colors. Black slate is stunningly beautiful, as is green slate. My personal favorite happens to be red slate. The red hue is typically a deep earthy red that transforms a room with its rich character.
Selecting a color for a project like this can be stressful. After all, once the floor is down it's permanent. One method that has worked well for me for years is to make test panels. You can buy small amounts of slate of different colors and quickly attach them to thin pieces of plywood. You only need to make up panels that are slightly larger that 30-inches square to get a feel for the color.
Set these panels in the room where you intend to use the slate, and look at the color over a period of weeks in sunny and cloudy weather as well as at night. The slate will look different depending upon the light. If you desire the wet look, apply a wet-look sealer to the panels so you really see what it looks like.
opens in a new windowCLICK HERE to read about using slate on the front porch.
Column 764