Sliding Door Leak Repair
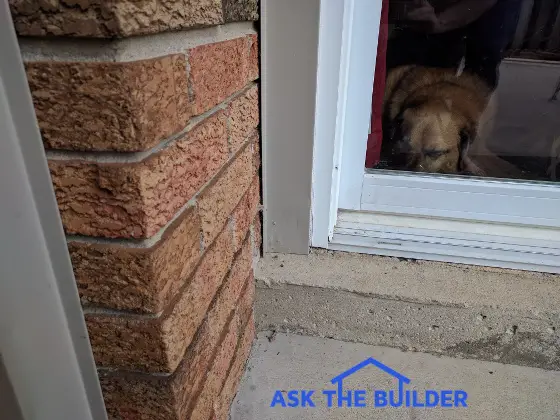
This is the lower corner of a sliding exterior door. How many places can you see where water can enter the house? (C) Copyright 2017 Tim Carter
Sliding Door Leak Repair Tips
DEAR TIM: I’ve got a sliding patio door on the back of my home. There’s a moisture problem directly under the door in the basement. The gutters are clear and the patio is level. I plan to seal between the bottom aluminum threshold and the concrete curb and caulk the gap between the side trip and my brick. I know I need to install a concrete overlay to get my patio to drain. Is that all I have to do? How would you repair my sliding door leak? Doug T., Windsor, Ontario, Canada
DEAR DOUG: You’re suffering like many other homeowners. Not a week goes by that I don’t get a request for help from one of my newsletter subscribers or a visitor to my AsktheBuilder.com website. When each homeowner sends me photos as you did, it’s almost always crystal clear that many builders, remodelers and carpenters are clueless with respect to flashing exterior doors.
I regret to inform you that your plan of attack may not solve the problem. What’s more, caulk is not a permanent solution no matter what the warranty on the label of the tube states. I’m beginning more and more to think that caulk manufacturers are using warranties more as a marketing gimmick rather than a factual statement as to how long the product will really perform without failure.
Your photos show that you’ve got a brick exterior with raked mortar joints. This method of dressing the mortar creates a small shelf on top of each horizontal row of brick and it’s the least waterproof mortar joint. The most weather-resistant mortar joint is one that’s been created with a convex rounded tool. When the bricklayer uses the tool on the soft mortar, the resulting shape is a slightly concave mortar joint where the edges of the mortar touch the outer edges of the brick.
Water flowing down the wall during an intense wind-driven rainstorm is automatically forced down the wall by the concave joints. With your raked joint, water can collect to a slight degree on the small shelf. If a brick or two or three has a backwards tilt, the water can begin to seep behind the brick.
Your photos also scream at me that your builder or the carpenter didn’t put a proper flashing under the door threshold. This flashing is designed to shed water to the outside of the concrete step beneath the door threshold.
Think for a moment how overlapping shingles work on a roof or lap wood siding works on the exterior wall of a house. Each successive shingle or piece of siding overlaps the one below. This is no different than the way feathers work on a bird. Gravity pulls the water over each shingle, piece of siding or feather and the water never can get into the core of the building or bird.
In your case, if you look at your threshold, water can get behind the concrete curb that’s under the door threshold. While there might be a hidden flashing behind the concrete curb, how is it possible for the water to get back out on top of the patio and drain away from the house? The concrete curb is acting like a dam.
My advice to you is to carefully remove the aluminum trim that’s covering the wood trim that surrounds the sliding patio door. You’ll then remove any wood trim around the door. You need to first determine if the top and sides of the door have proper flashing.
As drastic as it sounds, you also need to remove the simple concrete curb that’s under the door threshold. While this may seem like a difficult task, I’m quite sure it’s only going to take an hour or less using a four-pound hammer or even less time if you rent an electric demolition hammer from a tool rental business. Be sure to tape thin sheets of plywood over the glass to protect the door from flying pieces of concrete.
Once you’ve exposed the top, sides and bottom of the door you can do an assessment of what needs to be done to make the door waterproof. I’m hoping that you discover the builder or carpenter installed a proper flashing pan under the entire door threshold. That’s the first step that should have been done even before the door was lifted into the rough opening.
If there’s no flashing pan under the door, I’m afraid that you need to remove the entire door from the opening and start the entire installation process over from scratch. There are pre-formed plastic flashing pans that you can use under the door or you can create one with thin sheets of lead or the modern rubberized-asphalt-based flashing tape. There are countless videos online that show you how to install these flashings under a door or window.
The ultimate goal is to create a series of overlapping layers of flashing material so that any water that gets behind the door trim from above the door or along the sides is captured and redirected back out to the front face of the house below the door threshold.
Years ago builders used soldered sheet copper or tin-coated steel. The flashing issue is mission critical in homes that are framed with wood. It’s unacceptable for any water to gain access to the wood framing behind brick, siding or stucco. The technology to achieve this goal has been known for hundreds of years, but unfortunately many modern builders don’t study old buildings to see how the master builders of old kept houses dry.
Column 1212