Tile Fireplace Hearth
DEAR TIM: My wife and I wanted to remodel the dated fireplace in our living room. We recently put down hardwood floor around a raised brick hearth. I’ve since removed the raised hearth and we’re putting down ceramic tile. The trouble is there’s now a recess in the floor where the hearth was and how do I build it up to install the tile? We were thinking of putting it flush with the new hardwood floor. Do you have any design tips? What are the top mistakes I could make as I’ve never really done this type of work before? Chuck E., Farmington Hills, MI
DEAR CHUCK: I’ve taken out a raised hearth before on more than one occasion. One was a fireplace I had installed at my own home. My wife told me when we built the home the fireplace was in the wrong place and that the resulting family room would be too small. Twelve years later, I was up on the roof tearing out the chimney. It took me ten days to get down to the hearth level. Your job compared to mine is really pretty easy.
Before we start to work, let’s talk about the final look. You can install the tile in many ways, including another raised hearth. I know you thought about putting it flush with the new wood floor, but how about this idea?
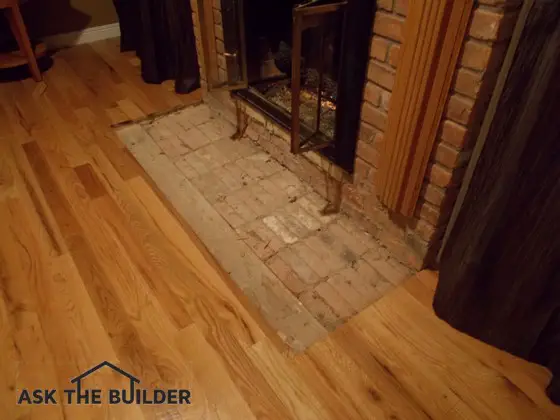
No one part of installing tile on this hearth is hard. You just have to take your time and think about each step. Photo Credit: Chuck Eglinton
I suggest you drop the hearth down so it’s not flush. A three-quarter’s-inch drop would give a nice relief line and you can almost always get a decorative transition molding that is that same thickness as what you decide to drop the hearth. Architects use this trick all the time to create interest in what we look at.
Think about simple trim around windows and doors. In most cases the wood has some sort of profile instead of just being flat. The profile, or different levels and contour, produce shadow lines and reflect light differently. Just about every older home I worked on early in my career had a tile hearth that was lower than the surrounding flooring.
The other advantage of doing it this way is you’ll have less trouble at the grout-tile-wood interface. If you decide to put the tile flush with the floor, you’ll have to make perfect cuts of the tile to keep the grout line the same width. The grout itself could crack over time where it contacts the wood floor leaving a blemish. Putting the tile lower and covering this contact point with a molding solves the problem.
The first step in the process, and it’s the most important one, is to pour a lowered platform that the ceramic tile will rest upon. It needs to be solid so the tile doesn’t crack. Based on the photo you sent, it appears this foundation only needs to be a little over 1 inch thick.
You can use coarse sand and Portland cement to make this mud. Mix three parts sand to 1.5 parts Portland cement. If it’s too much trouble to get these ingredients, you can purchase bags of mortar mix at a hardware store. Add just enough water to make the mixture the consistency of a stiff applesauce. To extend work time get the mortar mix cold before mixing and use cold water. Chilling the mix slows the hydration reaction that turns the wet mortar into hard stone giving you extra work time.
You need to make sure this mortar bed is in the same plane and it’s at the right height so the finished tile surface is 3/4 of an inch below the wood floor. Add 7/8 of an inch to the thickness of the tile and that’s the distance the finished mud floor must be down from the surface of the wood. This gives you the requisite 1/8 inch you need for the thinset that will be used to bond the tile to the cured mortar mud base.
To create this recess, you’ll smooth the wet mortar with a wood rod you make. Use a very straight piece of 1 x 4 to make this. Cut the wood one foot longer than the width of the recess. Cut an 9-inch-long L-shaped notch at each end that’s the same depth as you need to drop the mortar base. The thinner ends of the wood rod sit on top of the wood floor and the rest of the wood rod drops down into the hole.
When you shovel in the wet mortar and start to slide the wood rod sideways and pull it towards you at the same time, you’ll create a very uniform surface that’s going to support the tile. Triple check your math before you do this because it’s imperative the mortar bed is not too high or low. If it ends up either, it will just require you to custom fit the transition molding so it’s smooth and flush with your wood floor.
As you pull the wood rod across the wet mortar, constantly check to make sure it’s the right height. After you feel you’re finished, pull it across again to strike off any excess mortar that may have mounded up behind the wood screed. Check for excess along the edges where it abuts the wood floor.
Give the fresh mortar a day to harden and you can then install the tile. Use a 1/4 by 1/4 notched trowel to spread the thinset mortar you’ll use to bond the tile to the new mortar. Spread it evenly and press the tile lightly into the thinset. It will compress to the 1/8-inch thickness we calculated before we started.
Be sure you watch the entire series of videos at my AsktheBuilder.com website on how to grout the tile. If you make a mistake, and most do, you’ll ruin everything. The key is managing water as you work with the grout. Please send me a photo of the completed job!
Column 1120
One Response to Tile Fireplace Hearth