Wood Door with Insulated Glass
Wood Door Modification with Insulated Glass
Every time I watch a TV show where a doctor is cutting into a patient, I cringe. I think of the times I have cut myself with a knife or a razor knife tool. It makes me cringe. There is no doubt that the average person might feel the same way as they are about to drop a spinning circular blade down into the face of a perfectly good wood door!
Look at the X-ray!
The illustration below is a cross section of the average wood exterior door. The portion of the door on the left side of the image is either a stile or a rail. These are the thickest parts of the door and act as frames for the raised panels. The thinner piece of wood in the image is the actual raised panel that you will be removing.
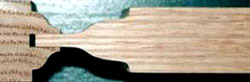
Courtesy of Byrcon Wood Products, Inc.
This image is courtesy of Byrcon Wood Products, an awesome Canadian door manufacturer. They make regular and custom wood doors. I have some in my own home that they made for me.
Note in the image how a shaping machine cut a mirror image profiled edge on the stile or rail. In addition, the machine cut a groove that is centered between the mirrored images that accept the edge of the raised panel.
Your task, in order to prepare the door for glass, is to carefully cut away the interior facing profiled edge of the door. If you use a small 5.5 inch diameter circular saw with an ultra thin kerfed blade, you might be able to salvage the profiled edge you cut to reuse to hold your glass in place. Remember to cut on the interior side of the door. You do not want thieves to be able to easily remove the glass by simply taking off the thin trim piece you will apply at the conclusion of the job.
Cut Just to the Corner
When you are making the cuts to remove a raised panel go slowly and carefully. You do not want to cut into the door rail or stile. Be sure that the blade depth is set no deeper than 5/8 to 3/4 of an inch. Any deeper and you will start cutting into the other side of the profiled edge!
Stop the saw blade where a rail meets a stile. You will need to finish the cut into the corner with a razor knife and or a very sharp wood chisel. You may be able to salvage the piece of wood you are cutting away but don't fret if you ruin it. You will be able to find a similar screen molding at an old fashioned lumber yard.
Ready for Glass
Look at the illustration again. Imagine if the top profiled edge was cut away and the raised panel was no longer in the picture. See the remaining ledge created by the lower profiled edge? This is the outside edge and acts as the stop for the insulated glass panel. Be sure to seal this interior surface with paint or urethane to prevent damage from rain that may run down the glass.
When you order insulated glass from a glass shop be sure to ask for the minimum thickness possible. This is regulated by the glass thickness and the spacer between the panes. You will also need to ask for safety glass. It is a code requirement for glass used in doors. Do not overlook this important point! The glass should not fit tight in the opening. You should leave a 1/8 inch space around the glass. Keep this in mind when ordering the glass!
Glaze the Glass
The glass company will recommend a glazing compound to use to set the insulated glass. Practice with it so you don't make a mess. I would layer the stained glass over the insulated glass after the door is rebuilt and in place.
Read Georganne's question on replacement insulated glass in her front door. opens in a new windowCLICK HERE for the Insulate Glass Replacement column.
Column B336