Cabinet Pulls
DEAR TIM: We just installed new kitchen cabinets in our home and now my wife wants handles on them if you can believe that. To make matters worse, she selected D-type handles that require me to carefully drill the holes for the screws. There is little margin for error. The cabinet doors and drawers have a face frame that's about 2 and 1/4-inches wide. What secrets can you share so that I don't goof up installing the cabinet pulls? I'm not really that great when it comes to measuring and I can't afford a mistake. Help me Tim, you're my only hope. Rusty W., Montrose, CA
DEAR RUSTY: Kitchen cabinet handles are fairly functional when you think about it. I know that you can open and close drawers and cabinet doors without them, but it's really best that you satisfy your wife's wishes.
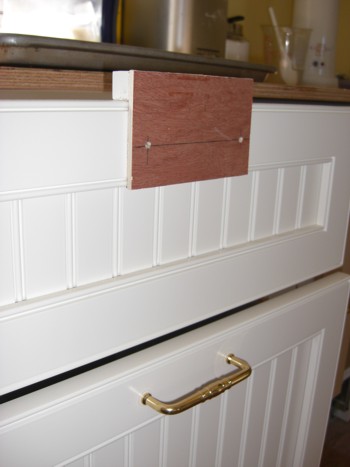
See how the custom jig fits over the face frame. If you do everything right, the result can be seen on the pull-out drawer just below where the D-handle pull is installed perfectly. PHOTO CREDIT: Tim Carter
The slender D-handle pulls can be a challenge to work with if you've got little experience. I agree that there is little room for error. That's why I take the time at the beginning of a job like this and make my own custom jig. You can buy stock plastic jigs and templates, but they don't always have the holes in the locations for my liking.
The way I make my jig takes very little time. For standard D-handle cabinet pulls, I cut a piece of thin 1/4-inch plywood about 6-inches wide. The height of the plywood can be 3 to 4 inches. At the top edge of this piece of plywood I glue a 6-inch-long piece of 3/4 by 3/4 piece of wood making sure the top edge of the plywood is perfectly aligned with the strip of wood. This block of wood will rest on the top of the drawers or on the edge of the doors so that the plywood laps over onto the frames.
Now you have to hunker down and measure correctly. You need to ensure the face frame of the drawers and doors is exactly 2 and 1/4 inches. If it is, take a very sharp pencil and make a line that's parallel with the long edge of the plywood. Measuring from the 3/4 by 3/4 block down the plywood, you want to make this line 1 and 7/8 inches. That's the sum of 3/4 inch and 1 and 1/8 inch. The 1 and 1/8-inch measurement is half the width of your face frames.
Lay your jig on a flat surface so that the wood block hangs over the edge of the surface and the small plywood is flat. Look at your D-handle pulls. See if the screw hole isn't centered in each leg of the pull. I'm sure it is.
Place the pull on the piece of plywood as if the plywood is a cabinet front. Center the pull on the plywood as best you can and slide the edges of the pull so they just touch the pencil line you drew.
Now mark carefully the center of each leg of the pull on the pencil line. Extend this line to make a small cross on the long pencil line. Use a small 1/16th-inch drill bit and drill a pilot hole through the plywood precisely at the two cross points. Then enlarge the hole using a bit that's just a tad larger in diameter than the diameter of the screws that will be used to fasten the pulls to the cabinets. Put the screws through the holes in the plywood and see if they don't fit the D-handle perfectly. If they do, it's time to do a test.
Cut a piece of 3/4 inch plywood or stock lumber so that it's about a foot long and 2 and 1/4-inches wide. This is going to be a test piece. Slide your new jig onto the piece of lumber and use your tape measure to center it. You don't have to do fancy math. All you need to do is make sure from each end of the strip of wood the distance to the center of each hole is the same.
For example, imagine you put your jig on the strip of wood and it measures 4 inches from the left side of the strip to the center of the left hole in the jig. Holding the jig securely so it doesn't move you measure from the right side and it's 6 inches to the center of the right hole in the jig. To center the jig on your test face frame, you need to slide the jig to the right 1 inch.
When you do this and have precisely measured, you should discover that the distance from each edge to that side of the hole in the jig will be 5 inches. Just take your time and measure accurately. Once you get the jig in position, take your sharp pencil and make two tiny circles inside the holes in the jig. Drill these holes and then install a D-handle pull on this scrap piece of lumber. If all the measurements were correct, it should be centered top to bottom and left to right and it should look perfect when you tighten the screws.
It's highly advisable to use a drill that has a level built into the top of the drill. This handy feature allows you to drill level holes into the cabinet drawers and doors. Always use sharp drill bits and drill the first hole from the front of the cabinet. If you drill from the back to the front, you can create ugly splinters when the drill bit blasts through the finished material.
Brad point drill bits are excellent for this work as the small point centers the bit on the wood so the bit doesn't walk around as you start the hole. Finish carpentry like this requires precision often measured in 64ths of an inch. So take your time and do it right, not over.
Column 875
One Response to Cabinet Pulls