Up next in 10


http://www.AsktheBuilder.com founder, Tim Carter, continues to explain various tricks that help when moving a basement shower drain.
Show More Show Less View Video Transcript
0:00
Just a few minutes ago I brought in the shower base. A big change has happened here on the job
0:10
site and I shoved it into place and here it is. You can see it right now it's down here and what
0:17
it's time to do is now that the shower base is in place and this is just temporary I'm going to move
0:23
it. I need to mark exactly where the drain pipe is going to come up, this 2-inch drain pipe
0:31
before I get rid of all the concrete. In other words, if I made the hole and kind of created a
0:37
hole underneath the shower pan, it would be bad because I wouldn't have any place to mark. So you
0:43
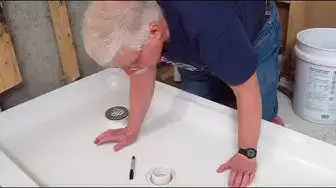
need to mark it before you enlarge the hole. So here's what I did. I took a 2-inch PVC pipe
0:50
coupling and centered it inside the drain hole for the shower pan. And the reason I
0:57
did that is because I can take a magic marker, a Sharpie marker, and then I trace the inside
1:05
diameter of the 2 inch coupling because that represents the outside diameter of the 2 inch pipe See how easy that is There really nothing to it You just got to make sure that the coupling is centered
1:21
in the big drain hole. The next step is I need to get this shower pan out of the room
1:28
and put it back in its protective box so that it doesn't get damaged because we're not going
1:32
to be using it for another three or four days. And then we have to do another very, very
1:37
important step so that we'll be able to center this drain pipe when we rough in that plumbing
1:43
pipe. Okay, I'm going to show you that in just a moment. To make sure that you get the drain pipe
1:49
in the right place, you have to have a template. Many, many years ago, an old season plumber
1:55
while I was a young, wet behind the ears plumber, he taught me how to do this. I was working on a
2:00
commercial job, we had a lot of pipes that had to come up through a wall and they had to be
2:07
perfectly centered. So what we had to do on this rough job site is I basically had to suspend a
2:13
wall plate. We actually staked out this 2x6. I know it doesn't make sense to you, but trust me
2:18
we had drilled the holes in this plate exactly where the pipes were going to go and then we used that board as our template to bring the pipes through Well guess what I can do the same thing with a piece of cardboard here Watch how I do it I cut a piece of cardboard that is far bigger than the hole
2:36
that I'm going to create in the concrete. I take the 2 inch coupling and basically center
2:41
it up and down, left and right in the cardboard and use the Sharpie once again to trace the
2:46
inside of the 2 inch coupling because that represents the outside diameter of the plumbing
2:54
pipe. I use a razor knife and carefully cut out the outline of that circle. Once I have
3:01
the outline cut out, I go ahead and set it over the black circle that's on the concrete
3:08
and then I carefully mark the corners of the cardboard and I also put A and B matching
3:15
letters on both the cardboard and the concrete so that when it comes time to place the template
3:22
back where it belongs, we'll know exactly how to align it. It's very simple to do this
3:30
I've got the template finished. I've got everything marked. I now just get it out of the way continue to make my hole and here what going to happen at the end I have to put duct tape down I tape this down to the concrete after we done cutting everything
3:47
and then you'll see why it was so important to make those marks at the corners and to have the
3:51
A and the B. One last thing I want to talk about. I want to talk a little bit about the shower drain
3:57
You need to make sure that the hole you create in the concrete is not very tight where the pipe's going to be
4:05
Give yourself an inch or so around the outer edge of that pipe so that the shower drain mechanism and the shower drain assembly is going to fit and not interfere with the concrete
4:18
You may even want to make it two inches wide or around where the pipe's going to be
4:22
Believe me, you'll never regret doing that. I'm Tim Carter for AskTheBuilder.com
4:27
If you want to discover more home improvement tips, go to AskTheBuilder.com
#Home & Garden
#Home Improvement
#Plumbing