Up next in 10


http://www.AsktheBuilder.com founder, Tim Carter, demonstrates how to remove the trim from a Kohler shower valve.
Show More Show Less View Video Transcript
0:00
Well, we're making progress, you can see that
0:14
And I've got a quick video here I want to show you. Something that's really important that happened on this wall
0:21
And you need to know what to do in that situation. I'm going to jump down, we're going to take a look at what I'm talking about
0:28
So, yesterday on this particular wall, we started to take the tile off and all of a sudden
0:36
we encountered the faucet, you know, for the shower head. And now if you're a rookie, you may decide, okay, I'm going to take that tile off, but
0:43
you know what, you could ruin the faucet behind the wall, you could absolutely ruin the trim
0:50
that's around the faucet, and you could maybe cause a leak. So what you need to do is before you start to take that tile off, you've got to take off
0:59
all the trim. And believe me, I get a lot of emails from people who are mystified
1:04
They have no clue where to even start to take apart a faucet
1:09
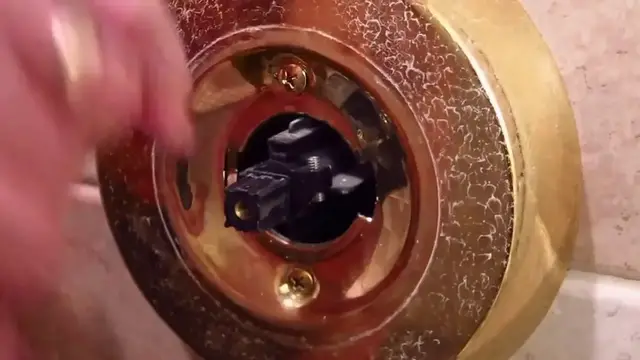
And that's what I want to show you. Look at this. When you go to take apart one of these faucet trims, generally speaking, there's a..
1:19
This is a particular lever that rotates. I don't want to turn it on right now because if I do I'm going to get soaked because the water is still on
1:25
So understand that there right behind some decorative part of the faucet there always going to be a screw In this case this decorative button is white but it could be a matching metallic finish It could be brass gold plated chrome whatever
1:44
It could even be some type of clear thing that looks like a diamond with these faceted edges
1:50
Well you just have to take a flat screwdriver, a nice flat edge screwdriver, and generally you'll
1:56
find a spot along this edge that you can get a purchase and take this out. In this case
2:03
this is a Kohler faucet. It's a very high quality faucet. And they've got the very tiny little
2:09
notch that I can put my screwdriver into to pop this off. Watch this
2:16
There you go. You take this off. Now look what happens. I can see this Phillips head screw in
2:23
here that's going to allow me to start to take this apart. So I'll switch out my bits
2:35
Simple as this. Nothing to it. Take your time. Don't lose that little washer right there. This
2:42
is really important in case you're going to reuse your faucet. Okay, I've got the screw out. Now
2:48
Now, here's the deal. This handle is pretty much independent of this faucet escutcheon, this trim
2:59
So the odds are there are probably screws that are hidden that hold this to the body of the faucet because this comes off too easily as you can tell Now remember every faucet different so the odds are this may come out Yeah it does look at this So this will come
3:18
out and then this trim here probably rotates one way or the other to be able to get it out
3:24
and let's see if we can do that. All right let's see if we can get this out. See it does rotate
3:31
Look at this. Look at that. There we go. All right, so now the last two screws that are holding on this trim are right here
3:40
Let's take those off. All right, let's take these two screws out. Alrighty. There we go. Look at that. Now we're going to be able to take these towels off
4:15
We've salvaged all of the parts for the shower and we're good to go. Okay, you can see how
4:20
simple that was. Nothing to it. You just have to kind of think it through. If you try to
4:26
pry off your, you know, the big decorative plate and it's not coming, it's probably telling
4:32
you there's something else holding me on. So typically it's screws, they're hidden. You
4:38
just have to kind of use some detective skills to figure out how they may have put together Unfortunately here the problem that I find and here how you can avoid this and here how you can do a future homeowner a really big favor
4:53
When you're remodeling your bathroom, when you get all of your new fixtures, you're going
4:58
to have installation instructions for everything, for your new faucet, for your toilet, for
5:03
your vanity faucet, etc. Okay, take all of those installation instructions, put them
5:10
inside of a sealable ziplock bag, like a big bag that you might store food in your freezer
5:18
and then tape that bag on the inside of your vanity cabinet. And believe me, some future
5:25
homeowner is really going to thank you for taking the time to do that. Because had we had those
5:30
instructions for this faucet, and this is a 15-year-old faucet, it would have shown us exactly
5:35
in an exploded view how to take the faucet apart. And then you don't have to wonder what to do
5:42
So that's just a little tip that you should really try to do. Pay it forward
5:47
Go ahead and save that paperwork for a future homeowner. They'll really appreciate it
5:53
I'm Tim Carter for AskTheBuilder.com. If you want to discover more home improvement tips, go to AskTheBuilder.com
#Bathroom
#Home Improvement
#Plumbing