Up next in 10


Join my Discord: https://discord.gg/u89GyDjBdr
In part 1 of 3, http://www.AsktheBuilder.com founder, Tim Carter, explains what to look out for when you install a new shower drain in an existing concrete slab.
Show More Show Less View Video Transcript
0:00
You can see I've made lots of progress, but guess what
0:11
The holes got a little bigger than I wanted to, and the reason why I had a little problem
0:17
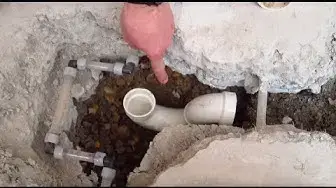
So let me go down here and let me explain everything that you can see down in the hole
0:21
Let's go look at it. This is where the old P-trap used to be, and here it is
0:27
I've already taken it out. And it was in the concrete, kind of like this
0:33
This is how it was underneath there. And I cut it off here
0:37
I actually had to cut a small piece out because it was so tight
0:42
It was the only way for me to get it to rotate out. So I had made a mark on the actual drain pipe back in here
0:49
because I had built this 90-degree angle. And this is really important
0:55
This is a really kind of a neat example of good plumbing practice. Some rookies, you might be tempted to put a 90 degree angle here, a hard 90
1:03
Well, if you do, and if you ever have a clog in the drain, it's very hard for one of those metal snakes to get around the 90
1:11
and you actually may drill a hole through it. So it's better to put two 45-degree angles together to make the 90-degree angle
1:20
So I knew that that had to line up with the trench here, so that told me here where to come
1:27
cut off the pipe. And you, the actual length of the drain pipe back in here, I cut it off right about where my fingertip is pointing right there
1:35
Because the pipe extends into these two inch fittings about three quarters of an inch maybe a little bit more Here you can see right here one of the heating pipes I was telling you about
1:49
it ended up right about where the thermal image showed, which is really, really nice
1:53
And as we come across here, here's the new P-trap right down in the hole
1:58
It's approximately where it's going to be located. But look at what happened
2:03
The other heating pipe was basically right over where the pipe is going to come up out of the floor. So I had to end up moving this pipe, believe it or not
2:14
I had to cut into the Peck's half-inch pipe and make it go around where the trap's going to be
2:23
So all that works complete. And the next step is for us to determine how long this piece of pipe that we need to connect between the P-trap and this 44
2:37
degree angle. That's our next step. Pretty exciting, isn't it? We're ready to go. We're ready to make the
2:43
final connection of the plumbing. Now, the next video, I'm going to show you the all-important
2:48
why it was so important to have that cardboard template and to make those black marks on the concrete
2:55
so you can align everything. I'm Tim Carter for AsktheBuilder.com. If you want to discover more home improvement tips, go to askthebuilder.com
#Bathroom
#Home Improvement
#Plumbing