May 10, 2018 AsktheBuilder Fast Tips Announcement

I've got TWO cool things for you this morning and a Stain Solver tip too.

Around 7:30 am this morning, I ended one of my consult calls with Mary. She lives in steamy hot & humid Orlando, FL.

She's got a pesky problem with a flashing detail at the edge of her roof.

As I often do in these phone consults, I find it's easier to make a drawing with my colored markers than try to describe something over the phone.

I told Mary I'd make this drawing and send it to her. It only takes me a few minutes to make these crude drawings. I did the same thing years ago sitting at customers' dining room tables when making a presentation to get a job.

Mary needed a simple flashing - she's going to make it herself - and it needs an all-important hemmed edge to prevent wind-blown rain from getting into her home.

What's a hemmed edge? Look:

Hemmed Edge on Flashing


See that green weird line (sorry if you're color blind)? See how it's got a 180-degree bend at the top?

That's a hemmed edge. The red hashed lines indicate an all-important AIR GAP you must maintain.

Can you see how if rain is blown up under the shingles the hemmed edge acts like a dam and prevents the rain from getting past the flashing?

The black thing is a shingle nail that stops the flashing from going higher up under the shingles.

Hemmed edges are another example of BEST building practices that are transitioning from history to legend to myth.

Upcoming Vinyl Siding Call - Monday

Yesterday, Rick from Maryland purchased one of my consult calls. It's about some new vinyl siding about to be installed on his home. You may ponder:

"Tim, why do I need to care about Rick's silly siding?"

I'm glad you had that thought. I'll tell you why in just a moment.

Rick and I are going to talk on Monday afternoon. But BEFORE the call, I suggested he skim over this FREE vinyl siding installation manual:

Vinyl Siding Installation Manual


Are you aware that MANY ASSOCIATIONS have fantastic FREE installation manuals showing the RIGHT WAY to install building products?

Here's why you should care about Rick's siding:

You should always download these FREE manuals and study them BEFORE you call contractors to do anything for you.

Why?

You can ask the bidding contractors specific questions about important installation details. See if THEY know WHY certain things are done.

If they answer three or four questions correctly, you may have a winner. If the person hems and haws and starts to spout some BS to you, then you might thank them for their time and give them the bum's rush.

For example: How TIGHT do you think the nails should be driven when you install vinyl siding?

Is there a reason for this? What's the reason?

What happens if you don't nail the siding correctly?

It's all in the above manual. And much much more.

You taking the time to skim, or read, the manual ensures you'll get a fantastic job with no issues down the road.

Well, so long as you pick the right contractor who will do the job right. Just put in the contract this wording:

"Contractor agrees to install the siding per the written instructions outlined in the latest edition of the Vinyl Siding Installation Manual published by the Vinyl Siding Institute."

CLICK HERE if you want to get FREE & FAST BIDS from vinyl siding contractors that will give you the correct answers.

Clean ANYTHING-OUTDOORS Video

What are you getting ready to clean outdoors?

Deck? Patio? Siding? Kayaks? Railing? Porch? Tent?

Please CLICK HERE and watch the bottom video on the page.

You'll see me showing how to clean ANYTHING outdoors using my certified organic Stain Solver oxygen bleach.

That's enough for a fast Thursday Tips e-blast.

Do you have ANY QUESTIONS???? Reply and ask them.

Tim Carter
Founder - www.AsktheBuilder.com
Captain Magic Cleaner - www.StainSolver.com
Purveyor of Invisible Audio - www.W3ATB.com
PODCAST MAN: www.askthebuilder.com/podcast/

Do It Right, Not Over!

May 8, 2018 AsktheBuilder Newsletter

New subscriber? Glad you're here!

Seasoned subscriber? - You know I love you too!

Warm WX has finally arrived here in central New Hampshire and that means I'll resume my decluttering project.

Last fall, I started to get rid of stuff that's accumulated in my shed, garage and the attic of my garage. I seem to have inherited a little bit of my Mom's packratitis disease.

Mom had a chronic case that I'm sure made it into one, or more, obscure medical textbooks.

Allow me to share a funny story, well I think it's funny - but Mom may have been a little embarrassed. It's important to realize I was in my mid-teens when this happened and started to get enough life experience that I could challenge Mom's fountain of knowledge.

My room was in the basement of our small house. When I was about ten years old, maybe nine, my Dad and Uncle Raymond transformed our basement garage into a paneled very private and cool bedroom.

I even had my own door to the outside world far away from the ears of my parents. You know those door hinges were well oiled, but I digress.

You got to this sanctuary by going down the stairwell that went from the kitchen down to the basement. There were pegs and hooks on the wall in the staircase. My mom saved the paper shopping bags that had those loop handles and stored them here.

Here's a photo I just took of some modern ones in my own mud room. We now have amazing fabric ones and see-through ones.

Mom's shopping bags

Anyway, Mom's collection grew and grew until I was constantly bumping into them as I went up and down the steps. Frequently they fell off the pegs onto the landing at the back door.

One day she was in the kitchen and I was in a rush to get somewhere. I bumped into the bags and about twenty fell to the floor. Exasperated I said, "Mom, why in the heck do you have so many of these STUPID BAGS? You'll never use them all up in your lifetime. You just keep getting more and more!"

Her response was priceless. It's as if she just said it a minute ago. In fact, when Kathy and the kids ask me why I'm saving this or that, I use the EXACT SAME LINE.

With a perfectly straight face she replied, "Timmy, they're not going to make them much longer."

Three years before I would have accepted that statement as if it were gospel. But I was now spreading my wings and discovering more of the outside world. I was connecting more dots on my own.

"WHAT?" I shrieked while shaking my head as I was picking them up and trying to get them to stop from sliding off the round pegs.

"Are you crazy? Some other company will start making them. We'll always be able to get paper bags with handles."

Mom didn't have an answer for that and I'm sure I remember her cheeks turning a slight crimson red as I had exposed her soft underbelly of packratitis. It's a fond memory to be sure!

As you can tell in the above photo, I was right and I probably have a few too many bags with handles of my own.

I also have other things that I've got too much of and I'm selling lots of it not only on Craigslist, but also on the special group pages on Facebook that are titled Garage or Yard Sale.

Believe me, there are lots of these groups in your city or town. Your junk is someone else's gold. You can transform just about anything into cold cash. Just be sure it's clean and take LOTS of photos.

CLICK HERE to see a refrigerator I just listed last night. It will be sold and in someone's house in the next 48 hours for sure.

Trust me, it feels GOOD to get rid of crap you don't need nor use any more. You then have cash to save or use to get things you really want or need now.

Getting Organized - Akro Bins Baby!

I've used Akro Bins for years to keep things organized in my garage and workshop. I was introduced to them thirty-five years ago by one of my customers, Dale Friemoth. He was a great engineer and they used him at his business. I mentioned using these bins back in my September 12, 2017 AsktheBuilder Newsletter.

Akro BinsThese multi-colored bins come in all sorts of shapes and sizes. They have a slot on the front where you can put in a heavy paper label. Almost all come with a french-cleat lip on the back so you can hang them on pegboard.

They're built to stack on top of one another. You can use colors to your advantage - storing certain types of things in the same color.

I not only stack them on my workbench, but I also have them hanging from my metal Wall Control pegboard. My metal pegboard gets lots of praise from visitors. The metal pegboard comes in all sorts of colors. It's amazing stuff.

The hooks NEVER come out of the metal pegboard like they do on the standard wood pegboard. No more frustration for me!!

Look at the photo below. You can see the Akro bins hanging from the metal pegboard in the lower left corner.

CLICK HERE to read the story about how I discovered the metal pegboard.

There's a GREAT PHOTO in the story showing my workbench and my own Akro bins hanging right where I need them. Some are also stacked on my workbench.

akro-bins-pegboard

Cast Iron Pipe vs PVC

You may not know this, but I've been a master plumber since age 29. I love, love, love to do plumbing work. To me, it's a 3D puzzle to make all the pipes connect.

Are you building a new home or doing a major remodel? Do you suffer from Niagara Falls in your home now when someone flushes a second-floor toilet and you hear the CRASHING WATER cascading down the PVC pipes in the wall and overhead ceiling?

Did you know you can eliminate that sound by installing cast iron?

CLICK HERE to see how easy it is to do.

Free & Fast Bids From Local Contractors

What jobs do you have planned around your home this spring? I don't care what they are.

How would you like to get FREE & FAST BIDS from local contractors? No obligation.

When I say FAST, I mean it. Don't believe me?

CLICK HERE and try it out. Let me know how long it takes for you to get a phone call or email. You'll be STUNNED!

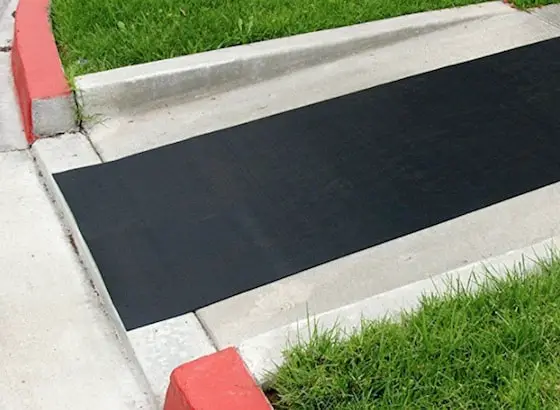
Shed Ramps - Easy to Build

Do you have an outdoor shed? How would you like to have a ramp to get things in and out with ease?

CLICK HERE and I want you to pay particular attention to the type of DOOR I use to get in and out of my shed.

Did you know you could get one that small??? I'll bet you didn't!!!

Deck & Patio Cleaning DANGER

My syndicated newspaper column that's now appearing in many papers is about the DANGERS of using chlorine bleach to clean things outdoors.

I still see MANY websites and articles saying, "Mix a 50/50 solution of BLEACH and water to clean your deck, patio, siding, blah blah blah."

The bleach they're talking about is chlorine bleach. The stuff in the white jugs you get at the grocery store.

The chemical name for chlorine bleach is sodium hypochlorite.

Chlorine bleach is the WORST THING YOU CAN USE OUTDOORS.

Chlorine bleach is VERY TOXIC to any vegetation, trees, expensive landscaping, etc.

It's FAR BETTER to use oxygen bleach. Oxygen bleach is SAFE for all outside vegetation. The solution adds beneficial oxygen to the soil!

My Stain Solver, to the best of my knowledge, is the only certified organic oxygen bleach out there.

Stain Solver Oxygen Bleach


Kathy and I own Stain Solver. We've made it for 23 years.

You may be one of our tens of thousands of REPEAT customers. If you've NOT TRIED IT YET, you're missing out.

CLICK HERE and just try a sample bottle if you're a Doubting Thomas or Thomasina.

Our sample bottle is less than $10 with FREE SHIPPING to any USA state or territory including Guam, Puerto Rico, and the US Virgin Islands.

If you have any issues with it, I'll give you your money back. All I ask is that you follow the directions on the small card I include with the cute sample bottle.

If you want me to autograph your bottle, I will. Just put that note in the COMMENTS section on the checkout page. 😉

That's enough for a Tuesday.

Do you have QUESTIONS about Stain Solver? Do you want to know if it's SAFE to use on something? REPLY to this email and ASK ME.

Tim Carter
Founder - www.AsktheBuilder.com
Uncle Tim's Magic Crystals - www.StainSolver.com
Purveyor of Outdoor Adventures - www.W3ATB.com

Do It Right, Not Over!

Steel in Concrete and Wobbly Deck Railing Posts

Reinforcing steel

Reinforcing steel is the best thing you can include when pouring concrete. When concrete cracks, the steel holds it together. (C) Copyright 2018 Tim Carter

Steel in Concrete

Question #1: Tim, my builder is telling me to forget about using reinforcing steel or mesh is my concrete driveway and patio. He says he’ll just add an inch of thickness and that’s good enough. What’s your feeling? Would you go to the effort and expense to install reinforcing steel in outdoor concrete? Carrie, Richwood, KY

Perhaps you’re about to install some new exterior concrete like Carrie. It’s an expensive undertaking and you want it to last. Hopefully, your concrete contractor has more insight than Carrie’s. If not, here’s what you need to know.

Concrete is very strong if you try to compress or squeeze it. But it’s weak if you try to bend or stretch it. When you bend or stretch concrete you’re applying tension to it. In fact, normal concrete only has one-tenth the amount of strength in tension than compression.

Carrie’s contractor may be pouring concrete that has a compressive strength of 4,000 pounds per square inch (PSI). That means it only takes 400 PSI to crack it. Standard reinforcing steel rods have a tensile strength of about 40,000 PSI. You should be able to see immediately it’s a good idea to use steel in concrete slabs!

You can use either 1/2-inch-diameter steel rods in concrete or you can purchase rolls of steel mesh that look like a giant piece of graph paper. The steel in rolls is in a 6-inch by 6-inch grid. In either case, you want the steel to be installed such that the concrete surrounds the steel by at least one or two inches.

Slabs that have concentrated loads and pressure from a certain direction will require the steel to be placed at a specific spot. Structural engineers will specify the exact placement of the steel in these situations.

You don’t need to be concerned about that for most residential work around your home. If you’re pouring a 5-inch-thick slab for a driveway, sidewalk or patio, just be sure there are at least 1.5 inches of concrete that will flow under the steel.

I like to place steel rods at 2 feet on center both directions in my exterior slabs. The benefits are tremendous. Since concrete shrinks 1/16th inch for every ten feet you pour, you know it’s going to crack. The steel keeps these cracks paper thin. Steel also prevents offsetting where one part of the slab raises up higher than the part on the other side of the crack.

You can view lots of close-up photos of steel rod placement before a concrete pour at my website. I also have three action videos there showing you steel mesh being used in a garage floor slab. CLICK HERE.

Wobbly Deck Railing Posts

Question #2: Tim, I’ve got a major problem. A remodeler is building a new deck for my daughter. I visited this past weekend and he had installed some of the deck railing posts by notching out 2 inches of material. He then just lag bolted them to the outer joist. This seems so unsafe to me and the posts feel like you can crack them off with little effort. What’s the best way to install wood deck railing posts? Mary, Billings, MT

The contractor who’s working at Mary’s daughter’s house is probably the cousin of the carpenter who put the railing on my house in New Hampshire. It’s important to realize that I didn’t build my NH house, and in the purchase contract I pointed out the unsafe railing to the owner.

Notching deck posts is a very unsafe practice. When you remove wood, you are removing strength. Lag bolts are perhaps the worst fastener you can use for a deck post. Lag bolts can be over-tightened and lose much of their holding power.

There are many code-approved methods to attach a deck post. Keep in mind the building code requirement for deck railing is a minimum requirement. This means that if you design and build the railing to meet code it’s like getting 70 percent on a test. You just barely pass. You can always build better than the code requires.

I feel the best method of connecting wood deck posts to wood deck undercarriage is to use metal deck tension tie connectors and through bolts. The deck tension tie connectors resemble joist hangers, but they’re installed on the side of the deck joists instead of under them.

Special heavy-duty bolts anchor the connector to the side of the joist and a through bolt passes through the outer deck rim joist, through the deck railing post and finally through the metal tension tie. For the railing post to fail, it must rip the tension tie out of the joist.

If you want to watch a short video showing horrible notched deck posts and the very cool metal deck tension tie you should be using, CLICK HERE.

Column 1247

Concrete Rebar Installation

Concrete Rebar

rebar

Here's a great example of rebar that's going to be embedded in a new city sidewalk in Meredith, NH. Copyright 2018 Tim Carter

rebar overlap

These are two pieces of rebar overlapping. Lap joints should be no less than 15X the diameter of the bars. Copyright 2018 Tim Carter

rebar chair

Use metal chairs like this to keep rebar off the soil or gravel base. Copyright 2018 Tim Carter


Concrete Rebar Installation Is Easy

Concrete Mesh Videos:


Shed Ramps

shed ramp

This shed ramp is made with treated plywood and treated 4x4 supports. It's very strong. IMPORTANT NOTE: See the door at the top of the ramp? That's a traditional overhead garage door, but it's only 6-feet wide! Yes, you can get small garage doors. Swinging shed doors don't seal well and are DANGEROUS on windy days. Copyright 2018 Tim Carter

"The shed ramp project is not very difficult, however, it will require some unusual cuts with a circular saw. On a scale of one to ten, with ten being the toughest job, I would rate this project a 2.5."

How To Build A Ramp For a Shed in Hours

DEAR TIM: I'm convinced you know a great deal about shed ramps. I need to know how to build a ramp for a shed because the ground around my shed slopes. It doesn't seem that shed ramp construction would be that difficult, but I don't want to start until I have an outdoor shed ramp plan.

What is the maximum slope you can have on a shed ramp? Do you know how to build a shed ramp with wood? I want the ramp to be safe and very sturdy because my riding lawn mower is quite heavy. Jerry McG., Lees Summit, MO

Related Links

How To Build A Ramp - Basic Carpentry

Treated Lumber Can Rot - Prevent It Doing This


DEAR JERRY: Although I have built my fair share of shed ramps, I don't know if you could say I am a shed-ramp guru. But I can give you some tips that will allow you to construct a woodshed ramp that with not shudder or snap as you drive your lawn tractor up and into the shed. I suggest we copy the way I built my own shed ramp.


The shed ramp project is not very difficult, however, it will require some unusual cuts with a circular saw. On a scale of one to ten with ten being the toughest job, I would rate this project a 2.5.

Quick Start Guide For Building a Shed Ramp:

  • design so slope is no greater than 3 inches of rise per foot of run
  • purchase treated lumber plywood and treated 4x4s and 2x4s
  • attach a treated 2x4 to the shed that 4x4s rest on
  • use hot-dipped galvanized or stainless-steel screws to fasten plywood to 4x4s

Free & Fast Bids

CLICK HERE to get FREE & FAST BIDS from local shed building contractors.

How Steep Can A Shed Ramp Be?

I feel the maximum slope should be no more than 3 inches of vertical rise per horizontal foot of run. My shed ramp has this slope and it rises 24 inches from the ground to the shed floor.

The total length of my ramp is 8 feet. Try to make your ramp as long as possible so the slope is less than 3 inches for every foot of run.

If a ramp is steeper than this, you might also have a problem when the lawn tractor pulls into the shed. My lawn tractor has a belly mower. The belly mower can scrape the top of the ramp and prevent the tractor from entering the shed.

Lawn tractors with snow plows might also have an issue with a steep ramp. The blade may dig into the ramp if you try to drive the lawn tractor up into the shed.

How Do You Prevent A Ramp From Being Slippery?

The best way to keep a ramp from being slippery is to keep it clean and free of slimy algae. You can also install pure rubber mats. You must keep the rubber clean.

Rubber is excellent because it's not slippery when wet.

shed ramp

This is a perfect rubber mat for a shed ramp. It's 3-feet wide and 7-feet long. Place two of them side-by-side. CLICK THE IMAGE NOW to have them delivered to your home in days.

Let's discuss the slope issue. The steepness of the ramp can be a safety issue when you are both on and off the lawn tractor. If the ramp is steep and you have not cleaned it for a year or so, it might develop a slippery algae covering.

When this algae gets wet, it is more slippery than a wet bar of soap. Just walking down the ramp may have you on your posterior faster than you can say "Whooops!". If you try to drive a lawn tractor up a slippery ramp, it is possible for the tractor to slide sideways and tip over the ramp. You can get severely injured if this happens.

Oxygen Bleach

Stain Solver is MADE in the USA with USA ingredients that are food-grade quality. CLICK THE IMAGE to order some NOW.

Clean shed ramps with certified organic Stain Solver as soon as you see a hint of green algae or black mildew. Both can be very slippery.

The cost of cleaning the ramp is far less than what the ER bill will be. The last thing you need is a broken wrist or tailbone.

What's the Best Shed Ramp Material?

The best shed ramp materials are treated lumber 4x4's, a treated 2x4 and treated three-quarter-inch-thick plywood. You can find treated plywood at traditional lumber yards. Don't count on a big box store to carry this specialty item.

I spaced the 4x4's two feet on center as they project away from the shed. Since my ramp is 6-feet wide, I needed four 4x4s.

The ends of the 4x4s are notched using a circular saw. This notch allows them to rest on the 2x4 which is through bolted to the end joist of the shed. The notch is only one and one-half inches deep and perhaps an inch high. The two cuts that make up the notch are 90 degrees to one another, but the one cut is not parallel with the end of the 4x4.

Shed Ramp Support

You can just barely see the treated 2x4 that's bolted to the side of the shed. The 4x4s are notched to sit flat on the edge of the 2x4. Copyright 2018 Tim Carter

The 2x4 is bolted to the side of the shed joist so the top of the 2x4 is 2.5 inches down from the top of the shed floor joists. If the shed floor has three-quarter inch flooring, this will allow the treated plywood of the ramp to line up nearly perfectly with the top of the shed flooring.

Once the small notches are made on the ends of the 4x4s, you can set them on top of the 2x4 and toenail them into the side of the shed joist. Use special hot-dipped galvanized nails that are 3.5 inches long.

CLICK HERE to get FREE& FAST BIDS from local shed building contractors.

How Do You Fasten the Plywood To The 4x4s?

After all of the 4x4s have been secured to the 2x4 ledger board, you cut the plywood to length and nail or screw it to the 4x4s. Use hot-dipped galvanized nails or screws for this task, but they only need to be 2.5 inches long.  Recess the screw heads. Your lawn-tractor tires and bare-foot children will love you for this.

Stain Steel Screws

These are great screws to use for a shed ramp. CLICK THE PHOTO to have them delivered to your home.

Are There Other Shed Ramp Materials?

Shed ramps can also be made from aluminum or other metal. There are any number of companies that make ramps that can be placed permanently or used only when you need access in and out of the shed. Some ramps are slightly wider than the width of the lawn tractor tires. These must be placed very precisely so the tractor does not flip over.

If you build a solid-wood ramp like mine, you can use real rubber mats to make pathways for yourself and the lawn-tractor tires. Real rubber, when wet, is not slippery. Get rubber mats that have some bumps on them that will give you superb traction. Clean the ramp and rubber mats on a regular basis to remove any dirt, algae or moss.

CLICK HERE to get FREE& FAST BIDS from local shed building contractors.

Column 671

Gutter Covers

This is the best gutter guard I've ever tested. A stainless-steel micromesh prevents any pine needles from getting into the gutter. Copyright 2018 Tim Carter

"I started to test different products and discovered quickly they all did a great job of keeping leaves out of my gutters. But in the spring, or after two spring seasons, all of the gutter cover products I tested FAILED."

Gutter covers are a huge business. They really came of age back in the 1990s.

Related Links

Extensive Gutter Guard Tests By Tim Carter

Gutter Guard Truth - Be Sure Guards Are Sloped!

Gutter Covers Work - But Most Allow Debris Into Gutters - BEWARE!

I clearly remember seeing these products multiply when I'd attend the different trade shows like the National Hardware Show and the International Builders Show.

Both of these shows have a playpen area that's got smaller booths designed for start-up companies.

If you want to see really new products, that's the best place to go in both shows. All the little guys are there and some have spectacular products such as the metal pegboard I spied at one of the shows back about fifteen years ago. But I digress.

When the gutter covers, or gutter guards as many call them, came about, I was intrigued. My own home had nearly 400 feet of gutter and huge oak, maple and gingko trees surrounded my house. Cleaning gutters was a huge task and it was dangerous.

I started to test different gutter cover products and discovered quickly they all did a great job of keeping leaves out of my gutters. But in the spring, or after two spring seasons, all of the gutter cover products I tested FAILED.

There were two primary designs:

  • Slots, Grooves, Holes, and Knockouts
  • Rounded Nose or reverse curve as the industry calls them

Goal: Water In - Everything Else Out

The slots, grooves, holes and knockout-type gutter cover were designed to let water into the gutter through the openings in the gutter cover. Big leaves couldn't pass. But small twigs, pieces of bark, pine needles, tiny leaves, roof shingle granules COULD get into the grooves and slots.

When this happened, some got into the gutter and the larger pieces CLOGGED the slots and grooves causing water to then shoot over the gutter guard onto the ground. That's BAD!

The rounded nose gutter guard works based on water's surface tension. As water flows over the metal roof of the gutter guard it tends to stick to the gutter guard and flows down into the gutter. Large leaves can't get into the slot.

The issue I discovered is, once again, all the small roof debris did get sucked down into the gutter.

Gutter Cover Test FAILURE Results

After a few years, my CLEAN gutters had an inch or two of organic MUCK in them. So much for great gutter covers!

Another reason they failed is that many gutter covers lay very flat over the gutters. This creates a shelf where debris can collect. The best design is to have the gutter cover be sloped and that slope should match the slope or pitch of the roof.

gutter guards pine needles drawing

Here's a quick cross-section showing how the gutter guard - in green - is in the same plane as the roofing material. The drawing is not to scale. I used to make drawings like this sitting at customers' kitchen tables. Copyright 2018 Tim Carter

The Best Gutter Cover - Micromesh

Finally, I discovered a new product years ago that was made from a remarkable ultra-fine stainless steel mesh. It reminded me of pantyhose fabric. The openings in the mesh were SO SMALL that you could barely get the head of a pin through it.

I thought they'd never allow water through. I KNEW they'd stop all the small debris from entering the gutter but would water flow through the mesh?

YES! They worked! You can discover MORE about the gutter covers I ended up using on my house just below. Click the link next to the STOP sign after the two videos.

Here are two videos that show you my test results.


Well, I have Amazon affiliate links throughout my site showing you great tools and products I own and use. Thousands of my newsletter subscribers BEG ME to tell them about the products I love and they have no issue with me getting a small commission as does a real estate agent, a car salesman or any other person who invests their time to help you make an INFORMED DECISION.

You could spend years and tens of thousands of dollars testing different gutter covers yourself, or you can just accept that I've invested all that time and money for you. That's fair, isn't it?

Wood Rot, Roof Overhangs and Concrete Anchors

Wood Rot

There are two reasons why this wood window sill is rotting. First and foremost, there’s no roof overhang. The second reason is low-quality hybridized lumber was used to build the window sill. (C) Copyright 2018 Tim Carter

Question #1: Tim, the window frame on the back of my house is deteriorating. If you look at the three photos I sent, you’ll see there’s no gutter over this window, but rain diverters up in the shingles. What’s the best way to repair the damage and prevent it in the future? Andy, Westerville, OH

I’ve seen an alarming rise in wood-rot questions like Andy’s. Perhaps it’s happening with your wood windows, exterior house trim, and wood door frames. It’s happening at my own home here in New Hampshire. It’s important to realize I didn’t build the house I live in and would have never used the brand of wood trim that’s all over my house.

Another key point is the lack of roof overhangs on the projecting bay where the problem windows are located at Andy’s house. Roof overhangs are yet another building best practice that are fast becoming myth. All Andy has to do is drive through neighborhoods near him where the houses were built in the early 1900s to see generous roof overhangs.

A roof overhang is not much different than an umbrella. You stay dry using a large umbrella as you walk in the rain because the drip line of the umbrella is a good distance away from your body. Roof overhangs do the same to keep house walls, windows and doors dry except during violent wind-driven rainstorms.

The wood trim on your home may be just like Andy’s. Over the past few decades, there’s been an alarming trend to use hybridized lumber that grows rapidly in the spring. This lighter-colored growth band between the darker summer wood band allows water to soak deep into the wood trim. Fungi spores go along for the ride and the next thing you know your wood is rotting.

You can use two amazing products to repair the wood rot and even rebuild missing wood. The first product is a milky liquid wood hardener that you brush onto the rotted wood. It works best if you apply this to dry wood. After one day you then mix up a heavy-bodied wood epoxy to fill any gaps, holes or large cracks. The epoxy can be sanded, painted and stained.

You can watch a short video how to use the milky liquid and wood epoxy. The video should give you the confidence that you can do this simple repair. I’ve used the products at my own home with great success and feel confident you’ll discover they’re easy to use. Go to: https://www.askthebuilder.com/repair-wood-rot/

Question #2: Tim, I really need your help. I’ve got to attach a piece of 2x4 treated lumber to a concrete block wall. A sidewalk gate will be attached to this piece of wood so it needs to be rock solid. I know the concrete block wall is filled solid with concrete because I watched it being built. How can I install an anchor bolt now in this wall so it never comes out? Teri, Bloomington, IN

You may be in a similar situation as Teri wanting to install a threaded bolt into a concrete slab or perhaps a concrete block wall. Believe me, there are countless anchor designs and products all that may work well.

The good news is you can get a simple hex-headed bolt and three nuts at your local hardware store that will do for you what Teri needs to do at her home. You’ll also need to rent a hammer drill to create a very special hole. The only other thing you’ll need is some easy-to-use concrete epoxy that holds the bolt in place and prevents it from ever being pulled from the concrete or concrete block.

You can borrow a tip from your dentist for this project. The reason the fillings in your teeth don’t come out is because your dentist creates a hole in your tooth that’s wider at the bottom than at the top. You’re going to do the same thing with the hammer drill by drilling into the concrete at different angles as you drill the hole.

I’d want the bolt to be embedded in the concrete at least 1.5 inches. Teri is using a 2x4 which is 1.5 inches thick. She should have about 1 inch sticking past the face of the 2x4 to attach a washer and nut. This means she’ll need a 4-inch-long hex-head bolt. To ensure the bolt doesn’t turn when she’s attaching the wood, she needs to thread on two nuts to within 1/4 inch of the head. Use wrenches to tighten the two nuts against one another.

After the holes are drilled all the dust must be removed from the hole. Don’t blow into it with your mouth! You’ll get a blast of dust in your eyes and be off the the ER. When you’re at the hardware store, get a 2-foot length of 3/8-inch plastic tubing. Insert one end into the hole, bend the tubing to get around the corner and then blow on the other end of the tubing.

Squirt some epoxy onto the end of the bolt that goes into the hole and then add more in the hole so it oozes out when you insert the bolt. Allow the epoxy to cure for 48 hours before attaching anything to the anchor bolt.

If you want to watch a short video showing how to drill the bell-shaped hole into concrete block for a permanent anchor, go to: https://www.askthebuilder.com/how-to-install-an-anchor-in-concrete-block/

Column 1246

April 29, 2018 AsktheBuilder Newsletter

Are you a teacher or do you work in a school? I had the pleasure of helping teach a middle-school STEAM class in Missouri about ten days ago.

Classroom STEAM

Ms. Chantell Mason reached out to me to ask if I'd do a video conference with two of her classes. They had an assignment that put them in charge of building a new school.

They had questions about building on rocky soil and Ms. Mason had discovered my past column about the topic.

The photo above was taken during the class and I'm up on that white screen believe it or not.

Each of the kids that had a question would come up to the camera and speak into the microphone. The other kids would tap away at their laptops with my answer.

In one of my answers, I gave an example of where NOT TO BUILD a school and referenced a silly school in Cincinnati, OH that was built in the floodplain of the Ohio River. The entire building is up in the air on giant concrete piers much like a huge table.

Within 60 seconds one of the kids came up to the camera, held up their laptop screen so I could see it and said, "Mr. Carter, is this the school building?"


It's important to realize I didn't ask the kids to go look it up.

This young woman had indeed located the CORRECT school with minimal clues. I didn't say the name of the school. I didn't mention WHERE in Cincinnati it was other than along the Ohio River.

There's HOPE!

If you're a teacher and need me to help you one day in your classroom, you know what to do. Just Ask Tim.

On-Demand Radio Benefit For You

Friday, my great buddy Chuck Eglinton uploaded my ninth on-demand radio show. It's free to listen to.

One of the great things about getting back in front of the microphone is I'm rediscovering past columns I forgot about!

I'll be talking to a homeowner about a problem, for example Steve last week, and BOOM!

"Hey Steve, I've got a column that explains how to fix that."

Steve had reached out to me with a common problem - his ancient toilet wasn't flushing correctly.

He told me he had been dealing with this issue for well over TEN YEARS!

The best part is he shot a short video and sent it to me. CLICK HERE and scroll down the page to see the video:

slow flushing toilet


Not only did I fix Steve's toilet making it flush like NEW, but my recommended fix got rid of some horrible staining he had tried to remove for years.

Steve was SO HAPPY he taped a follow-up video showing how his toilet was flushing correctly AND it looked like new! The follow-up video is part of the above video. Go watch it.

WOOT! I love love love getting feedback like that as it reinforces that what I do is really helping you.

Here's the old column that I had Steve read to see how to fix his toilet.

Andy's Rotten Wood Window Sill

I then talked with Andy about a common problem you might have.

Wood rot

In Andy's case it was caused by an idiot builder or architect who didn't provide enough roof overhang on Andy's house.

CLICK HERE to see three photos of Andy's lack of overhang and his wood-rot problem.

CLICK HERE to see how to repair the wood rot. Watch the video I taped last November in Los Angeles.

Fun Construction Quiz

Friday, I was driving back from a journey and I saw a house being built just a few miles south of my home.

Surprisingly, there were just a few workers there and I decided to walk around and get some photos. If the homeowners are expecting to enjoy the summer along the lake here, they better light a huge fire under the builder.

CLICK HERE to see one of my photos and take the FAST two-question quiz.

It's FUN and I GUARANTEE you'll discover something new.

Be sure you SCROLL UP after clicking SUBMIT so you can see your score. If you selected the wrong answer, I tell you the right answer and why it's correct.

That's enough for a Sunday. More next week.

Tim Carter
Founder - www.AsktheBuilder.com
Captain Magic Outdoor-Radio Man - www.W3ATB.com
Purveyor of Uncle Tim's Magic Crystals - www.StainSolver.com

Do It Right, Not Over!