Shed Floor Material

Shed Floor Material

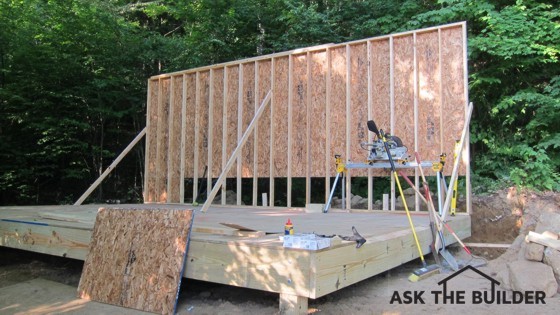
This large storage shed under construction has a treated wood floor system. It's just one possible option. ©2017 Tim Carter

Shed Floor Material TIPS

DEAR TIM: I'm going to build a storage shed. Actually I'm building two sheds, as my wife wants her own cute garden shed.

I'm not able to get much help for these projects and am wondering what to do about the floor of each shed. I want them to be waterproof, but I can't even imagine pouring a concrete slab myself.

What are my options when it comes to building a shed with a waterproof floor that will stand the test of time? Al H., Asheville, NC

DEAR AL: I commend you on thinking ahead about the durability and longevity of your shed. All too often people just throw something together and fail to realize what things could look like 30 or 50 years down the road.

Wood & Water Bad Juju

The floor of the shed is absolutely important. You bet you want a floor that can handle water. You might bring in a dripping wet garden tractor covered with water. I used to pull my garden tractor into my shed caked with snow on the machine and the plow. When the temperature rose, puddles of water would be in my shed.

CLICK HERE to get FREE & FAST BIDS from local shed builders.

Your wife will probably want a sink in her shed that's fed by a garden hose. You know that water on the floor of that shed is going to happen like the sun is going to rise tomorrow.

Concrete Is Possible

I don't know how big your sheds will be, but if they're 10 x 12 foot in size or smaller, you can pour a concrete slab with ease if the following conditions exist.

If the concrete truck can pull up to the shed location eliminating the need to wheelbarrow the concrete, you'll be in great shape. Second, you have to have just one fairly unskilled laborer who'll help you for less than an hour place the concrete. Once the concrete has been poured, has been screeded and bullfloated, one man can easily finish a 10 x 12-foot slab.

Concrete Floor Video Series

Watch these following videos to see how easy it is to pour a small concrete slab.


Vapor Barrier

If you do decide you can tackle a concrete slab, be sure to put a high-quality vapor barrier under the concrete. You don't want water vapor from the soil permeating into the shed. Also be sure the slab contains reinforcing steel so the slab doesn't crack and break apart.

The best vapor barriers are cross-laminated virgin vinyl ones. I've had great success with Tru-Tuf. CLICK HERE to ORDER IT.

Treated Plywood

If you can't pour concrete, you can have a waterproof shed floor with little effort. The best part is that you can do this completely by yourself.

You can install a treated wood floor system that will not rot and will give you peace of mind for decades, if not longer. I've built sheds with concrete floors and treated wood floors and both have stood the test of time.

Treated Joists Too

A waterproof wood floor system for a shed starts with a floor framing system just like an outdoor deck. You use treated lumber floor joists that are raised up off the soil. I like to have at least 6 inches of air space between the bottom of the floor joists and the top of the soil.

This space allows foxes and other animals to keep mice away. It also allows you to deal with critters that might want to set up a homestead under the shed.

CLICK HERE to get FREE & FAST BIDS from local shed builders.

Closed Cell Foam

I then prefer to install closed-cell foam insulation in between the floor joists that's located just under the treated plywood that is nailed to the top of the floor joists.


The closed cell foam insulation provides superior energy savings and comfort in case you decide to heat the sheds.

It's also an amazing vapor barrier that stops water vapor from entering the shed through the floor. This water vapor can rust tools that you store in the shed.

Visit Real Lumber Yard

Many people don't realize you can purchase treated plywood. You rarely find this at home centers, but traditional lumber yards almost always stock this fantastic product. You'll need a extra sheet or two to make a low-slope ramp to get you in and out of the shed.

Concrete Piers

The entire floor system can rest on concrete piers that rise up out of the ground. You can also connect the wood floor system to wood posts that rest on concrete piers.

Be sure to use approved hold-down anchors to connect the floor system to the buried concrete footers. You don't want your shed tumbling across your yard in a severe windstorm.

Treated Lumber Bottom Plates

When I frame the walls of my sheds, I always use treated lumber for the bottom plates. This is necessary for concrete, but it's a best practice on a wood-floor system. The reason you want treated lumber for a bottom plate is because no matter what floor you have, it's possible for liquid water to flow across the floor and contact the bottom plate.

You never want the possibility of the bottom plate rotting out. Not only is it hard to replace this critical framing element, it's also very time consuming. The cost to use treated lumber vs. regular lumber is just a few dollars.

Shed Building Videos

You can get access to a series of videos that show you how to build a shed, including a wood floor system. Simply click on this link "shed videos".

I also have a complete set of step-by-step videos for building a shed. I completed the shed this year and videoed each step. The videos are broken down into the various aspects of the shed construction. The complete video series is available for purchase at my AsktheBuilder Store. Just click here for the Shed Building Videos.

CLICK HERE to get FREE & FAST BIDS from local shed builders.

Column 964

Tile Falls Off Wall

 tiles fall off the wall

These wall tiles had poor adhesion to the wall. The reasons for failure are many. Photo Credit: Lloyd May

Tile Falls Off Wall TIPS

DEAR TIM: The 8-inch by 10-inch wall tiles in my bathroom are bulging out in places. I pushed on them and they moved.

Further investigation revealed many are loose and only held in place by the grout between the tiles. The tile have been up for eight years installed by a pro who supplied the adhesive.

What might be the cause for this problem? I believe I can salvage the tile. How can I permanently adhere my salvaged tile to the wall? Lloyd May, Sydney, New South Wales, Australia

DEAR LLOYD: I'm sorry to hear about your dilemma.

CLICK HERE to get FREE & FAST BIDS from local tile contractors.

My Own Failure

I've had the same thing happen to me many years ago when I was just getting started in construction. It only took eight days for my tile job to fail, not eight years! It was the first and last time I had a problem with tile failing.

Disappearing Secrets

As each day passes, I'm afraid young contractors and tile setters become more detached from the tile setting methods of old. I have vivid memories of using a sledge hammer to remove ceramic tile from a wall.

It was cemented, yes - real cement - to a bed of cement mortar that was installed over metal lath. That tile, had I not beat it to death with the hammer, would have stayed on the wall for centuries.

New Methods Not Tested

New time and cost-saving methods often push aside time-tested techniques used by the master tile setters of old. Fortunately there's a compromise you can choose allowing you to reinstall your tile so it will not fail.

Organic Glue

Let's first discuss the possible reasons for failure. I can see from your photos the installer used an organic mastic on your wall. This glue resembles warm cake icing and is usually water-based. It's not a bad product and can have strong adhesion if you just follow the use instructions.

Skin Over Blues

The biggest mistake many make when using an organic mastic is allowing it to skin over. This happens if you expose the mastic to air for too much time before you press the tile into the adhesive.

When a skin develops on the mastic, the adhesive doesn't offer much of a mechanical bond to the tile. The water evaporating from the mastic causes the mastic to stick to itself. The best example I can offer is a piece of fresh adhesive tape that gets coated with dust. The tape is no longer sticky.

Possible Defect

The mastic could have been defective, although I would say this is a low probability. The tile setter could have used the wrong sized notched trowel. The instructions that come with the tile or mastic tell you what size trowel to use for each sized tile. Bigger tile need a larger notched trowel.

CLICK HERE to get FREE & FAST BIDS from local tile contractors.

Dust Issues

The wall surface or backs of the tile could have been dusty before the adhesive was applied. Dust and adhesive are bad jujumagumbo. The dust is selfish and steals all the adhesive for itself.

Not Flat

The wall surface could have been irregular with humps and dips in it. I feel this, in conjunction with skinned-over adhesive, is the root cause of your tile failure. As ceramic tile get larger, the wall or floor surface must be flatter and flatter.

Since the tile is flat and in the same plane, the wall surface must also be a perfect match. If the wall has humps, the back of the tile will touch the hump and then not contact the wall where there is a dip.

This is why my tile job failed all those years ago. When I pulled my tile of the wall, you could clearly see bare spots on the tile where no adhesive even touched the tile.

Lady Luck

I'm glad you're able to salvage the tile. Your job now is to remove any organic mastic that is stuck to the tile backing. If you soak the tile in water, the mastic will almost always soften. You can scrape it off with a flat spackling knife or a chisel.

Remove Glue

It's now time for the hard part. You may be able to scrape off any mastic from your walls using the same method. You'll have to spritz the mastic on the wall with water from a spray bottle. You may discover using a paste paint stripper is an easier way to soften the adhesive as paint is nothing more than colored glue.

Fill Hollow Spots

Once the mastic is off the wall, it's time to use a straightedge to determine if the wall surface is perfectly flat. If there are low spots and humps, you need to skim coat the wall with cement-based thinset to get the wall surface flat and in the same plane.

thinset

Thinset is just silica sand and Portland cement. It's dry and needs water. CLICK HERE TO ORDER THIS THINSET NOW.

Cement and Sand

Thinset is a blend of fine silica sand and Portland cement. It's imperative the wall is dust-free and slightly damp when you apply the thinset. You want the thinset to bond very well to the existing wall surface.

Thinset Video

Watch this video just to see what thinset is. I'm using it on a floor, but it goes on walls too. Pay attention to the consistency of it.

Work Fast

You'll use the same thinset to adhere the tile to the wall. Do what the master tile setters did nearly one hundred years ago. Install the tile the day after you flatten the wall with the thinset. The microscopic crystals of the hydrating cement in the thinset already on the wall will interlock with the fresh thinset you trowel onto the wall creating a lasting bond.

Cover in 5

Only apply as much thinset on the wall as you can cover with tile in five minutes. Use cold water to mix the thinset to retard the setting time. Do NOT add water to the thinset if it starts to get hard in the bucket before you spread it. Only mix enough thinset as you can use in one hour or less.

Correct Notched Trowel

Use the correct notched trowel to apply the thinset. CLICK HERE to see lots of great notched trowels.

notched trowel

Here's a 1/4 x 1/4-inch notched trowel. This is a great size for 8 x 8 tile. The bigger the tile, the larger the notch has to be. CLICK THE IMAGE TO BUY THIS TROWEL.

CLICK HERE to get FREE & FAST BIDS from local tile contractors.

This column was featured in the November 6, 2013 AsktheBuilder Newsletter.

Column 1011

Painting Walls or Trim First

Tim painting woodwork outside

When woodwork is flat and waist high, you can make hay while the sun shines!

Painting Walls or Trim First TIPS

DEAR TIM: My husband and I are building a new home. We're going to install all of the door and window trim ourselves and paint the entire interior as well.

Should we paint all of the trim before it's installed and spray paint the walls and ceilings? Is it better to install the trim and paint it in place?

We want to spray as much as possible but don't quite know the order in which things should happen. Johnette P., Ft. Dodge, IA

DEAR JOHNETTE: I don't know if there are correct answers to your questions. My guess is if we had ten painters and ten finish carpenters in a room and presented your case, we'd get back twenty different scenarios as to the precise steps they would take to minimize work and maximize the quality of the overall job.

Pre-Finished Surfaces

Perhaps the biggest challenge you face is working with finished materials. It sounds to me as if you're trying to install pre-painted trim on top of walls that have been finish-painted.

While this sounds good in theory, it doesn't translate well in practice because you will damage the pre-finished surfaces as you finish the job.

CLICK HERE to get FREE & FAST BIDS from local painters who can paint FAST.

Spray Painting

I have no problems with spray painting walls and ceilings. It's been done on several of my jobs with outstanding results. The finished look is as good or better than if the walls had been painted with the best rollers.

The speed with which an experienced person can spray paint a room is astonishing. If you have minimal spray painting experience, I suggest you practice in a garage or closets before moving out into rooms you will see each day.

Airless Sprayers

The technology of DIY paint sprayers has advanced rapidly. There are some very good airless paint sprayers that are easy to operate and clean. When you have the paint thinned correctly, they deliver professional results.

Paint Sprayer Videos

Watch these two DIY paint sprayer videos. I really liked the one sprayer.


Installing Woodwork Dirty

Installing woodwork on walls around windows and doors is not as easy as you might think. I's not uncommon for a wall to get scuffed by a hammer as the finish carpenter taps the edges of trim to adjust it.

A carpenter's hands get dirty while working and she/he may smear a wall by accident. Walls can get nicked and scratched as long lengths of trim are moved around the house. The time spent being careful may be counter productive.

Touch up painting of the spray-painted walls with a brush can also yield less than satisfactory results.

CLICK HERE to get FREE & FAST BIDS from local finish carpenters who can install your woodwork.

Prime Woodwork

It's a great idea to prime woodwork on both sides and applying one coat of finish paint on its exposed face before it's installed. The finish trim will need one final coat of paint after it is installed.

The woodwork can get nicked, scratched and abused as it is installed. What's more, the spackling compound used to fill the countersunk nail holes will have to be sanded, primed and sealed before the final coat of paint is applied if you use the wrong one.

There are spackling compounds that have a built-in primer/sealer. CLICK HERE to buy it.

spackling with primer

Here's a pretty cool spackling compound. It's got paint primer built into it. This saves you time and money. CLICK THE IMAGE NOW TO ORDER THIS SPACKLING.

Flat Dots

If you fail to prime and seal these small filled holes, they often stand out after the finish paint is applied. You see a bunch of dots that have a different sheen than the gloss of the paint on the wood.

The porosity of the adjacent painted wood is much different from that of the sanded porous filler. Primer/sealers even out the porosity between the spackling compound and painted wood.

Caulk Gaps

Woodwork rarely fits perfectly against the walls. There can be long large and small cracks between the woodwork and walls that should be filled with caulk.

If the walls and trim are already painted, the resulting caulk job will look like pinstriping as it is doubtful the caulk color will perfectly match the color of the finish paint. The caulk will look best if it's covered with a coat, or two, of paint.

Partial Paint

If I were in your shoes, I'd spray paint the walls with a primer/sealer paint and then follow with one coat of finish paint. The ceilings can be finish painted at this time if no woodwork touches up against them.

I'd then install all of the woodwork including the baseboard. All cracks would be then caulked and all nail holes would be spackled. I prefer to use the lightweight spackling that can be wet sanded with a damp sponge.

Wet sanding eliminates dust problems. I would then spot prime and seal all spackling, unless I had used the newer spackling compound with the primer / sealer in it.

CLICK HERE to get FREE & FAST BIDS from local painters who can paint FAST.

Paint Walls Next

If I were you I would apply one final coat of paint to the walls. It's a smart thing to brush a very small amount of paint up onto the edges of all the woodwork as you are covering the caulk with the wall paint.

After the wall paint is dry, I'd then apply the final coat of paint to the woodwork using an expensive two-inch tapered brush. The final coat of woodwork paint extends to the edge of the woodwork where it touches up against the walls.

If you have excellent hand-eye coordination, you should have no problem maintaining a crisp paint line at this intersection. Don't believe what you see on the home improvement TV shows about using masking tape. It's a joke and takes too much time.

Caulk Is The Secret

If you desire truly professional results, you'll caulk each and every crack you see. This is the most obvious mistake I see in DIY paint jobs - missing caulk.

The trick to applying caulk is to have a bucket of warm water and a grout sponge with you as you caulk. Cut the tip of the caulk tube so it is slightly smaller than the average sized crack and use a top-quality caulk gun to carefully control the amount of caulk being discharged into the crack.

Caulking Videos

Watch this video to see how I apply and finish caulk. You need to wipe the caulk with a sponge!

Two Feet

Apply caulk to no more than two lineal feet of crack at a time and then use your finger to smooth the caulk. The excess caulk on your finger should be minimal if you applied just enough caulk.

Immediately stroke the caulk twice with the damp, not dripping, sponge to remove any excess caulk that smeared onto the wall or woodwork. The only caulk visible should be that in the crack.

CLICK HERE to get FREE & FAST BIDS from local painters who can paint FAST.

Column 516

R Value Meaning and Map

R Value Meaning & Map TIPS

insulation USA map

This is a very good map showing the different insulation zones in the USA. CLICK THE IMAGE to get MORE INFORMATION.

R Value - What It Means

You may be one that wonders what  R value means. It's pretty easy.

The R represents the word resistance. Pretty good alliteration for 6:45 AM wouldn't you say?

R value is a measurement of resistance to heat flow. There's an entire body of science that studies heat. It's complex and called thermodynamics.

That's a cool word when you stop and think about it. Thermo describes heat and dynamics describes movement.

It's a perfect word because heat is constantly moving to a place where it's colder.

CLICK HERE to get FREE & FAST BIDS from local contractors to INCREASE your INSULATION.

Your Body

Think about your own body and how it reacts to heat and cold. In the summer if it's blistering hot, the heat tries to get inside your body.

Let's say it's 110 F outdoors and you're in Phoenix, Arizona. Your body is 98.6 F if you're feeling fine.

The extreme heat, even in the shade, is trying to creep into your body. You sweat to try to combat the heat transfer. But if you run out of water, it's over.

In the winter, you already know that without great clothes on your body loses heat faster than water going through a colander.

Insulation Resistance

Insulation is designed to slow the transfer of heat. Some insulation work better than others. 

Fiberglass is not a bad insulation and it's found in many homes. It's cheap to make.

Foam insulation works better and it's part of the reason you find it in picnic coolers. On a per-inch-basis, foam slows down heat transfer better than fiberglass.

Moving Target

The US Department of Energy constantly develops new insulation guidelines. This happens so the bureaucrats stay busy and because there are technology changes that bring us better insulating materials.

Minimum Standards

The guidelines are minimum standards. There's absolutely nothing stopping you from installing more insulation. The only thing you need to consider is the long-term payback.

At the time I built my last house in Cincinnati, Ohio, the guidelines for ceiling insulation were an R-30 in my climate zone. I doubled that and installed an R-60 ceiling of blown-in fiberglass.

Did I waste my money? I think not. My neighbors fuel bills for houses smaller than mine were nearly double mine! To be fair, I built a new home and all the homes around me were at least thirty-five years old, some being fifty years old.

I had better wall insulation, better windows and an air-infiltration barrier.

CLICK HERE to get FREE & FAST BIDS from local contractors to INCREASE your INSULATION.

Big Savings Possible

I saved approximately $1,000 per heating season in that Cincinnati, OH house. I probably saved an additional $400 during the cooling season. Most of these savings can be attributed to my thicker sidewall insulation, an air infiltration barrier, and tight building practices. But no doubt I saved hundreds of dollars with the thicker attic insulation.

Savings Not Immediate

However, in your existing home, you might save $150 to $200 per year on average. If it costs you only $300 more to upgrade to an R-60 or more, do so! Within two to three years, you'll be saving money once you pay yourself back in energy savings the amount of money you spent on the extra insulation.


R Value Map

The following table shows the different R values that you need to achieve in ceilings, walls and floors with respect to the zone you live in. Study it for a few moments and it will make sense.

insulation USA map

This is a very good map showing the different insulation zones in the USA. CLICK THE IMAGE to get MORE INFORMATION.

insulation table

This table explains what you need to do depending upon which zone you live in. Look up at the map. (C) Copyright 2017 Me and every other US Taxpayer

CLICK HERE to get FREE & FAST BIDS from local contractors to INCREASE your INSULATION.

Column B165

How to Repair Chipped Tile

How to Repair Chipped Tile TIPS

DEAR TIM: I dropped a glass on our new tile and put a chip in one of the tiles. The chipped tile is part way under the refrigerator and we don't want to put in a new tile.

The inside of the tile is very dark, but the top glazed surface on all of the other tile is a white/tan color. Is there anyway we can fill the chipped place and do some kind of repair job? Ann A., Estero, FL

DEAR ANN: It's absolutely possible to repair this chipped tile.

If you're patient and have some decent hand-eye coordination, you can very possibly accomplish a repair that will fool everyone unless you draw their attention to the exact spot of the accident.

CLICK HERE to get FREE & FAST BIDS from local handymen who can repair your chipped tile.

Simple Materials

The first step is to gather the needed materials for the job. You'll need the following:

CLICK HERE to get a wonderful primer / sealer that's easy to use and dries fast.

clear primer sealer

This clear primer sealer is perfect to seal the absorbent inner core of the chipped tile. CLICK THE IMAGE NOW TO ORDER SOME.

You'll get the finish paint at a top-quality local paint store. Your challenge will be to get a great color match. This may take a few attempts.

Hopefully you have a piece of spare tile you can take with you to the paint store. If not, you'll have to use the color chip samples and get as close as possible.

CLICK HERE to get a great two-part quick-setting epoxy I've used for years. It's a great product.

clear epoxy

I use this brand of clear epoxy all the time. It's a great product and will work well on your chipped tile. CLICK THE IMAGE NOW TO ORDER IT.

Clean Tile

Oxygen Bleach

Stain Solver is MADE in the USA with USA ingredients that are food-grade quality. CLICK THE IMAGE to order some NOW.

I prefer to use Stain Solver to clean tile and grout. It's a deep cleaner that's certified organic.

You mix Stain Solver with warm tap water and stir. Apply some of the solution to the chipped area of the tile and allow it to soak.

After 15 minutes, scrub the tile and chipped area and rinse. Use a hair dryer for several minutes to ensure the tile is completely dry.

Even when you think it is dry, continue to blow warm air over the chipped area for 15 minutes. The exposed tile can soak up lots of water and it may take a while to wick out all of the moisture from the tile. It's best to wait 24 hours before proceeding.

You need the tile and chipped area perfectly clean so the next materials bond permanently to the tile.

Seal Porous Tile

Once the tile is dry, use a very small brush and carefully apply some of the primer/sealer to just the chipped area of the tile. Don't get any on the upper glazed surface immediately adjacent to the chipped depression.

Don't apply so much that you end up with a puddle of paint in the chipped area.

The primer / sealer is going to allow you to make sure you get a perfect color match with the glossy paint you'll be using.

CLICK HERE to get FREE & FAST BIDS from local handymen who can repair your chipped tile.

Finish Paint

Wait an hour and then apply a coat of finish paint in the same manner as you applied the primer/sealer. Once again do not get any on the glazed surface of the tile and don't apply any excess paint so it puddles in the chipped area.

The purpose of this step is to see if you've got a perfect color match. You don't want to discover at the final step the paint doesn't match.

Wait for the paint to dry and check the color against the adjacent tile that's not chipped. 

Be sure to check the color in different light, both night and day. If the color is off, do what you need to do to get the paint to match.

Epoxy

Once you have a great color match it's time to install the epoxy. The epoxy is going to be built up so the depression created by the chip is filled in.

Carefully squirt out equal amounts of each part of the epoxy onto a scrap of cardboard and mix it very well. I prefer to use a toothpick for this task. Be sure the chipped tile area is lighted very well so that you can see what you're doing.

Tile Repair Video

I taped this video a few years before refined my method of repairing chipped tiles. That means what you see in the video will not match exactly what you read here. Follow the steps you read here for perfection, but still watch the video.

The video shows you how to use the Stain Solver and how easy it is to use the clear epoxy. It's worth watching.

Precision Work

Apply the epoxy with the tip of a toothpick being very careful to only get it in the chipped area. Carefully dab a small amount of epoxy at a time and add just enough so the top of the epoxy is level with the top of the tile. It usually takes an hour for the epoxy to fully set.

You may need to apply two layers of epoxy to get the surface to match the adjacent tile. You can apply the second layer in just 30 minutes.

Final Paint

Allow the epoxy to set for about eight hours. Paint the epoxy patch and sit back and pat yourself on the back for a job well done!

CLICK HERE to get FREE & FAST BIDS from local handymen who can repair your chipped tile.

Column EM0007

New Home Construction Checklist

New Home Construction Checklist

Would you like to have a checklist of some of the top things I've discovered make the perfect, or near-perfect home?

Can you imagine waving a magic wand and having my years of experience at your fingertips?

It's possible. You can access the tips just below.

Must-Have Tips

I've tried to collect as many of the tricks and tips I've discovered from building new homes and fixing defects in those that weren't build so well by other builders.

The top tips are in my checklist. When you see them all, you'll understand why it's important to make sure you include as many of them as you can in your new home.

CLICK HERE to get FREE & FAST BIDS from local architects and designers that can help you plan the perfect home.

Save Thousands of $$$

Just one of the items in the checklist could save you thousands of dollars in the future. Here's an example:

Ceramic Tile Backer Board - Avoid using green board drywall. It's not waterproof. When the paper rots after getting wet, the tile WILL FALL from the wall.

Use pure cement board or GP DensShield, or equivalent, waterproof board.

If you're forced to use green board, you can try to make the green board more water resistant, but it may not last forever. CLICK HERE for more information about this topic.

Peace Of Mind

See how that one tip could save you vast amounts of money? What do you think it's going to cost you in five years to replace all that ceramic tile in all your bathrooms that were placed over the crap green board?

Here are four more checklist items:

Building Lot - Does your lot have superb drainage? Is your lot susceptible to flash flooding?

The ideal lot has at least 4 feet of fall across it so water runs away from your home.

Lots at, or near, the bottom of a V-shaped gentle valley are where water runs. This valley, before homes were there, had water in it during periods of heavy rain.

CLICK HERE for more information about building lots.

CLICK HERE for more information about how to read topo maps about ground slope.


Concrete Slabs - Will your new concrete driveway and patio resist large cracks?  Will the surface of the concrete not crumble?

Outdoor concrete should contain reinforcing steel, either 1/2-inch rebar or mesh. This holds the concrete together.

Slab thickness should be 5 inches minimum for driveways and patios.

Water added at the job site can dilute the Portland cement in the concrete mix. Don't allow finishers to sprinkle water on the concrete as they finish it.

CLICK HERE for more information about reinforcing steel in concrete.

CLICK HERE for more information about finishing concrete.

CLICK HERE to get FREE & FAST BIDS from local architects and designers that can help you plan the perfect home.

Bath Fan Vents - Will your bathroom fan vents exit the house at the right location?  Will the builder use inferior flexible accordion-style plastic pipe or solid-steel pipe?

Bath fan exhaust needs to be vented to the outdoors. The best place is out of the roof if you live where you get little snow. If you're in a snow region, vent it out a sidewall away from a roof overhang. Never vent a fan at a soffit.

Bath fans should be vented using solid galvanized pipe or smooth PVC pipe. Joints need to be sealed and the pipe needs insulation if in a cold climate.

CLICK HERE for more information about bathroom exhaust fans.


Roof Ventilation - Will your new home have continuous ridge vents? Did you know these don't work to exhaust hot air in the summer?

Continuous ridge vent is over hyped. You can have it installed but you should also install at least two 14-inch turbine vents. Turbine vents can suck all the air out of an attic in less than an hour providing excellent ventilation. They're inexpensive too.

CLICK HERE for more information about time-tested turbine vents.


Instant Hot Water - Will your new home have a simple return loop so you can have a gravity hot-water recirculation system? Are you being pressured to buy a tankless water heater?

A good plumber can install a simple length of pipe from the fixture farthest away from the water heater back to the heater in just a few hours. This pipe creates a loop so you can have hot water in two seconds each time you need it.

Tankless water heaters consume energy at a rate three times higher than a traditional storage water heater. They burn at this rate for however long you have a hot water faucet open. Many people who have tankless water heaters see higher fuel bills.

CLICK HERE for more information about a gravity hot-water loop.

CLICK HERE for more information about tankless water heaters.

CLICK HERE to get FREE & FAST BIDS from local architects and designers that can help you plan the perfect home.


CLICK HERE to purchase many other tips, checklist items and helpful suggestions that will guide you as you plan your new home!

Small Engine Care and Storage Tips

small engine carburetor

Gum and varnish build-up inside a small engine carburetor will eventually lead to problems. The secret tips below are SO GOOD I shared them with 31,000 subscribers who read my November 15, 2020 FREE newsletter. Copyright 2018 Tim Carter

"Gasoline begins to degrade about thirty days after it's pumped."

Small Engine Care and Storage TIPS

Want to listen to this column? Use the following audio player:

DEAR TIM: Spring has finally arrived in the high country here. It's time to cut the grass, but the small gasoline engine on my lawn mower refuses to start. I use the same gasoline that goes in my truck, and my truck always starts.

My guess is that you work with small engines all the time and know what the problem might be and how to prevent it.

What's the best way to store a small engine for months so when it's time to use it you can depend on it starting? Don G., Baker, NV


DEAR DON: I used to have hard-start issues with small engines. I've also had small engines that refused to start no matter how much starting fluid you squirt in the air filter.

How Can I Start Engine First Pull?

You can have your small engine start first pull if you do the following:

  • store the engine with a full tank of gas
  • use 91 octane or higher gas with stabilizer
  • start the engine every 30-45 days to keep fuel in the carburetor

Years ago I discovered a trick that ensures my small engines start the first pull each time I take them out of winter or summer storage.

CLICK HERE to get FREE & FAST BIDS from local handymen that can clean your small engine carburetor.

Your truck starts all the time because you drive it frequently and the gasoline in the tank and fuel system are almost always fresh. If you add gasoline to your truck every thirty days, you'll rarely have problems.

People that don't drive their cars much should absolutely continue reading because they need to do what I do with my small engines.

Did You Talk With a Briggs & Stratton Engineer?

I decided that I'd blend my years of personal experience with the vast knowledge base of Briggs & Stratton's Wayne Rassel, an engineer, to shed some light on how to store small engines. I have small engines in snow blowers, a lawn mower, a hydraulic log splitter and a standby generator. All the engines sit idle for months at a time, so it's important that they respond when I need them.

What are the Best Storage Practices?

I discovered a simple trick years ago that allows my engines to start each time I pull the starting cord. But information I got from Wayne has caused me to modify my approach to storing small gasoline engines.

Now I incorporate the best practices known to woman or man about how to ensure small engines start.

Is Ethanol BAD for Small Engines?

Yes, ethanol is very bad for small engines and even larger ones like in your car or light truck.

The gasoline you and I purchase contains 10-percent ethanol. Using gasoline that contains more than 10-percent ethanol can cause significant damage to small engines, so avoid it at all costs.

If you want to put the best gas in your small engines, get ethanol-free gasoline.

Where Can You Find the Best Gasoline?

There is a website called pure-gas.org that has a list of over 10,000 locations, broken down by states or provinces, that sell pure, ethanol-free gas.

If you can't locate a station near you, just visit your local small airport. All aviation gasoline is ethanol-free. You can buy great gasoline at any small airport.

Some boat marinas may also sell ethanol-free gasoline.

CLICK HERE to get FREE & FAST BIDS from local handymen that can clean your small engine carburetor.

Does Gasoline Break Down?

Gasoline begins to degrade about thirty days after it's pumped. If you've not used all the gasoline in your gas cans within that time frame, pour it into your truck's fuel tank and drive to the gas station to get fresh fuel for your small engines.

That's what I do. I never put gasoline in my small engines that's older than thirty days.

What is the Chemistry of Gasoline?

Understand that ethanol-based fuels tend to attract water. Water is heavier than gasoline.

IMPORTANT TIP: If you don't operate your engines on a frequent basis, a layer of ethanol-enriched water can settle to the bottom of the tank and be drawn up into the carburetor and engine.

This water-ethanol blend is highly corrosive to small engine parts.

How Does Gum & Crap Form?

Gum and varnish, chemical compounds in the gasoline, form as the fuel degrades. This gum and varnish can lead to stuck intake valves, clogged fuel lines and jets in the carburetor.

This could be why your engine is refusing to start. It could be clogged with this gunk.

Should the Tank Be Filled at All Times?

I keep my small engines in great shape by keeping the gas tank filled to the brim at all times. I do this after I shut the engine off.

I do this even if I'm going to use the engine in a week. Keeping the tank filled with fuel minimizes the oxygen in the tank.

Oxygen reacts with gasoline causing degradation. 

BEST Storage Tip - Fill 'er Up With Stabilized 91-Octane Gas

At the end of each season, I discovered that if I ran the engine completely out of gas right before storing it for months, I'd be able to restart the engine with no issues. However, after talking with Wayne, I've decided that state-of-the-art fuel treatments and stabilizers are probably the best way to protect my small engines throughout the entire year.

You also want to use 91-octane gasoline too unless you go to a local small airport and get higher octane gas with NO ethanol in it. Ethanol is NOT permitted in small-aircraft engines so I'm told.

What About Modern Stabilizers?

Some modern fuel additives have a triple anti-oxidant formulation that slows down the fuel degradation issue. The chemicals in the additives react with the gasoline preventing outside water vapor from causing the gasoline to deteriorate.

The additives protect the entire fuel system and all engine parts exposed to the gasoline. Metal parts receive a protective coating that prevent rust and corrosion.

gasoline stabilizer

This is the brand I use to keep my small engines in great shape. CLICK or TAP HERE or the image to have it delivered to your home.

Metal deactivators in the additives stop aggressive chemical reactions caused by dissolved metal ions in the fuel. Detergents in the additives help prevent the formation of the gum and varnishes that cause hard or no-starting issues.

You can get long-lasting results if you decide to use the advanced formula fuel stabilizers. If you want two years of protection, just add one-half ounce to each 2.5 gallons of gasoline. Double the amount of stabilizer and you can protect gasoline up to three years.

Since I take a conservative approach to small engine care and maintenance, I'm going to start to add the fuel stabilizer to all my gasoline. I want to protect the metal parts in my engine. The fuel stabilizers are not expensive, and one 8-ounce bottle treats up to 40 gallons of gasoline. Believe me, I can blow lots of snow and cut lots of grass with 40 gallons of gasoline!

CLICK HERE to get FREE & FAST BIDS from local handymen that can clean your small engine carburetor.

A small engine reminder was featured in my June 25, 2013, April 13, 2014 and my  January 25, 2017 AsktheBuilder Newsletter.

Column 992

Washing Machine Water Valve Stuck

washing machine valves

Here are two ball valves that control the hot and cold water into my washing machine. I have them up above the machine in view so it's easy to operate. I also exercise them once a month so they don't get stuck. Copyright 2017 Tim Carter CLICK THE IMAGE NOW TO ORDER BALL VALVES.

Washing Machine Water Valve TIPS

DEAR TIM: One of my washing machine water valves is stuck and I can't turn it. The other water inlet valve that supplies cold water to our washing machine drips slowly and water accumulates on the round handle.

I see a hex nut at the base of the stem that connects the handle to the valve body. What happens if I turn that nut?

Will I be forced to replace the valve? If so, what is the best type of valve to buy and why? How do you solder the new valve? Greg H., Atlanta, GA

DEAR GREG: Let's stop the leaking valve first then deal with the stuck valve.

Turn The Nut

If you turn the nut counterclockwise looking down on top of the valve, the leak will get drastically worse. If you turn it clockwise, perhaps one-eighth of a full revolution, there is a good chance the leak will stop.

See far below some additional tips from Connie on dealing with old packing nuts. 

CLICK HERE to get FREE & FAST BIDS from local plumbers who do repair work.

Packing Nuts Old Technology

The nut in question is called a packing nut. It's the component of an old, and old-technology, valve that serves to keep water from squirting into the room. The actual stem that connects the handle to the valve is surrounded by a packing material.

This material must be compressed around the stem and the inside of the valve to keep pressurized water from leaking out of the valve body past the stem. The nut you see provides this compression when it is tightened.

Packing Dries Out

The packing material can dry out over the years and lose it's leak-stopping super powers.

IMPORTANT TIP: The packing around a valve stem can wear out. You may stop the leak as soon as you tighten the nut, but the next time you open and close the valve be sure to inspect it every hour or so.

It's possible for the valve to leak again and again. At some point you will reach the limit of tightening the packing nut and water will drip no matter how tight you have turned it. This happens when the packing material has reached the end of its useful life.

Stuck Valves

I got my master plumber certification before I was thirty years old. I've always loved plumbing.

Before you even attempt to open that stuck valve, go and locate your main water shut-off valve. Be sure that valve works. In fact, turn off all the water to your home before you try to wrestle with the stuck valve.

Many a homeowner has caused a massive gushing mess by breaking a valve or pipe where it connects to the valve by applying too much pressure to unstick it.

Don't be that person filing an insurance claim.

Use A Wrench

Get a pipe wrench and attach it to the valve handle. If the valve is inside on of the tiny recessed washing machine boxes, you're pretty much toast. You'll never get a wrench into that spot to be able to do any good.

You can try any tool you can think of to turn the valve. I'll wager you'll have less than a 25% chance of success.

And even if you do get it unstuck, there's a chance the calcification inside the valve parts will not work to completely shut off the water.

If the valve is really old, you'll end up snapping the valve stem.

Cheap Stem Valves

Based upon your description of the existing valve, it sounds like you have a fairly common shut off valve. These valves are very inexpensive and fraught with maintenance headaches as you now know.

Often when you want the valve to stop the flow of water, it will not do so as the rubber or plastic washer hidden within the valve has worn out. The valve seat inside the valve can also become encrusted with sediment.

Ball Valves Are Best

If you want a shut off valve that is virtually maintenance free, you should seriously consider replacing your existing valve with a ball valve. These shut off valves are constructed differently than the valve you have.

The inside of a ball valve is just that - a stainless steel ball that has a hole bored through the middle of the metal sphere. A shaft is welded to this ball that connects to a flat handle.

When you rotate the handle just 90 degrees, the valve turns completely on or off. If you rotate the handle anywhere in between, you get partial or controlled water flow.

Hard Plastic Seat

Ball valves have a wonderful hard plastic seat that surrounds the entire ball. It's not much different than the hip joint in our own bodies.

The fit between the ball and the plastic seat is so precise that each time you move the handle, the valve cleans itself of any and all deposits.

CLICK HERE to get FREE & FAST BIDS from local plumbers who do repair work.

Full Flow

Another advantage of ball valves is full water flow. The diameter of the hole in the ball is often identical to the size of the water line that feeds the valve. This full-bore opening provides for unrestricted water flow through the valve. The valve you have now does not offer this advantage.

New Nylon Packing

Ball valves also have a small packing nut that sometimes requires adjustment. But once tightened, they rarely leak again.

The packing is a synthetic hard plastic or nylon. They can last for decades with no leaks.

Low Cost

The ball valves also cost just one or two dollars more than a conventional shut off valve, so in my opinion they are worth every penny. In fact, I would gladly pay even more money for the years of leak and trouble-free performance they deliver.

My washing machine is served with ball valves that give me enormous peace of mind.

Exercise the Valves

To prevent valves from getting stuck, you need to exercise them. This means you need to operate the valve. It's a good idea to do this twice a year. With modern technology, there's all sorts of ways you can set reminder to do this.

Burst-Proof Hoses

Furthermore, I installed burst-proof water supply hoses from the valves to the washing machine. These rubber hoses are sheathed with stainless steel fabric that prevents them from breaking. I urge you to install these hoses when you replace your valves. CLICK HERE to see an assortment of burst-proof stainless-steel washing machine hoses.

washing machine hose

This is the brand of stainless-steel braided washing machine hose I use. I've never had a failure with this brand. CLICK THE IMAGE NOW TO BUY THIS HOSE. You may need two of them.

Soldering

Soldering a ball valve onto copper water lines is easy. The water lines must be void of any water so be sure to turn off the main water valve in your home and drain the system.

Soldering Copper & Valves Video

Watch these videos to see how to solder and a great torch to use to solder.

Clean Fittings & Pipe

The ball valves and copper tubing must be cleaned with sandpaper or a wire brush to remove all oxidation. Apply a light coat of soldering flux paste to the copper tubing and the inside surface of the ball valve.

Close Ball Valve

Insert the copper tubing into the valve and make sure it is fully seated. Rotate the handle and close the ball valve. Doing this helps maintain the shape of the plastic seat within the valve as you heat the valve with the torch.

Solder Both Sides

Be sure to insert an additional piece of copper tubing into the other end of the valve and solder both sides of the ball valve at the same time.

Lead-Free Solder

Use lead-free solder to create the soldered joint. Apply uniform heat with a torch to the ball valve body and to the tubing. You should heat the valve so that solder will melt and flow freely into the joint when the torch flame is removed from the valve and tubing. Once you have soldered both joints, use a dry rag to gently remove any molten solder drops that are hanging from the joint.

Cool Down Quickly

Immediately apply a damp rag to the body of the ball valve. Be very careful since hot steam will be created as the stored heat in the valve flash heats the water in the rag. This moist rag cools the ball valve slowly so that you do not overheat the plastic seat within the ball valve body.

Install Balls Everywhere

Ball valves can and should be used at many locations within a home. A ball valve absolutely should be used as the primary shut off valve for the main water line of your home.

It's easy for plumbers to install a ball valve for use as the shut off valve under every plumbing fixture. A simple adapter can be soldered to the copper tubing leaving the valve that allows you to attach a flexible water line between the valve and any fixture.

Reliable

One of the best things about ball valves is their reliability. As a traditional valve ages, the inner parts can corrode and fail as you turn the valve handle. The inside of most ball valves are made from plastic and stainless steel.

Neither of these materials will corrode. I have turned the handle of a ball valve that had not been touched for fifteen years and it worked as if I had installed it the day before. Ball valves rock!


Author's Notes:

I was very fortunate to receive a letter from Connie Dearolf who lives and works in Trenton, NJ. Connie works for the Trenton Water Works as a meter repair person and read the above column with great interest.

She scolded me for not including the following tips. I did write her back and tried to explain that newspapers hold me to a specific column length and one simply can't include all of the information one might like to. But here are some helpful things Connie thought all should know:

"....three things you didn't mention regarding stopping leaks at a valve packing nut:

  1. If tightening the nut does not stop the leak you can put Teflon tape on the stem threads. Wrap the tape clockwise.
  2. If Teflon tape doesn't stop the leak, you can purchase packing at a local plumbing supply store. Use the string-like packing to repack the nut.
  3. Be careful about tightening the nut too tight! It can crack and you will be forced to replace the packing nut or the entire valve.

Additionally, you didn't mention another common problem with gate valves, especially older ones. If you close a gate valve too tightly, the gate may drop and break off of the stem. It will be permanently in the closed position......" Connie Dearolf, Trenton, NJ

CLICK HERE to get FREE & FAST BIDS from local plumbers who do repair work.

Column 484

How To Connect Cabinets

How to Connect Cabinets

DEAR TIM: I’m on a very tight budget and remodeling my kitchen by myself. I’m having great difficulty connecting my cabinets together. After numerous attempts, there are gaps in between the face frames and the front faces of the cabinets don’t line up.

What am I doing wrong? How can I get professional results? Also, what’s the best order to install cabinets, both wall and base cabinets? Amy M. Waterville, OH

DEAR AMY: Your question brought back strong flashback memories of my early days in the remodeling and building business.

CLICK HERE to get FREE & FAST BIDS from local finish carpenters who install cabinets.

My First Attempt

I clearly remember the first job I had installing kitchen cabinets. I was pulling my hair out having the exact same issues as you’re experiencing. Once I saw the face of the cabinet frames go out of alignment, I knew I had to do something different.

Then there was the time I split the cabinet frame because I failed to drill a pilot hole deep enough. 

Oh, and then there was the time I snapped off a screw halfway because the pilot hole was too narrow and the dense oak wood frame won the battle of friction.

Only through trial and error did I finally develop a system that produced professional results every time.

No Clamp Syndrome

My guess is you’re having issues because you’re trying to hold the cabinets together with your hands as you drill the screw pilot holes through the edges of the face frames. No matter how hard you squeeze all seems well until you then drive the screw. As you tighten the screw, the cabinet face frames move out of alignment. Am I close?

Shavings - You Gotta Hate Them

To add insult to injury, my guess is you’re getting small shavings of wood from the drilling operation in between the cabinets. That makes it impossible to have a tight seam between the cabinet frames.

The only way to prevent shavings is to have the face frames be as tight as possible with no gap as you drill the pilot hole through the one frame and then into the adjacent cabinet frame.

The clamps never are removed until the screws are tight.

Ratchet Or Screw Clamps

The solution I’ve used for years are ratcheting squeeze clamps that have hard rubber pads that won’t harm the cabinets. These clamps, when installed properly, temporarily hold the cabinets together stronger than the grip of Ironman™! The best clamp I've ever used is the one you see in the photo below.

connect cabinets clamps

Using professional ratcheting squeeze clamps are a must if you want to expertly connect cabinets. © Copyright 2017 Tim Carter

It's got a unique cam on the rotating handle. You open the handle so it's in the same orientation as the long bar.

The next step is to adjust the jaws so they're pretty tight on the two things you want to clamp. You should have the two face frames as tight as possible at this point. You then rotate the handle and as you approach about 60 degrees, the clamp really begins to squeeze tightly.

If you can't locate a cam ratchet clamp, then go with the screw type but be sure you use a block of oak wood to protect the one face frame. You can crush the wood fibers if you don't spread out the pressure from the metal foot.

screw-type clamp

This is a screw-type clamp. These work really well too, but you need to protect the sides of the cabinet face frames from wood crush. Yes, you can screw them so tight you can crush the wood! CLICK THE IMAGE NOW TO BUY THIS SET OF FOUR. You may need more than four!

IMPORTANT TIP: Don't think that a simple squeeze clamp is going to work. Most of these clamps don't have enough squeeze power and leverage to do the job. The screw clamp or a ratchet clamp with a cam is the only way to go. I'm finding it increasingly difficult to find the cam-type ratchet clamps.

Shim Base Cabinets

It’s imperative you have the cabinets shimmed to the proper height before you start the connection process. The cabinet face frames need to be perfectly aligned and touching with no gaps before you apply clamping pressure. Expecting the clamps to make up for an out-of-level floor or a wavy wall is asking too much.

Two Or More

I use two clamps to squeeze the cabinet frames together. I then drill the screw pilot holes. I put a minimum of two screws in each one about 1.5 inches from the top and bottom of the face frame opening. Cabinets 24 inches or taller always get three screws connecting the face frames.

CLICK HERE to get FREE & FAST BIDS from local finish carpenters who install cabinets.

The Screws

I've had great success using 2.5-inch drywall screws to hold the cabinet face frames together. The bugle-shaped head of the drywall screw works perfectly with the countersink bit you read about in a moment. This provides lots of contact area for the head of the screw which is important.

drywall screw

This is a fine thread drywall screw. They work great. Be sure you drill a pilot hole that's 1/32 of an inch smaller than the diameter of this screw. CLICK THE IMAGE NOW TO ORDER THESE PERFECT SCREWS.

Countersink

Once the pilot holes are drilled, I create the countersink cavity for the screw head. Using my drill/driver or an impact driver I then install the screws. CLICK HERE to see the great impact driver I use to install cabinets.

After all that, I remove the clamps. If you do everything right, the cabinets are locked into position and the seam between the two cabinets should look superb.

 countersink bits

Here's a marvelous set of countersink bits. You match the diameter of the bit to the head of the screw. CLICK THE IMAGE NOW TO ORDER THESE.

Wall Cabinets First

I’ve found it’s far easier installing wall cabinets first. You don’t have to reach over the base cabinets risking damage to them. Interestingly enough you’ll have other carpenters or builders tell you just the opposite. They prefer to put in the base cabinets first.

Hold Back

When I install wall cabinets that need to be screwed together, I don’t drive the screws holding them to the wall completely in. I want the cabinets to have a small amount of play in them so I can pull them together with the squeeze clamps.

Couple Cabinets

If you have plenty of muscle power or a few helpers you can also do what I’ve done for years. Screw the wall cabinets together on the ground - as many as you can safely lift - and then install the solid mass of cabinetry as one unit. This same trick can be done with base cabinets.

Screws Into Studs

You’ll have to have lots of help to do this and it really pays to do the math ahead of time as to drilling the holes in the back of the cabinets so the screws go into the center of wall studs or pre-installed solid blocking that’s hidden behind the drywall or plaster.

Be sure to use screws long enough to penetrate at least 1 and 1/2 inches into the wall studs. The weight of the cabinet and the items in the cabinets can be hundreds of pounds. Special screws like the ones just below are made for hanging wall cabinets.

cabinet screw

These are the screws you use to mount the cabinets to the wall. Do NOT use these to screw cabinets together. CLICK THE IMAGE NOW TO ORDER THESE GREAT SCREWS.

Remove Doors

I also recommend removing cabinet doors, especially wall cabinets, when you’re trying to connect them. It’s mandatory if you need to screw together cabinets where the hinges connect to the face frames. The cabinet doors need to be out of the way for the squeeze clamps to grasp the cabinet face frames.

Removing the cabinet doors minimizes the chance of damage to them as you work. In the case of wall cabinets, it also decreases the weight of them as you lift them into place.

Practice Countersink

If you’ve never used a countersink bit to create the cavity for the screws, I beg you to practice. You want to discover the correct depth of the countersink hole so the screw head is flush with the inside edge of the face frame. It’s a precision task. If you drill to deep, the diameter of the countersink hole will be too large. Drill too shallow and the screw head will be proud of the cabinet frame.

CLICK HERE to get FREE & FAST BIDS from local finish carpenters who install cabinets.

Column 1024

Treated Wood Foundation Problems

termite damage treated lumber

Lookie lookie, Can you see the extensive termite damage on the right side of the post? Imagine my reaction when I pulled this treated lumber post out of the ground. I was told it wouldn't rot and that termites couldn't eat it. How would you like to have your foundation built out of this wood???? You'd have to be NUTS to take that chance. ©2017 Tim Carter

Treated Wood Foundation TIPS

DEAR TIM: Several years ago, there was a movement toward the use of wood foundations due to the rising cost of labor and concrete. I toured a couple of newly constructed homes in the Toledo, Ohio area at the time that had used this technique.

My question is "How have these structures fared over time?" Are they still considered sound and what has become of the idea of wood frame foundations?

Are there any contractors using this method actively today? At the time I thought it a good idea, but being the skeptic I am I thought it was better left to someone else to prove the concept.

I've built several homes over the years (for my own use) and have given thought to another project. Your thoughts and insight are always appreciated as I am an avid reader of your column in the Toledo Blade. Roger Puppos, Toledo, OH

DEAR ROGER: I absolutely remember that movement promoting wood over masonry for foundations. The thought back then that rushed through my head was the fable about the Three Little Pigs. As many of us know, the big bad wolf ate two of the three little pigs - the ones that used straw and wood to build their homes. The pig that used masonry was not harmed by the wolf.

CLICK HERE to get FREE & FAST BIDS from local foundation contractors.

Castle Clues

Have you ever seen photos of ancient castles in Europe? Often the walls are still standing, but the roof is long gone.

Treated Wood Foundation Problems

Here's an old castle in Germany. The masonry walls are still standing, but the wood roof structure is long gone. Wood never wins against water, insects and fungi. Copyright 2017 Kathy Ziprik

The roofs were made from wood. The walls were made from stone. They didn't have treated lumber a thousand years ago, but believe me the timbers they used to construct those castle roofs were the densest and most rot-resistant lumber available at the time. Water always wins with lumber if there's oxygen around.

Cast, or poured, concrete is artificial rock or stone. You can order it with more Portland cement and make it incredibly strong so it lasts hundreds of years if that's the legacy you want to create.

Wood Is Strong

My problem with the wood foundations was never one concerning engineering. I was convinced a properly constructed wood foundation could easily act as a retaining wall against all soil pressures that were trying to push it over. Wood shoring has been used for years to protect workmen who install piping in deep trenches and those who work in mines.

I have no doubt that the treated wood manufacturers still promote wood as a viable material for foundations. I also believe there are builders who still use wood for foundation work.

Insects & Rot

My real concern was long-term degradation caused by water and insects. The thought that kept playing in my head like an endless loop of video tape was an image of a workman at a plant that makes treated lumber. There were two episodes in this short documentary.

Human Error

The first one was of the workman coming to work with a very bad head cold or the flu. In this episode, he starts to blend the chemicals that are used to preserve the wood, but because of his lack of concentration he makes a serious mistake and that batch of lumber does not receive enough chemical treatment.

Hoping

The wood certified for wood foundations is supposed to contain a higher amount of the preservatives. That's a given. But how do you know if it does?

Do you want to hope your treated lumber foundation has enough preservatives? Hope is the emotion of last resort. You hope for things you can't control.

You can control your foundation. You can make your foundation wall last as long, or longer, than castle walls.

CLICK HERE to get FREE & FAST BIDS from local foundation contractors.

Anger Issues

Episode two is a little different but the result is the same. The workman who mixes the chemicals goes and asks his boss for a raise. The plant manager tells the worker that he is not deserving of a pay increase. The disgruntled worker goes back to the work station and decides to take his anger out on the next load of pressure treated lumber.

Quality Control?

I don't doubt for a moment that plants that make pressure treated lumber have quality control measures in place and follow them making sure mistakes don't happen. That's just good business. But mistakes do happen and I have proof.

How many food recalls or other product recalls can you remember in the past year or two?

How did those mistakes happen? Who was in charge of the quality control that day at the factory?

Impossible Test

The questions you have to ask yourself, since you can't easily test the lumber at your job site, might be:

  •  Is the treatment in this lumber the correct mixture and will it LAST?
  • Was the lumber mislabeled?
  • Was the correct amount of preservative used and was the pressure high enough in the vessel?

Tim's Failure

In the early 1990's when CCA treated lumber was still being produced, I built a large play structure for my daughter. The main supports were 4x4 posts that I placed directly into the ground and backfilled with the soil.

These posts were approved for direct ground burial. The treated lumber came with a lifetime warranty against rot or decay.

Fifteen years later, I took the play structure apart so I could build a large Queen Anne Victorian garden shed for my wife. To my amazement, two of the six 4x4 posts had significant termite damage to that portion that was buried in the ground.

To say the least, I felt vindicated about my suspicion that treated lumber was not to be trusted 100 percent of the time.

Great Wonders Of The World

When it comes to building for a lifetime, I have a tendency to lean on my college degree in geology. Look at the great temples, tombs and castles that are still standing in the world today. One thing they all have in common is they all are made from rock.

The Great Pyramids are still standing after thousands of years as are temples in Central and South America. Europe has castles that are hundreds of years old that are still in excellent condition. Remember, concrete is nothing more than artificial rock.

Build your foundation from concrete and sleep well at night.

CLICK HERE to get FREE & FAST BIDS from local foundation contractors.

This column was mentioned in the May 12, 2015 AsktheBuilder Newsletter.

Column EM0013