Can I Cut My Roof Trusses?

Attic trusses

Attic trusses are complex structural elements of a building. They’re designed by registered engineers in almost all situations and you should never cut any part of a truss without consulting an engineer first. © Copyright 2017 Tim Carter

Can I Cut My Roof Trusses TIPS

DEAR TIM: My family is growing and I need to move my home office. I looked up into the attic over my garage that’s built with standard roof trusses. There’s plenty of room to create a room.

How do I cut and modify the trusses to create an open space like the attic in the old house I grew up in? It doesn’t seem to be that hard to do.

I need to get started soon as the new baby will be here before you know it. Kevin B., Silver Spring, MD

DEAR KEVIN: If you want to live to see that new addition to the family, make sure your reciprocating saw stays in its case for now. The good news is you can convert that space above your garage into a room, but you’re going to go about it with some help from a registered structural engineer.

CLICK HERE to get FREE & FAST BIDS from local structural engineers who can help you cut your trusses.

Trusses vs. Common Rafters

Let’s compare common roof trusses with the roof framing materials that were used in your parent’s house. While they look the same, you probably didn’t notice the subtle differences.

Most common attic trusses for homes and garages are made with 2x4’s. Your parents' roof rafters were probably made from 2x8's and could have been 2x10's or 2x12's. My own home I live in now has 2x12 rafters.

Strong Wood Species

Typically the truss designer will specify a very strong wood species like southern yellow pine or even Douglas fir. A 2x4 on it’s own can’t support lots of weight without cracking. So how do they do it when you consider how heavy shingles are and possibly 2 feet of snow on a roof?

Webbing Support

Trusses will have angled pieces of 2x4 that connect between the sloped top chord member and the horizontal bottom chord. These are referred to as webbing. Each piece of webbing where it contacts the sloped top chord acts like a support beam to the otherwise flimsy 2x4.

Triangles

You’ll notice a common truss is almost always a series of interconnected triangles that make up one giant triangle. A triangle is an incredibly strong structural shape. This is why you see this same design used in massive bridges that span hundreds of feet over rivers and canyons.
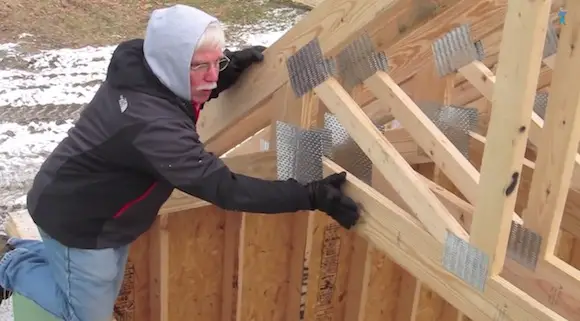
CLICK HERE to get FREE & FAST BIDS from local structural engineers who can help you cut your trusses.

Wood Truss Videos

Watch these two videos and pay attention to the angled webbing pieces that extend from the bottom chord up to the top chord. These are VITAL to a truss's overall strength.


Common Roof Framing

Let’s look at the attic in your parent’s house. Typically you’ll have a long common rafter that extends from the roof peak down to one of the exterior walls. This rough lumber is not a 2x4. At the very least it’s a 2x6, and it’s probably a 2x8 or 2x10.

The attic floor you walked on as a kid was no doubt made with similar larger dimensional lumber. These pieces of lumber, when spiked together with long nails, also created a giant triangle.

Collapse Hazard

The horizontal bottom chord of the truss, as well as the attic floor lumber at your parent’s home, hold the sloped top chords and common rafter is position so the roof doesn’t kick out and collapse.

Possible Engineering Solution

A structural engineer who knows all about roof truss design may be able to come up with a design that allows you to modify all the small angled pieces of 2x4 that connect between the top and bottom chords.

I guarantee you he’ll come up with a design that requires you to install a much larger bottom chord. This will not be easy to do, but it’s possible.

CLICK HERE to get FREE & FAST BIDS from local structural engineers who can help you cut your trusses.

Take Measurements

I suggest you take measurements of your garage as well as great photos of the exterior and photos of your existing trusses. You’ll need the width of the garage and the height of the trusses measured from the tip of the peak down to the bottom of the bottom chord.

Truss Plant Visit

Take all of this information to your local truss fabrication plant. You can locate these via a trip to your local old-fashioned lumber yard. The lumber yards order the trusses they sell from these local plants. Call and make an appointment to meet with the plant engineer. Most will accommodate you as they don’t want to read about you in the newspaper.

Quick Consult

The engineer can look at your photos and measurements and tell you within minutes if there’s a chance at modifying your existing trusses. If you get good news, ask how much it would cost for him to complete a design drawing that you can follow.

Be sure to ask for the step-by-step directions on how to provide temporary support to a truss as you start to modify it. You just can’t start to cut and hope all works out!

CLICK HERE to get FREE & FAST BIDS from local structural engineers who can help you cut your trusses.

Attic Trusses

To get a quick idea of what you’re trying to do, you can get a drawing of the truss that should have been installed above your garage when it was built. Attic trusses don’t cost that much more than a common truss and it’s a shame more builders don’t use them all the time.

Your local lumber yard often can produce this drawing while you wait using computer software. You’ll see what the engineer may come up with before you even meet with him.

My Man Cave

I have attic trusses that span my garage giving me a room that’s 12 feet wide and has a ceiling height of 8 feet. Part of the walls of the room are sloped, but that’s okay. My cozy man cave is inside the room created within the attic trusses. It's a great room.

I’ve also used attic trusses on jobs where a standard rectangular room was created that had straight walls floor to ceiling. Good luck, take your time and be safe!

CLICK HERE to get FREE & FAST BIDS from local structural engineers who can help you cut your trusses.

Column 1042

How to Wallpaper on Drywall

How to Wallpaper on Drywall

How to Wallpaper on Drywall TIPS

DEAR TIM: I was thinking of wallpapering several rooms in my house and installing a few borders in others. But after talking with some friends who have removed wallpaper from their houses, I think I might not do it.

As they removed the paper, they ruined their walls. The paper facing on the drywall was ripped off! Is there a way to prevent this? What can my friends do to restore their drywall? Darcey R., Brookville, IN

DEAR DARCEY: Ouch! I absolutely know how frustrated your friends must be. Tell them not to panic as there is an easy repair method that will restore the walls to like new condition.

Drywall Damage Preventable

The sad thing is that all of the damage to the drywall face paper could have been prevented. Whoever installed the paper skipped a vital step. They failed to size the walls before they hung the paper. 

CLICK HERE to get FREE & FAST BIDS from local wallpaper hangers who use the special sealers. Ask them!

Sizing = Ancient Process

Sizing walls is a mystical process that generates lots of puzzled looks from clerks at paint stores as well as homeowners who wonder what it is. I can remember clearly the first time I heard the term.

I thought it meant you had to carefully measure the walls before you hung paper so that you purchased a sufficient amount of wallpaper. The truth of the matter is that sizing is a process that allows wallpaper to be installed with ease and at the same time allows it to be removed at some future time with little or no effect on the wall substrate.

Primer / Sealer = New Method

The word sizing tends to be used by older professional wallpaper hangers. New paper hangers just entering the field talk about priming and sealing walls instead of sizing them.

Many years ago paper hangers applied diluted wheat-paste adhesives on plaster walls to size them before they hung paper. This adhesive soaked into the fresh plaster and acted as a crude sealer. Modern technology has produced some amazing products that work much better than applying a thin wheat-paste to a wall.

Just A Few Tools

Let's get started with the tools. Fortunately, you don't need many tools to wallpaper.

Here's a list that will get you going on this job:

  • retractable razor knife with snap-off blades
  • 4.5 or 6-inch drywall taping knife
  • smoothing brush or plastic smoother
  • 4-foot level
  • grout sponge
  • measuring tape
  • paint roller & pan
  • paint brush

Click the Image Below to get all, or some, of the tools now:

Wallpaper Tools List

CLICK HERE to get all the tools I recommend in one place. It's easy and fast.

Plaster Wall Suction

Without the diluted adhesive coating the adhesive on the back of the paper sucked into the bare plaster too quickly. This made it difficult to adjust and smooth the paper. In some instances the wallpaper adhesive soaked so deeply into the plaster little glue remained behind to hold the paper to the wall.

Wallpaper Videos

Watch these wallpaper videos to get an idea of what you're up against. It's not that hard, but I'd start on a small room first to get your skills honed.


New Adhesives

Modern wallpaper adhesives are very different than the old wheat-paste glues. Some are so strong that they can actually penetrate through many porous wall paints and actually grab onto the wall surface beneath the paint.

This is where many rookie paper hangers and homeowners get into trouble. They look at a painted wall and think that the wall has been primed and sealed. Indeed the wall may have a paint primer on it but this is not the right type of primer.

The new sealers create a barrier the glue can't get through. You absolutely need this if you're applying wallpaper over drywall.

CLICK HERE to get FREE & FAST BIDS from local wallpaper hangers who use the special sealers. Ask them!

High-Tech Sealers

To prevent the high-strength paper adhesives from bonding to the drywall paper you must apply specialized primer/sealers made for wallpaper. These water-based low-odor products form a tough barrier that paper adhesives can not penetrate. CLICK HERE to buy some of this special primer / sealer now.

high-tech wallpaper primer / sealer

This is the new high-tech wallpaper primer / sealer. It's an amazing product. I've used it and like it very much. You can tint it. CLICK THE IMAGE NOW TO BUY SOME.

The primer/sealers are perfect for painted drywall, bare drywall, paneling, and even existing walls that already have wallpaper on them. The products look just like paint and apply the same way.

Tint The Sealer

What's more, some brands are tintable. You can colorize the primer to match the background color of the wallpaper. This feature comes in very handy if a paper seam spreads apart in the future.

Extend Hang Time

The new primer/sealers also help you when you hang paper. They help to slow the drying time of the adhesives so that you have plenty of time to adjust and trim the paper as you work each sheet.

This characteristic is very important if you're double cutting paper as you install inlaid borders within a paper pattern. Not all wallpaper sealer/primers are created equal. If you want the best performance you will have to pay slightly more per gallon for it.

Seal Damaged Drywall

The damaged drywall at your friend's house can be salvaged with a similar product. Advise your friends to purchase a similar water-based sealer formulated specifically to seal unpainted or damaged drywall surface. CLICK HERE to buy this special primer.

drywall primer

This is the fantastic clear drywall primer made to stabilize drywall that's lost it's top layer of paper. This is easy to apply and dries fast. CLICK THE IMAGE NOW TO BUY IT.

Before they apply this special sealer they need to sand off any loose or ragged paper edges. The special sealer is blue when wet but dries clear. Your friends will appreciate this once they begin to apply the necessary skim coating that will transform the ugly mess into smooth walls once again.

Blisters & Bubbles

If you don't seal the damaged drywall, the water from the joint compound used to skim coat the walls creates horrible blisters and bubbles. If you think your friends are upset now, just wait till you see their faces when the walls resemble a life sized mural of blister packing material!

CLICK HERE to get FREE & FAST BIDS from local wallpaper hangers who use the special sealers. Ask them!

Column 377

Roof Ventilation with Turbine Vents

roof turbine

Roof Ventilation with Turbine Vent | This turbine vent spins with just the slightest breeze. It is but one tool to use when you want superior attic ventilation. The top part of this vent was made from durable plastic. The vent was manufactured in Australia. It was on my Queen Anne Victorian garden shed in Cincinnati. PHOTO CREDIT: Tim Carter

Roof Ventilation With Turbine Vent TIPS

Is Roof Ventilation Important?

Yes, roof ventilation is very important. The more you can get the better.

The roof-ventilation rage over the past fifteen years has been continuous ridge and soffit ventilation. These systems are nearly invisible and they create a system through which air enters your attic space and then gently floats through the attic space.

But I've discovered over the years there's a much better product to use to ventilate an attic.

Do Ridge Vents Work All the Time?

Ridge vents do not work all the time. In hot weather with no wind, no air floats out of your attic space.

The companies that make the ridge ventilation products claim that no matter what the time of year, the air exits the attic space through small gaps at the peak of the roof. I've tested this claim, or hypothesis, and it doesn't work in the summertime.

IMPORTANT TIP: I'll explain more in a moment, but realize that hot air rises, it doesn't go down. 

At the peak of your roof there's a gap in the wood sheathing.

This gap is covered with any number of different products that allow air to pass, but prohibit rain, snow and insects from entering your attic area. You can't see these vents as they are almost always covered by the roofing shingles at the peak.

CLICK HERE to get FREE & FAST BIDS from local roofers who can install turbine vents in an hour or less.

Ridge Vent Gap Video

Watch the video just below to see this gap. You'll see it about 1:40 into the video. If you want to advance to that point, just do so. Realize this gap you see is where the air comes out of the underside of the roof.

What is the Physics of Hot Air?

The mechanics of the air movement are quite simple. During warm weather, the air inside your attic heats up. Since warm air rises, it tends to float out of the highest ventilation spaces. As air leaves your attic, more air has to replace it.

The conventional wisdom is to put in soffit vents down at the bottom of the roof so the replacement air can enter here and flow up under all the roof sheathing.  This convection movement naturally draws in cooler outside air to replace the air that just exited.

Does Wind Suck Air From Attics?

Yes, wind does suck air from attics. It's called the venturi effect.

Wind that blows across the roof anytime of year also acts to vacuum air from the attic space. The wind blowing across a roof can create a partial vacuum on the leeward side of a roof. When the wind blows and at the right angle a significant amount of air can be pulled through the attic space by the vacuum created as wind blows across the peak of the roof covered with a ridge vent.

Can You Test Ridge Vents With Incense?

I loved taking physics in high school and college. There I discovered that hot air rises and cold air falls down.

For a ridge vent to work, the hot air has to rise up to the peak under the shingles, then it needs to go down several inches in altitude to get out of the ridge vent.

That seemed impossible to me. I decided to test it.

I went up into my attic on a blistering hot day around 1 pm. The sun had been beating on my roof for hours and it was probably 145 F up there.

I made sure there was no wind outdoors. It was a calm humid Cincinnati summer day.

I lit a stick of incense and held the stick about 10 inches down from the underside of my continuous ridge vent.

Smoke from the incense floated lazily up but it was NOT drawn out of the ridge vent. It just sat up near the peak of the roof.

Are Turbine Vents The Best Ventilation?

In my opinion, turbine vents are the best ventilation. They work with just the slightest breeze.

Turbine vents can vacuum vast quantities of air from an attic space on a windy day. It's the common turbine vent. Some people call them whirlybirds or whirlybirds.

These balance ventilators have a dome that spins on high-quality ball bearings. Just hot air rising out of one will make it spin.

If the wind is blowing and catches the fins, then the turbines act like giant vacuum pumps sucking hundreds of cubic feet of hot air out of an attic per minute.

The faster the wind speed, the faster the turbine rotates.

turbine vent

This is a standard turbine vent. They come in different colors. Some have external braces. This one you see is Made in the USA. CLICK THE IMAGE TO ORDER ONE OF THESE GREAT TURBINE VENTS.

CLICK HERE to get FREE & FAST BIDS from local roofers who can install turbine vents in an hour or less.

Turbine Vents are Time Tested

Turbine vents have been used for many years in both residential, commercial, agricultural and industrial buildings. The vents are very affordable, easy to install, and they pump vast amounts of air from attic spaces.

CLICK HERE to see an assortment of turbine vents that I've used on my jobs. Made in the USA!

A Small Turbine = Lots Of Air

A small 12-inch diameter turbine vent with a constant wind speed of 5 miles per hour (mph) can remove 347 cubic feet of air per minute (cfm) from the attic space.

A single 14-inch diameter turbine vent that is subjected to 15 mph winds can expel up to 1,342 cfm of air! If the winds are still, the vents still allow air to drift up and out of the attic space, although not nearly as much.

How Much Attic Air Change is Required?

Those amounts of air might not mean much to you at first blush. But consider a moderately sized home whose attic space is 36 feet deep, 50 feet long and 10 feet high at the peak. This attic space contains 18,000 cubic feet of air.

A single 12 inch diameter turbine vent could provide a complete change of air in the attic space every 52 minutes if the outside breeze was just 5 mph.

The 14 inch diameter unit could provide a complete air change in the attic every 14 minutes at 15 mph. Imagine what happens if you install two or three of these simplistic turbine vents on the back side of your roof out of view!

Can You Achieve a Leak-Proof Installation with Turbine Vents?

It's easy to install a turbine vent and have no roof leaks.

The roofer your builder hires can install a turbine vent in less than 15 minutes. The average cost of a high quality turbine vent is just $50. The best ones provide years of maintenance-free service since they have permanently sealed ball bearings.

Roof Flashing Video

Watch this video of me installing a bathroom vent fan hood. It's the EXACT SAME process for a roof turbine vent. Nothing about the install is different.

If your roof is not too steep and you have asphalt shingles, this is a DIY project. Once again, watch this video and imagine I'm installing a turbine vent. The base flashing of the turbine vent is IDENTICAL to the bath fan flashing you'll see.

CLICK HERE to get FREE & FAST BIDS from local roofers who can install turbine vents in an hour or less.

No Leaks

Many people look at the vents and think they will leak during a rainstorm. The wind that almost always accompanies a rain shower or storm actually causes the turbine to spin and blow rain drops away from the vent. The same is true for snow.

If you want the strongest turbine vent, be sure to buy one that has external braces. These are simple metal braces that extend out beyond the spinning turbine. These visible braces do a fantastic job of stabilizing the turbine when the winds are really blowing.

CLICK HERE to get FREE & FAST BIDS from local roofers who can install turbine vents in an hour or less.

Column NH039

February 8, 2017 AsktheBuilder Newsletter

This is going to be VERY FAST since I reached out yesterday.

You may have missed the exciting news about True Value Hardware.

CLICK HERE to see what I had to share.

Look over what I sent yesterday and consider doing both of us a huge favor.

Would you consider forwarding / sharing my email I sent you about the paint videos to all of your friends and relatives? Let them know about the great paint and the rebate offers.

Send them this link:

http://go.askthebuilder.com/TwoGreatPaints

Let's try to get this to go viral. Spread the news on social media if you use that.

Here's a url you can use on all your social media channels:

http://go.askthebuilder.com/TwoGreatPaints

Woodprix SPAMMERS

I wanted to warn you about a suspicious website that sells plans.

It's called woodprix.com.

I've been having a HORRIBLE time deleting their SPAM comments from many of my videos.

They open up countless false, or empty, accounts on YouTube so they can comment on videos.

It's like playing Whack-a-Mole. Each time I block the account from commenting a new name pops up.

I can tell you based on this activity I'd NEVER BUY ANYTHING from this website.

Many New Revised Columns

I've gotten way ahead on you. Sorry about that.

Consider clicking the following links and SKIM them so you know there's great information and products for you at the website.

Some of these have incredible embedded videos and NEW TIPS I've never shared before.

Good luck!

Diagonal Bracing Tips - VERY IMPORTANT!!

Duct and PVC Pipe Noise

How to Clean Exterior Siding

How to Drill Ceramic Tile

How to Insulate an Old Brick Home

Easy Peasy Tile Grout Cleaning

Blown vs Batt Insulation - Guess the Best!

Magic Toilet Bowl Cleaner & Restorer

DIY Home Inspection - Yes, But ...

How to Paint Aluminum Gutters - Special Primer!!

Ceramic Tile Wall Gap Issue

Cultured Marble - It’s Still Around

Septic Tank Garbage Disposals

Replace Paneling with Drywall - Not So Fast!

Reinforcing Steel in Concrete - GREAT VIDEOS

Pot Filler Faucet - Back Saver for Cooks!

Concrete Resurfacing - It’s a DIY Project

That's quite enough for today.

Tim Carter
Founder - www.AsktheBuilder.com

Do It Right, Not Over!

Resurfacing Concrete

Resurfacing Concrete

Here's an overlay on a small concrete slab. You can see the form boards that allow you to get the top in the same plane. There's a nice coat of cement paint that bonds the new overlay to the old concrete. (C) Copyright 2017 Tim Carter

Concrete Resurfacing TIPS

DEAR TIM: Is it possible to add an additional layer of thin concrete on top of an existing concrete surface? My concrete patio and front porch are scaling and there are patches where the top surface has deteriorated. The rest of the concrete looks fine. Can the average homeowner successfully complete such a job? Marcia D., Helena, MT

Podcast Concrete Overlay

CLICK this image and listen to the first story - Vic has a gorgeous patio on the back of his house. One part of the patio has sunken down. I've got the fix.

DEAR MARCIA: Resurfacing concrete with an overlay over existing concrete surfaces is a fantastic way to extend the life of a driveway, sidewalk, patio or porch. Believe it or not, this is a great DIY project if you just practice first on a smaller concrete slab.

Super Strong

The new surface will be durable and certainly more long lasting than the original finish if you diligently follow a few simple steps. The best part is that the material cost is minimal and you can do the work on different days to suit your schedule. I believe you can tackle this project if you take your time.

Remove Loose Material

The most important step in the process is to make sure that all loose concrete material is removed. Weak concrete can be removed by hand with a chisel and hammer or you can rent a lightweight demolition chipping hammer that blasts away material.

CLICK HERE to get FREE & FAST BIDS from local concrete contractors that do overlays.

Hammer Drill

This is a great demolition hammer tool to chip out rotten concrete. If you've got a bigger job that's going to last a few days, you should BUY one, keep it in good shape and then SELL it on Craigslist once done. This will be cheaper than renting one. CLICK THE IMAGE NOW TO BUY THIS GREAT POWER TOOL. I own one just like it.

Industrial-strength power washers can also be used. The concentrated stream of water removes weak concrete. The surface that will receive the overlay must be clean, oil and dust free.

Low Angle

Hold the wand close to the concrete at a low angle and use it much like a paint scraper trying to get the water jet spray under the thin layers of peeling concrete.

Thickness Matters

Before you purchase the materials for the job you need to decide how thick the overlay will be. If the thickness will be 3/4 inch or less you will not need any small stone aggregate. The size of stone in concrete mixes is very critical.

1/3 Rule

The maximum diameter of any stone in a concrete mix should never exceed 1/3 the thickness of the pour. Small pea gravel often has stones larger than 1/4 inch in diameter, thus it can only be used in overlays that are greater than 3/4 inch thick.

Ultra-Thin Overlay

Overlays can be as thin as 1/16th inch thick. In these instances you would use fine sand mixed with Portland cement. You can purchase these products already premixed in a bag or pail. You just need to add water.

quikrete-concrete-overlay

This is a resurfacer material that's premixed. You just follow the instructions on the label. Remember, it's just for THIN overlays. CLICK THE IMAGE NOW TO ORDER THIS PRODUCT.

If you decide to mix your own, realize that sand purchased from a traditional gravel pit or building supply yard often is available in three grades: fine, medium and coarse.

Coarse sand has very small stones in it that can be as large as 1/8 inch in diameter. This sand is perfect for one half to 3/4 inch thick overlays.

For a thin overlay, you need to get fine sand.

Form Boards

Before you mix any material you need to set up some small form boards. Use furring strips that are braced against the sides of the existing concrete work. The top of these pieces of lumber should be set at the final height of the overlay.

It's not necessary to attach them to the existing slab. Simply drive stakes next to the furring strips to pinch them against the existing concrete work.

CLICK HERE to get FREE & FAST BIDS from local concrete contractors that do overlays.

More Cement = Better Job

If your overlay will just contain sand and cement, make the mixture rich. Simply mix the two parts sand and one part cement together before you add any water. If you decide to do a thick overlay, here's the recipe I'd use:

  • 3 parts rounded gravel
  • 2 parts sand
  • 1.5 parts cement

Feel free to add another half measure of cement for an extra strong overlay. You should add enough water to the mix to make the mixture plastic. It should flow out of a wheelbarrow like pancake batter pours from a bowl.

Secret Ingredient - Lime

If you want to really make the overlay mixture sticky, then consider adding hydrated mason's lime to the overlay mixture.  Lime is one of those magic ingredients that's rapidly becoming myth. This happens in construction. Some great methods and materials transform from history, to legend to myth. 

hydrated lime

This is excellent hydrated lime. It's a fine white powder and it's going to look great on your home. CLICK THE IMAGE TO ORDER SOME RIGHT NOW.

This is the recipe you need if you decide to use lime:

  • 3 parts rounded gravel
  • 2 parts sand
  • 1.5 parts cement
  • 0.5 part hydrated lime

Cement Paint

To permanently bond the overlay to the old concrete, apply a cement paint to the old concrete. This paint is made by simply mixing Portland cement and water until it is the consistency of paint. Don't allow the cement paint dry on the existing concrete. It must be covered with the overlay mix within minutes of being applied.

Cement Paint Video

Watch the first three minutes of this video to see how easy it is to mix cement paint. You just need a bag of pure Portland cement.

Best Weather

The best weather to perform this work is when the temperatures are in the 50 - 60F range. Overcast days are ideal. You want the resurfacing to set up slowly. You apply your final finish to the overlay when the material is somewhat firm.

IMPORTANT TIP: Don't sprinkle water on the surface as you finish it. This will weaken the top skin of concrete. Tightly cover the finish slab with plastic to cure it or spray a clear curing compound on it so that the overlay cures very slowly. This will allow the concrete to attain maximum strength.

CLICK HERE to get FREE & FAST BIDS from local concrete contractors that do overlays.

Column 379

February 7, 2017 AsktheBuilder Newsletter

I've been doing this newsletter since 1997 is my best guess. I can't tell you when I sent out my first newsletter.

One of the biggest mistakes I've made in the Ask the Builder journey is not keeping a journal or diary.

That one line from the movie Field of Dreams that old Doc Graham uttered in his office comes to mind.

"At the time you don't think much of it. You know, we don't recognize the most significant moments of our lives while they're happening."

Well, I do recognize this moment right now. And it will forever be kept at my AsktheBuilder.com website so I can go back and reflect on it.

What is it? Read on, please.

True Value Hardware Paint

Two months ago I mentioned that I had been in Chicago for a brief business trip. I can now share where I was.

I had the good fortune to visit the True Value Hardware paint manufacturing plant in Cary, Illinois.

I've been on many a factory tour. They're all eye-opening.

Usually my biggest takeaway as I watch all the products marching rapidly down the assembly and packing lines is, "How is it possible THIS MUCH of this product is needed day after day after day?"

You're wondering, "Tim, big deal. What's in this for ME? Why should I care about your cool factory tour?"

There's quite possibly LOTS in it for you. Keep reading please.

The Test

I got to meet the top team members while there, John, Rich, Mark, and a few others I fail to remember because I didn't get their business cards.

We all agreed I'd tape two videos for them about two paints True Value is very excited about.

The one was their X-O Rust spray paint and the other one was their EasyCare interior paint. Both are made at the Cary, IL plant. It's a massive facility.

EasyCare Washable Paint

Above is a photo of the can of EasyCare paint I bought from one of my local True Value hardware stores. I had it sitting on my deck railing.

The following photo shows two lab test panels where the X-O Rust spray paint was put up against a top national brand you've probably used for years. The True Value X-O Rust paint is the one that's on the right in the photo.

These test panels were subjected to an official scratch test and then subjected to an ASTM 200-hour salt-fog test.

xo paint vs rustoleum salt fog

These two paints are exclusive to True Value Hardware and you can only get them at your local True Value hardware store owned by one of your neighbors.

The True Value team at the paint plant wanted to test to see how well you would react to my feelings about their paint.

They wanted me to try it myself, do an honest review of both and then see if you'd then consider using it yourself.

To encourage you to do just that, I was able to get them to create two EXCLUSIVE rebate offers. They're fantastic offers and they only run for the next three weeks.

These rebates are ONLY AVAILABLE to you as an AsktheBuilder.com follower / subscriber.

Both rebate offers expire on March 1st.

True Value paid me to take the time to test the two paints and create a video about each one. The links to them are just below.

But Wait, There's More

The real payoff for you is not the rebates. Yes, they're great, yes, you'll save money, yes, you'll get some of the best paint you've ever used.

But the big payoff is a little farther down the road.

However, this payoff all depends on you. Only you can make it happen.

If you can prove to True Value that you trust what I say, go buy a little bit of this great paint you're about to see AND then send in for the rebates, then there's a really good chance I'll be taping many more videos for you.

These videos will help show you how to save lots of time and money and demonstrate amazing new products that I love.

Both paints are already an exceptional VALUE before the rebates.

I can pretty much tell you after you get two cans of the spray paint, you'll wish True Value would have allowed you to send in the rebate for ten cans.

Watch the Videos

Please click the two links and watch the videos. Do that first, then keep reading. The links to the rebate offers are just below.

CLICK HERE to watch the EasyCare wall paint video review.

CLICK HERE to watch the XO-Rust spray paint review video.

The Rebate Offers

Now it's your turn. If you feel the paints are worthy of your investment, then please go visit your local True Value Hardware store and buy some.

CLICK HERE to find your closest True Value Hardware store.

Each rebate is good for two cans total per household. Just read the offers and you'll figure it out.

You NEED TO ACT FAST because the rebates are only good if you buy the paints by March 1st and then send in the rebate form. You'll see.

CLICK HERE for the X-O Rust spray paint rebate.

CLICK HERE for the EasyCare interior paint rebate.

Why It's So IMPORTANT

I thought years ago that some company would take an interest in me and help me get the word out to you about great products.

But it never happened. It could have been poor marketing of myself to companies.

However, the time has come.

To get the word out to you about great products, great methods, etc., a person like me needs resources and support.

We both know that video is powerful and it's the future for allowing you to discover new things FAST.

But video done RIGHT is resource intensive.

I've had the pleasure to work with a professional video recording team over the years. John Wall, now a good friend, was my producer / director / mentor.

There were others on the team and some invisible people who did all the post production. A team like this costs money. A real set to tape on costs money. I could go on and on.

The videos you see me do now are done by me with little or no help. Occasionally I can enlist my son to help, but it depends on his schedule.

If you step up and come through buying some of the amazing EasyCare and X-O Rust paint, then there's a CHANCE I'll get to once again work with a professional crew and really crank out lots of videos.

You'll get to watch them for free forever.

Help me get all that information that's in my brain into and out of a video camera.

Help me create more videos.

Help your kids, your grandkids and friends discover at least one more time-tested way to Do It Right and Not Over.

Help me make this a day we'll both never forget.

Tim Carter
Founder - www.AsktheBuilder.com

Do It Right, Not Over!

EasyCare Paint Review

EasyCare Paint Review

Watch the above video review of the EasyCare paint sold exclusively at True Value Hardware stores.

I tested EasyCare out in my own bathroom. Here's my opinion:

  • Nice and thick
  • Above-average hiding power
  • No roll splatter
  • Very low odor
  • Exceptional value

Paint Prices

When you compare indoor wall and ceiling paint, you should always consider the price. Traditionally, cheaper paints didn't perform that well.

Guess what? There are apartment building owners that WANT A CHEAP paint. They just want to freshen up walls before a new tenant moves in only to mess up the walls in a month.

This is one reason there are low-cost paints. Some look good, but don't hold up.

Great Price & Performance

EasyCare is a great paint that doesn't leave you broke. It's not the cheapest by far, but it's not priced out-of-sight like some huge national brands that I've used in my home.

I'm convinced when you go into your local True Value hardware store and see how much it is, you'll do a double take.

You can also order it NOW if you want online. CLICK HERE to check pricing. Just realize what you gain in convenience not visiting a True Value store, you'll pay for in shipping.

Also, when you go to your local store, you can get any color you want. They'll match other brand-name paint color chip names. Bring in a different brand paint chip you love, and they'll mix it in EasyCare.

EasyCare Washable Paint

Here's a washable wall paint. I tried this in my bathroom and it cleans easily. CLICK THE PHOTO NOW to have this delivered to your home.

EasyCare Price

What you'll discover when you compare the price of EasyCare is that it's substantially lower in price than many of the top name-brand paints that perform just as well as EasyCare.

Why are these other paints so expensive? My guess is they spend more on advertising and/or the stores selling the paint have to make up so much of their soft business costs if they're just selling paint.

A True Value hardware store owner has hundreds and hundreds of other products they sell that they can use to spread out the soft business costs. But realize I used to eat lunch sitting on overturned drywall buckets and I don't have a master's degree in business administration!

CLICK HERE NOW to BUY EasyCare paint and have it delivered to your door!

Reminder - February 19, 2017 AsktheBuilder Newsletter

XO Rust vs Rustoleum

xo rust spray paint

XO Rust spray paint is on top. Rustoleum is on the bottom. These are actual lab scratch tests done. The results are SHOCKING. CLICK HERE to have XO Rust paint delivered to your home in DAYS. Copyright 2018 Tim Carter

XO Rust vs Rustoleum TIPS

I'm very lucky. As a syndicated newspaper columnist and Internet publisher, I get to visit places the average person can't go.

December, 2016 was one of those times. I was able to tour the True Value Hardware paint factory in Cary, Illinois.

There I got to see how many of their paints are made including XO Rust spray paint.

Rustoleum Results

But best of all, I got to see how XO Rust Spray Paint performed against the popular heavily advertised Rustoleum paint.

You're going to see test panels in the video just below.  The panels were created using an ASTM B117 test procedure.

After you see them, something tells me you'll probably think long and hard before buying Rustoleum again.

xo rust paint

Do I need to tell you which brand is on top? Yep, XO Rust. Copyright 2018 Tim Carter

Tough Love

It's my job as a journalist to share facts with you. Sometimes it's not easy. This is one of those times.

It's not my job to beat up on a company. I've used Rustoleum for years but now after seeing the XO Rust ASTM B117 test results, I'm switching. 

Competition

The free marketplace is amazing. A company that decides to make a fantastic product deserves to do well. Those that make so-so products reap what they sow sometimes.

The way I see it is, if a company knows their product doesn't perform as well as it could, then they can do better to ensure it does. You and I as consumers end up the winners.

I know I'd never use Rustoleum again until such time as Rustoleum provides me with test panels that show how they've re-formulated their paint to outperform all others, including XO Rust.

When you see the test panels, you'll agree the Rustoleum chemists have lots of work to do.

XO Rust Spray Paint Video

Watch this video to see how I used XO Rust spray paint to restore a rusted piece of wrought-iron patio furniture. The test panels will be just after the music interlude.

Test Panels Tell The Tale

The test panels you saw in the video were real. Nothing fake there at all. The chemists and engineers that work for manufacturers use these standard tests all the time. In fact, they're the ones that sit on the committees that come up with the test procedures.

The ASTM B 117 scratch really shows up on this photo set. Look at all the peeling paint on the lower Rustoleum panel. The XO Rust panel on top looks fantastic. (C) Copyright 2017 Tim Carter

Any paint manufacturer can run the ASTM B 117 test. They often do it to see how their paint stacks up against a competitor's.

But not all manufacturers share the test data for all the obvious reasons.

These tests were run using the industry-accepted ASTM B117 Salt-Fog test. The basic steps in the test are:

  • Paint pieces of bare steel
  • Allow paint to cure
  • Scratch the center of the test panel
  • Put panels in the salt-fog chamber
  • Expose for 200 hours

CLICK HERE to see the actual ASTM B117 test requirements.


CLICK HERE to BUY XO Rust and have it delivered to your home. Remember, you can get it in quarts and gallons for bigger jobs.


Pot Filler Faucet

Pot Filler Faucet

Here's the pot filler faucet from my own kitchen. I installed it. CLICK THE IMAGE NOW TO ORDER ONE. ©2017 Tim Carter

Pot Filler Faucet TIPS

DEAR TIM: A pot filler faucet has been suggested by my kitchen designer. I have never had one before, and wonder if it is really necessary.

Is a pot filler in a kitchen a good idea? Will the contractor have any problems installing a pot filler faucet?

What are the most important things to consider should I decide to include one of these interesting faucets in my new kitchen? Penny R., Manteca, CA

DEAR PENNY: I am willing to wager that within one month of taking possession of your newly-completed kitchen you are going to call the kitchen designer and tell her how smart she is. If she has thought out the need for a pot filler faucet, there is not a doubt in my mind she has also included all sorts of other labor-saving features.

Commercial Product

Over the past few years, many of the things commonly find in commercial and institutional kitchens have found their way into residential kitchens. Look at the monster cooktops, ranges, ovens and refrigerators that now seem to be commonplace in a modern home kitchen.

Even my own kitchen has a six-burner cooktop. Pot filler faucets can be added to the list of things that are starting to become mainstream in kitchen design.

CLICK HERE to get FREE & FAST BIDS from local plumbers that can install a pot filler faucet in your kitchen.

Back Saver

I feel a pot filler faucet is an excellent idea for your kitchen. These gorgeous articulating faucets save your back. A pot filler eliminates 50 percent of the work when it comes to transporting water to and from a cooktop. Once a pot filler faucet is installed above your cooktop, you never have to carry a pot full of water to the cooktop. This saves wear and tear on your hands, wrists, arms and back.

Pot Filler Faucet VIDEO

Watch this video. You'll discover something new.

62.4 Pounds

Water is actually fairly heavy, as just one gallon weighs a little over eight and one-third pounds. A cubic foot of water weighs in at a hefty 62.4 pounds

If you measure the amount of water you might boil to make a large pot of pasta, you might be surprised to discover you carry nearly 20 pounds from the sink to the cooktop.  When you're doing lots of cooking during large holiday celebrations, the last thing you should be doing is wasting energy carrying water around your kitchen.

Easy Install

I doubt any contractor or plumber worth his salt will have any problems installing a pot filler faucet. Most pot fillers require a single one-half inch cold water supply line.

The plumber can usually install this extra pipe in 30 minutes or less in most kitchens. It may require a small amount of extra labor when remodeling an existing kitchen.

Get The Faucet

There are several very important things to consider before the plumber arrives at the job site. The location of the pipe projecting out from the wall that feeds the pot filler faucet is very critical. If this pipe is not in the correct location, the pot filler faucet might end up too low and/or it might not fold back completely to nest against the wall.

I urge you to purchase the pot filler faucet before the plumber arrives, and read the written installation instructions carefully.

CLICK HERE NOW to view many great pot filler faucets and to order one.

If you don't want to get the faucet that early in the job, most manufacturers have all of the technical notes, dimensions and instructions available for free at their websites. Download these documents, and get ready to do some math.

CLICK HERE to get FREE & FAST BIDS from local plumbers that can install a pot filler faucet in your kitchen.

Cabinet Conflict

The pot filler faucets fold back on themselves. Depending on how you want it to look when not in use, it can bang into a low-hanging wall cabinet that may be adjacent to the cooktop.

Keep in mind the height of the faucet is important so it is higher than your tallest pot you intend to fill! Almost always the faucet body will be higher than the bottom of a standard 30-inch-high wall cabinet. If you don't plan this out, you'll have all sorts of anxiety when the faucet is installed.

Critical Dimensions

You will also need several other important dimensions, such as the height of the cooktop burners above the finished height of the countertop, and the height of your tallest pot. When added together, these dimensions tell you the absolute minimum height above the finish countertop the tip of the pot filler faucet must be.

I'd always add another inch to be safe. Be sure you or the plumber takes into account the height of the finish flooring as you do all of this math.

IMPORTANT TIP:  This is a reminder. Don't underestimate the faucet fold-back issue.

Since a pot filler faucet swings out of the way when not in use, you need to make sure it will not hit against wall cabinets that might flank either side of the cooktop.

My wife and I wanted our pot filler to fold towards the wall cabinets so it would not block a decorative tile backsplash in our kitchen. It took some planning to make this happen, but it was well worth it.

Two Valves

When looking at pot filler faucets, consider ones that have two separate on and off valves. You may think this is poor design until such time as you walk away from your pot filler and it has a slow drip. The second valve acts as a safety to minimize damage that might be caused by a dripping faucet.

Keep in mind that a pot filler faucet in a standard kitchen does not have a sink underneath it to catch pesky drips of water.

Emergency Shut-Off Valve

It's also a fantastic idea to have the plumber install a separate ball valve on the supply line that feeds the pot filler faucet. If you ever have to work on the pot filler faucet or it does develop a leak, the ball valve allows you to shut off the water to the pot filler without interrupting the water supply to any other faucet or fixture in your home.

Be sure this valve is in an easy-to-get-to spot in a closet, the basement ceiling, etc. Put a tag on the faucet so everyone knows what it's for.

CLICK HERE to get FREE & FAST BIDS from local plumbers that can install a pot filler faucet in your kitchen.

Column 663

Reinforcing Steel in Concrete

Reinforcing Steel

This is 1/2-inch rebar. The rods are almost always 20-feet long. Hand and pocket knife for scale. © 2017 Tim Carter

Reinforcing Steel in Concrete TIPS

DEAR TIM: I am having a large amount of concrete work done at my house. As you know, it can be expensive. I want the concrete to last and last.

What are the secrets to long lasting concrete that does not crack, scale, or fall apart? The concrete walks and driveway in my childhood home are in very good shape and my guess is that these surfaces are nearly 40 to 50 years old!

Is it still possible to install concrete that will last longer than I will? Beverly D., Schaumburg, IL

DEAR BEVERLY: Concrete is one of the most abused building materials that I am aware of. All too often the people who work with it have absolutely no formal training with respect to how the material needs to be specified, placed, finished, and cured.

Basic Components

The components that make up standard concrete are very basic - gravel, sand, water, cement, and certain additives. But the science surrounding concrete is very, very complex. Scientists invest their entire lives studying it and producing professional papers. Perhaps the top organization that is the center of the vortex with respect to concrete science is the Portland Cement Association.

CLICK HERE to get FREE & FAST BIDS from local concrete flatwork contractors.

Cement Glue

Installing concrete that will last a lifetime is absolutely possible. The process begins by ordering concrete correctly.

Always keep in mind that the cement powder in the mixture is the glue that holds the sand and gravel together.

More Cement = Strength

You can order concrete with different amounts of Portland cement in it. The amount of cement is directly related to the overall tensile, bending or stretching, force of the cured concrete. You might order concrete in these strengths, all in pounds per square inch (PSI):

  • 2500
  • 3000
  • 3500
  • 4000
  • 5000

Some regions of the USA have you order it based on the number of bags of Portland cement there are per cubic yard of finished concrete. A typical bag of Portland cement weighs 94 pounds. A mix that produces 4,000 PSI has six bags, or 564 pounds of cement in each cubic yard of the concrete.

Guidelines

If you have small amounts of glue the concrete will be weak. Concrete suppliers and concrete trade associations have developed tables that tell you and your builder how strong concrete needs to be for different applications.

For example, concrete used in standard residential foundation footings can be lower strength than concrete used for outdoor patios, sidewalks and driveways. The average person might think the opposite is true.

Concrete Videos

Watch these videos. I've got many more at my AsktheBuilder.com YouTube channel.


Ice & Concrete

Concrete exposed to freezing weather must be a minimum of 4,000 PSI strength. Remember, this is a MINIMUM recommendation. You can always order it stronger.

Concrete exposed to the weather can absorb water. This water soaks into the surface of the concrete and then freezes. When water freezes, its volume increases by nine percent.

This crystal growth can tear apart concrete that's not strong enough to resist the forces. Adding air to the concrete helps create spaces where the ice crystals can grow into.


Want perfect concrete work? Find a pro by using my Concrete Work (Sidewalks, Driveways, Patios & Steps) Checklist. I offer a 100% Money Back Guarantee.


It Shrinks

I know you don't want to hear this but concrete is supposed to crack. As concrete hardens it begins to shrink ever so slightly. In fact, concrete shrinks 1/16th of an inch for every ten feet of length that is poured.

Crack Control

Wise concrete finishers know this and install contraction or crack control joints that encourage the concrete to crack at these locations. For the joints to work correctly they need to be a minimum depth. Always make sure that these joints are cut 1/4 or more of the thickness of the slab.

CLICK HERE to get FREE & FAST BIDS from local concrete flatwork contractors.

Steel A Must

Concrete is incredibly strong when you try to squeeze or compress it. But it has only about 10 percent of this strength if you try to stretch or bend it. This bending or stretching happens if the soil is weak under the concrete or say a heavy vehicle drives onto the concrete.

The concrete wants to bend or snap much like you'd snap a toothpick in two. The bending or stretching force is called tension.

You can prevent small hairline cracks from offsetting or widening by installing reinforcing steel.

Wire mesh and one-half inch diameter steel bars are readily available and very inexpensive. This steel needs to be in the middle of the concrete or slightly above the middle of the slab to provide the necessary reinforcement.

Super Strong

Reinforcing steel has enormous tensile strength. The average piece of rebar, or reinforcing steel rod, has a tensile strength of 40,000 pounds.

That means you need to apply 40,000 pounds of pulling or stretching force to rip apart the steel rod.

The average concrete you order from the ready-mix plant only has 4,000 pounds of tensile strength.

Beware Water

Water is needed to mix and cure concrete but if excess water is added to concrete after it leaves the central mix plant or is mixed into the surface of concrete during the pour or finishing activities, it can severely harm the concrete.

IMPORTANT TIP: Water added to already mixed concrete can dilute the amount of cement in the mixture. This added water weakens concrete just as added iced tea to your half empty glass at a restaurant dilutes the sweetness of the remaining tea.

Cure Concrete

Once the concrete is finished, it needs to be cured. The water within the concrete fuels a chemical reaction called hydration that continues to happen within the concrete for weeks and months. If this water evaporates from the concrete too rapidly, then the concrete might never achieve its design strength.

Curing Compounds

Liquid spray curing compounds can be added to the concrete as soon as the concrete finisher completes his/her final trowel stroke. You can also cover concrete with sheets of plastic. Curing is a simple step that is often neglected.

 concrete curing compound

This is a typical concrete curing compound. They're liquid you spray or roll onto stiff concrete. CLICK THE PHOTO TO SEE A VARIETY OF THESE AMAZING LIQUID PLASTIC MATERIALS. THEY DRY CLEAR.

I can assure you that concrete that is specified, mixed, placed, finished, and cured in accordance with industry accepted guidelines will last and last. The biggest problem I feel you are going to have is finding a concrete contractor that is familiar with these guidelines.

Concrete Associations

If you mention Portland Cement Association, American Concrete Institute, or World of Concrete to a contractor and his eyes glaze over, then keep looking!

CLICK HERE to get FREE & FAST BIDS from local concrete flatwork contractors.

Column 322