AsktheBuilder mp3 Radio Show March 11 2006

Each title below is a direct link to a downloadable mp3 file. Just click the title if you want to listen. Right click if you want to download into your computer to save and play at a later date.

The Copyright to all radio segments is owned by Tim Carter. I would love to know what you think of these radio segments.  Do you like them? Do they help you? Have they saved you money and/or time?  Let me know by sending me an email: [email protected]


Canadian Geese and Canada Geese Migrating in New York State

Vapor Barrier in Remodeled Bathroom

Sag in Roof

Wood Roofing Like a Ship's Deck

Orienting Laminate Flooring

Crumbling New Grout

Repairing Cracked Rookwood Tile

Truss Uplift Problems

Low Water Pressure in Faucets

faucet aerator

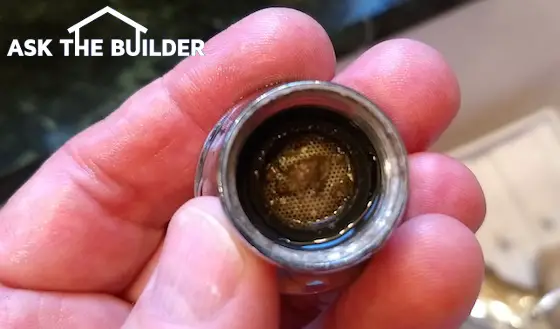
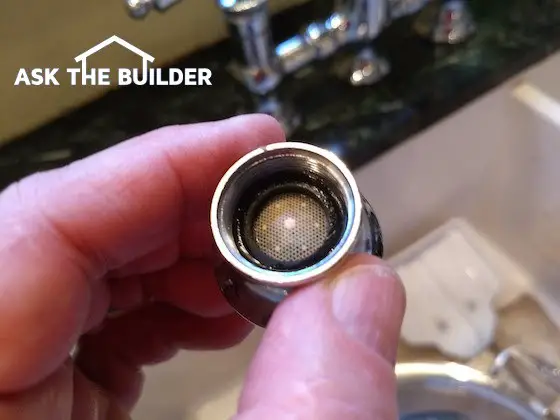
Low water pressure in faucets is almost always caused by debris and sediment in the aerator at the tip of the faucet. This gunk can be unhealthy too! Copyright 2018 Tim Carter

Low water pressure in faucets is caused by debris and sediment in either the aerator or the valve cartridge. Remove the aerator first and inspect it for sediment, goo, or hard-water deposits.

Revised February 2018 and mentioned in the February 13, 2018 Newsletter and April 29, 2010 Newsletter.

Low Water Pressure in Faucet TIPS

  • Remove aerator from tip of vanity or kitchen sink faucet
  • Check screen for sediment and pieces of sand
  • Soak in hot white vinegar to remove hard water deposits
  • Replace valve cartridge if problem persists
  • CLICK HERE to get FREE BIDS from local plumbers

DEAR TIM: Several weeks ago our whirlpool faucet water pressure and volume dropped to half while I was filling the whirlpool with water. The pressure and volume slowly returned to normal.

At the same time, our kitchen faucet pressure and volume dropped even more than 50 percent. It has not returned to normal and gets worse each day. All other faucets seem to work fine and the toilets fill quickly. What happened? What is wrong and is it expensive to correct? Patty J., Sterling, VA

Related Links

Low Pressure in Shower Heads - Easy to Solve

How To Solve Low Pressure Problems Without a Plumber

Free & Fast Bids

CLICK HERE to get FREE & FAST BIDS from local plumbers who can fix pressure problems in your home or condo.

DEAR PATTY: I've been a master plumber for decades and I'm sure I can help solve your problem. Strange residential water pressure problems are far more common today than they were years ago.

Part of the dilemma has to do with the internal design of many modern faucet valves and another part of the problem is directly related to natural resource conservation measures.

Low Water Pressure Caused By Small Clogged Pathways

Years ago many standard kitchen, bath, and shower faucets had rubber and plastic washers that contacted a circular valve seat inside the faucet. As you opened a faucet the washer would pull away from the valve seat creating a very large pathway for water to flow through.

In many faucets the pathway was so big, a small, round BB could easily pass through the faucet and into the sink or a glass of water. This older design allowed vast amounts of water to flow through a faucet and this is not a great thing when we have a growing population and limited fresh-water supplies.

faucet-aerator

This is the same aerator as in the top photo. I cleaned it in just minutes with a small brush and a toothpick. Copyright 2018 Tim Carter

What Part Inside a Faucets is to Blame For Low Pressure?

But many of today's modern faucets have washerless cartridges inside the body of the faucet. The modern cartridge replaces the older washer and valve seat design which controls water flow. The pathway through which water passes in these cartridges is much smaller than old faucets. These small passageways can get clogged with small pieces of sand or sediment.

Many of today's faucets also have an aerator at the end of the faucet. These devices are often made up of several small parts including a flow restrictor and a screen with very small holes. These also can get clogged very fast with very tiny pieces of sand or sediment.

If you take the aerator apart, you will discover extremely small holes in round disks made of plastic or metal. The water flowing from the faucet must pass through these tiny orifices.

Sediment  & Hard-Water Deposits The Culprits

I'm convinced the drop in water volume and pressure at the two faucets was caused by small pieces of sediment or some other debris that clogged a passageway within the valve cartridge and/or the tiny orifices within the aerator and or a flow restrictor. This is an extremely common problem for many homeowners.

CLICK HERE to get FREE & FAST BIDS from local plumbers to solve your faucet problem.

The sediment can form within a faucet or its parts depending upon the hardness of your water. Sediment also forms as a scale on the inside of municipal water supply pipes and the water lines inside your home.

Pieces of this sediment can break off and be transported through the water lines as water moves towards a faucet. Small pieces of sand or rocks can enter a water system, especially those of people who use a private well. These can block the pathways within your faucets.

low water pressure

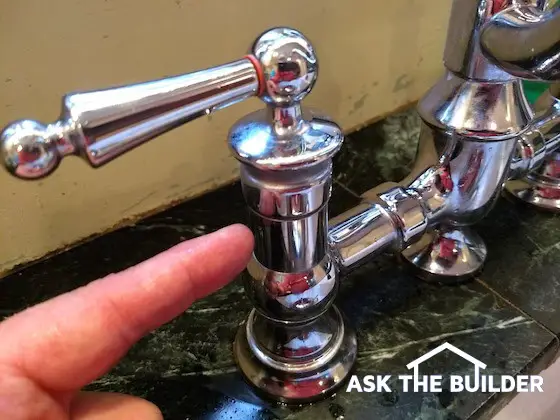
Low water pressure could be caused by a clogged cartridge. You'll find the cartridge just under this decorative faucet handle cover. Copyright 2018 Tim Carter

These low water pressure and flow problems are very common just after a water main break in a municipal water system. Sand, dirt and other debris can enter municipal piping systems when a water main fractures. Once the water main is repaired, this debris is transported through the water system and can end up in your home.

What Can Clog Water Lines or Aerators?

Small shavings of piping, soldering flux, sediment, etc. can also be carried through your own pipes when repairs are made to your plumbing system or new piping is added to your home. Problems can also happen by simply turning on or off a main or secondary water control valve within your home by a plumber who might be installing a new faucet or performing a repair.

It's important to realize when you install a new faucet, like this American Standard Saybrook one, that you remove the aerator before you turn on the water. Turning off shut-off valves and moving supply tubes around can loosen debris that will clog the new aerator.

Can a Water Main Break Clog Aerators?

If a city water main or water line inside your home is drained and then refilled with water, the incoming water can break off tremendous amounts of sediment and carry it through the water system. This happens when the surge of water rushes into the empty pipes creating a miniature tsunami of roiling water and sediment as the water fills the pipes.

CLICK HERE to get FREE & FAST BIDS from local plumbers who can fix pressure problems in your home or condo.

Is it Expensive to Fix a Faucet Aerator?

It is not expensive to correct the problem. The first thing I would look at are the aerators in any faucet that is giving you problems. Carefully remove the aerator and pay attention to how the different parts are assembled.

Look at the parts, including the screening at the tip of the aerator, to ensure all parts are free of debris and all pathways are clear. Use tiny straight pins to open up any closed holes in these parts. You may have to soak the parts in warm, white vinegar overnight to removed caked, hard-water deposits that can build up within the aerator.

If, after reassembling the aerator, the water pressure and volume are still low, this means the problem is probably in the valve cartridge. The owner's manual that came with the faucet will show you how to remove and replace this common and inexpensive part. If you do not have the manual, try visiting the manufacturer's website for a technical bulletin showing you an exploded view of the faucet and its parts.

How Do You Flush Water Lines After A Repair?

To stop sediment from ending up inside the faucets in your home, it is best to open up an outside hose faucet or two to allow water to flow through them after you have completed a plumbing repair on your own home. These faucets often have the old-fashioned rubber or plastic washers. It is also a splendid idea to remove all faucet aerators before water is turned back on after a repair.

I suggest turning on the main water valve very slowly after a home plumbing repair. Be sure to have the outdoor faucets open before you do this. This allows the pressure within the piping system to build slowly and a majority of sediment might be carried outdoors if the repair was made between the location of the hose faucet and the main water inlet to the home.

If a water main breaks near your home and you notice there is no water in your home, do the same thing. While the water is off, go turn on one or two outside hose faucets. Also remove all faucet aerators. Since the water works employees will often turn the water on without notifying each homeowner, you may not get a warning. You want any sediment to be carried to these outside hose faucets or bypass faucet aerators if at all possible.

CLICK HERE to get FREE & FAST BIDS from local plumbers who can fix pressure problems in your home or condo.

Column 612

Spiral Stairs

DEAR TIM: It appears I must use a spiral staircase to solve a tight access problem between two floor levels in a room addition I am building. This circular staircase was a shock and I need to get up to speed quickly with respect to sizing, appearance and structural issues. What do I need to know about spiral and circular staircases so I do not regret owning one? Sharon R., Manchester, NH

DEAR SHARON: The first thing you need to do is ensure you are using the correct terms. I have found that some people say one thing and mean another when talking about curved, circular or spiral staircases.

A curved staircase is one that has a gentle bend between floor levels. The total curvature or change of direction from one floor level to the next may only be 90 degrees or less. These sweeping, gentle curves make for dramatic staircases and have had many cameo appearances in movies and television shows. A curved staircase takes up a generous amount of space on the floor plan of a home.

This five-foot wide set of spiral stairs has been heavily used for nearly 20 years. The oak treads are screwed to the metal treads making for a classy, yet contemporary look. PHOTO CREDIT: Tim Carter

This five-foot wide set of spiral stairs has been heavily used for nearly 20 years. The oak treads are screwed to the metal treads making for a classy, yet contemporary look. PHOTO CREDIT: Tim Carter

Spiral and circular staircases are two different terms that generally describe the same product. These staircases resemble a corkscrew and may twist 270 degrees or even up to 360 degrees as the stairs turn a fairly tight radius. Spiral staircases that connect floor levels of 12 feet or more can sometimes have several complete 360 degree rotations in the staircase. These staircases are often used when space is at a premium and a normal straight, L-shaped or curved staircase will not work.

The least expensive spiral staircases usually have a center support column that each tread connects to. You can purchase helical spiral staircases that have no center support column. The support for the spiral comes from two stringer boards that connect to each flat tread. These stringers are twisted like taffy and each one has a different radius. These spiral staircases are extremely dramatic and seem to float in the air, defying gravity.

I have installed several different spiral staircases. One of the things I've learned is that bigger is better. The overall diameter of the staircase is critical, especially if you think there might be people going up and down the staircase at the same time. If you feel this will happen, then you better consider a spiral staircase that has an overall diameter of six feet or greater.

It is vitally important to talk with building code officials and develop an accurate plan of how the staircase will be built. The railings, tread area, baluster spacing, riser height and overhead clearance are all important considerations with respect to the building code. Do not order a spiral staircase until you have a written approval from your building department. Then be sure the staircase is built exactly as it is drawn.

Spiral staircases can be very heavy. If you plan to have one that will have a center support column, this post needs to bear on a solid floor. If you have a wood subfloor system, you will undoubtedly need to have the center support column directly over a floor joist below. If the staircase is extremely heavy, a structural engineer may have to design a special solution so the staircase does not deflect the subflooring or cause the wood floor to crack.

This spiral staircase was made in one piece by some talented welders. It took four people to carry it and lift it into place. PHOTO CREDIT: Tim Carter

This spiral staircase was made in one piece by some talented welders. It took four people to carry it and lift it into place. PHOTO CREDIT: Tim Carter

A spiral staircase that rests on a concrete slab is usually not an issue so long as the slab is on compacted fill. But the building department may require special concrete footers beneath the spiral staircase to help spread the weight over a wider area. Do not underestimate the weight of a spiral staircase, especially when four people may be going up or down at the same time.

The variety of spiral staircase styles seems endless to me. They can be ultra-modern to classic Victorian. Any number of manufacturers exist who specialize in these unique, but useful, staircases. It would be very wise for you to consult with several before making a final purchasing decision.

If you decide to have a spiral staircase built in one piece, do not forget to plan how it will be installed. Although the staircase may have a finished diameter of five or six feet, you might be able to make them fit through a smaller three-foot wide doorway. A set of spiral stairs can be brought through a doorway on its side by actually screwing the staircase into the house as you would install a screw into wood. I have seen them dropped through a hole in a roof by a crane. The point is, plan ahead for how the staircase will make it into the house.

The distance between finished floors is very critical. Be sure the distance is calculated from the upper landing to where the lowest tread ends. It is vital the floors are level and measurements are double checked. If possible, schedule a time for the manufacturer to do a field visit to ensure the spiral staircase they are building will work at your jobsite.

Column 611

AsktheBuilder mp3 Radio Show March 4 2006

Each title below is a direct link to a downloadable mp3 file. Just click the title if you want to listen. Right click if you want to download into your computer to save and play at a later date.

The Copyright to all radio segments is owned by Tim Carter. I would love to know what you think of these radio segments.  Do you like them? Do they help you? Have they saved you money and/or time?  Let me know by sending me an email: [email protected]


New Laminate Countertops and Keidel.com

Level a Kitchen Subfloor

Plaster Cracks in an Old 1915 House

Insulate New Walls in a Basement

Failed Septic System Sand Filter

Matching and Painting Exterior Stucco

Builder Framing Mistake

AsktheBuilder mp3 Radio Show Feb 25 2006

Each title below is a direct link to a downloadable mp3 file. Just click the title if you want to listen. Right click if you want to download into your computer to save and play at a later date.

The Copyright to all radio segments is owned by Tim Carter. I would love to know what you think of these radio segments. Do you like them? Do they help you? Have they saved you money and/or time? Let me know by sending me an email: [email protected]


Lead Paint Hazard in Older Homes

Broken Sliding Door Parts

Concrete Seawall for a Lake Property

Water Leak in a Main Line Between House and Road

Heat Pump Efficiency

Broken Toilet Flange

Water in Crawl Space

Framing Basement Walls

DEAR TIM: I have plans to finish my basement in the near future, and I live in an area where expansive-clay-bentonite soil is very prevalent. I understand that I need to install floating walls in the basement. Do you have any suggestions or references that I could use to see how these type of walls are installed? Art Gomez, Lubbock, TX

DEAR ART: Gosh, if your basement slab is moving up and down at a greater rate than the actual foundation walls because of the expansive clay soil, you might have all kinds of serious issues down the road. But let's not concern ourselves with that right now as there are ways to stabilize expansive clay soils so the movement is eliminated or minimized.

The trick to framing basement walls that rest on slabs in contact with expansive clay soils is to ensure there is a space between the top of the wall and any floor joist above. The space can be as little as 3/4 inch or up to 1.5 inches. At first blush, you might see a problem as the top of the wall would be flimsy and tilt or tip over when something pushes against it.

A simple L-shaped steel framing clip solves the problem. This clip is used by professional builders and rough carpenters for basement walls and roof trusses. Roof trusses in cold climates also present the same problem. During cold weather, the horizontal bottom chord of a wooden roof truss can bow upwards. If the interior walls are tight to the truss and nailed to it, the walls can lift up along with the moving truss and all sorts of havoc occurs.

The L-shaped clip is nailed tightly to the top of the wall, but it has long slits in the vertical leg that rest against a floor joist, truss or solid blocking between trusses or joists. Nails are driven through the slits into the truss, joist or blocking. This connection keeps the wall from tipping over, but allows the wall to move up and down as the slab moves.

These clips are inexpensive and you must use special structural nails that are made by the same company that manufactures the clip. Do not use roofing nails as they are not as strong as the thicker, structural nails.

Expansive clay soils can be stabilized, if you maintain a steady or constant level of moisture content within the soil. These soils shrink and swell in response to the loss and gain of water. Installing irrigation piping in the soils allows you to add water to the soil during dry spells or periods of drought. Since the soil stays wet year-round, it doesn't move.

Column EM0025

Wood Straight Staircase Length

rough staircase stairs new house

Wood Staircase Length | This is the stairs going up to the second floor in my daughter's new home. You need to do a little math to calculate how long of a space you need for stairs to fit.

Staircase Length - It's All About Distance Between Floors

DEAR TIM: I am making rough plans for a new home. What is the footprint for a normal set of stairs from the first floor to the second floor of a house? William Worthington, Pearl City, HI

DEAR WILLIAM: Unfortunately there is no exact answer. You can blame the mathematicians who claim there are an infinite amount of points on a line. But all joking aside, I can get you pretty close.

What is a Normal Staircase?

You didn't give me enough information to give you a highly accurate answer. First I am going to assume that normal to you means a straight staircase. The first thing a carpenter needs to know is the exact distance between the two finished floor levels. There can be many other variables including, but not limited to, the wall height for the first floor walls and the thickness of the actual second-floor structure.

Can You Adjust Riser Height and Stair Tread Depth?

It actually is more complicated as you can adjust the riser height of the stairs as well as the tread length. These have to fall within certain limits for the building code, but for my example below I used the most comfortable tread-riser combination known to man: 7.5-inch risers and 10-inch treads.

What Controls the Length of Stairs?

The length of stairs is controlled by the distance between the two floors the stairs connect.

The first-floor wall height can be any dimension, but common ones seem to be a standard eight-foot-high wall or perhaps a nine-foot wall. The floor joists for the second floor could be 2x8's, 2x10's, 2x12's, and even deeper floor trusses or wood I-beams.

For the sake of this column, I did two quick calculations for you. I assumed you would have a standard eight-foot-high wall and I did a calculation for a nine-foot wall system. In both examples, I calculated 2x10 floor-joist material.

What is the Total Stair Height for an 8-Foot-Wall House?

In the eight-foot wall system, you have a total rise of 108 and 5/8 inches. Here's how I arrived at that number:

  • 9 and 1/4 inch for the 2x10 floor joist
  • 3/4 inch for the second-floor subfloor thickness
  • 92 and 5/8 inches for the stud height for an interior bearing height wall
  • 4 and 1/2 inches for the top and bottom plates for the bearing wall

This number is not evenly divisible by 7.5 inches, but it is close. It will yield a staircase with 14 risers.

Why Do Stairs have One More Riser Than the Number of Treads?

All staircases have one more riser than they do treads because you have to step up to get to the first tread.

In my example above for the 8-foot-high wall home, this means you will have 13 treads for a total length of 130 inches or 10 feet 10 inches. If the stairs end at a wall, you must also figure in a minimum three-foot landing or clear floor area at the bottom of the steps. For an eight-foot wall height, figure on a 14-foot-long footprint for a straight staircase.

What is the Height for a 9-Foot Interior Wall Home?

If you have nine-foot-high walls on the first floor, your total height is 120 and 5/8 inches. Once again this is not equally divisible by 7.5, but it yields 16 risers. Multiply the 15 needed treads by 10 inches and you get 150 inches or 12 feet 6 inches. Add to this the three-foot clear area and you end up with 15 feet 6 inches for a straight staircase in a house with nine-foot-tall interior walls.

How Can you Shrink the Footprint of a Staircase?

You can minimize the footprint by installing an L-shaped stairway if needed. The absolute minimum footprint for the stairway would be a circular staircase.

Column EM0024

Home Depot and Jerry Willis Perry, Georgia

Kudos to two employees of the Warner Robins, GA Home Depot store: Scott Wancus (millwork) and Renee Smith(cashier). Both demonstrated outstanding service today - so much that I asked for their names, intending to contact Home Depot myself and indicate the superior service rendered by both.

I felt like I had stepped back fifty years to the small-town hardware store where the proprietor knew you and made certain that you were well served. If you will return the proper email chain, I will send Home Depot more detail and copy you. I think, however, that a note from you will have considerably more influence than mine. I think you have a great idea, and hope it is successful.

Thanks,

Jerry Willis

PS: I'm 65 and have seen my share of good AND bad store representatives. These two did everything right.

Column HD0005

Black and Gray Lines on Walls

DEAR TIM: I have gray and black lines on the exterior walls of my home. Some friends say the lines are caused by back drafting. Is this the real cause and what is the solution? Deborah D., Carlton, MI

DEAR DEBORAH: I think your friends watch too many movies, especially ones about the exploits of firefighters. The dark-gray lines are not back drafting at all. Back drafting happens when exhaust gases from any fuel-burning appliance are drawn backwards down a chimney. This happens when a house does not have enough combustion air entering through approved combustion air intake vents.

The lines on the walls are perfectly aligned with the exterior wall studs. The gray and black lines are created when airborne dust and dirt stick to the walls in these locations.

The dust and dirt stick to these distinct areas because of condensation. The condensation forms because the studs conduct cold through the wood and then transfer this cold to the wall surface. Water vapor in the air in your home then turns to tiny liquid droplets as the water vapor condenses on these cold strips.

You can stop the problem by lowering the humidity inside your home. Better indoor air filtration may also help the situation.

Column EM0023

Home Depot and Larry Andrews Madison, Wisconsin

I shopped Home Depot for several years for my remodeling-handyman business. Unfortunately, I have watched the level of service go from a 10 (excellent) down to 1-3 (poor) at best. The salespeople I talk with don't know anything or else give me wrong information. They don't return my phone calls and the service I receive is extremely poor. When asked, they can't ever tell you when a product is coming in.

It's really bad in Madison, Wisconsin, so I shop at Menard's, Lowe's or the lumber yards.

Column HD0004