Play Sets – Fun and Dangerous

261 backyard wooden swing set play set

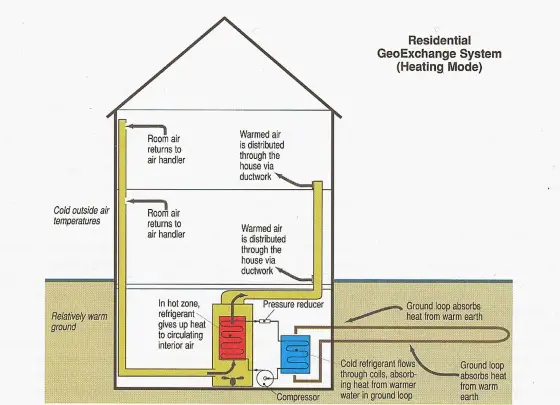
DEAR TIM: I have decided to build an outdoor activity center for my children. After looking at some of these at stores I am really discouraged at the installed price. I have a small budget of $900.00 and am quite handy. Do you think I can build a nifty play set for this kind of money. Do you have any design guidelines that might help me? Becky T., Winchester, KY

DEAR BECKY: I think you can tackle a project like this if you have some general construction knowledge. You will need an extra hand from time to time, but for the most part, it is a one person job. If you build a play set like mine, you will be able to stay $100.00 under your budget. I feel it may take you about 30 to 50 hours worth of work to build what I have in mind.

The key to this project is to think small. Kids love spaces that are in proportion to their bodies. Their arms, legs, and hands are smaller too. You need to keep this in mind as you build ladders, railings and other grab bars. Ceiling heights should not exceed 6 feet if you want them to feel comfortable in their new clubhouse/fort/vacation home.


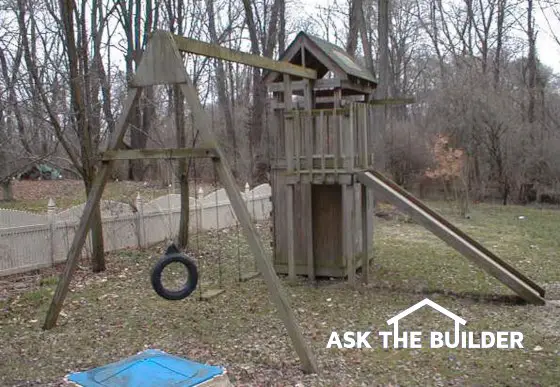
I built a combination swing set with slide, first story playhouse with a second story lookout post/fort that my kids are continuing to enjoy. The fort has a steep pitched shingle roof with a plexiglass panel skylight. A climbing rope and trapeze beam are also part of the structure. A fireman's pole is going to be added this spring.

The swing set design needs to be right if you want safety and lots of glee from your kids. The bottom of the beam that supports the swings should be a minimum of 10 feet from the ground. This provides a generous radius for each swing. Use medium grade zinc chromate coated chains that will easily support the weight of an adult. The chains need to be connected to eye bolts that pass completely through the overhead beam. Do not use lag type bolts as they can pull out over time.

My playhouse measures four feet wide by six feet long. It has an interior ceiling height of 6 feet. There is one door and three windows in the walls. Directly above the playhouse is a second story lookout post/fort. It is built just like a deck with a 36 inch high pickets spaced on 5 inch centers. You access this fort outpost by scaling a vertical ladder attached to one side of the playhouse.

The lookout post/fort is covered by a shingled roof that protects the defenders from direct sunlight, rain, or incoming mud balls. The bottom of the roof is just four feet from the lookout post floor. This allows occupants adequate protection from the elements and projectiles.

The four foot wide end of the second story closest to the swing set opens to a platform at the top of the slide. This small platform is one step down from the second story level. It is surround by a safety railing. This same platform is the access point of the future fireman's pole that will be opposite the slide.

The large 4 by 6 inch beam that supports the three swings is supported at one by the playhouse structure. The other end is supported by two angled A frame 4x4 inch posts that are sunk into the ground. If you don't desire to dig angled holes for these posts, you can prevent the bottom of the 4x4 inch posts from spreading apart by using two horizontal 2x6 members that are through bolted into the bottom of the A frame posts.

Be sure to through bolt all structural connections. Lag bolts can loosen over time and pull out as kids stress the structure with swinging, climbing, and jumping. Periodically check the nuts and bolts and tighten as necessary. Always check in the spring before play activity begins and once again in mid-summer. You will be surprised how wear and tear will loosen play set hardware.

Author's Notes: June, 1999

When this column appeared in April, 1999 in the St. Petersburg Times, it was seen by one of the nation's top experts on playground equipment. He quickly contacted me to tell me that the set I had built for my daughter had glaring safety defects - some of them that could cause a fatality. One problem that I knew of from the beginning involved the slide. It does not have a radius landing and simply dumps the rider into the dirt. This can cause cracked or bruised tail bones! I simply could not afford a safe plastic slide when I built my play set. I recommend you purchase an approved slide if you build a set.

I had developed a set of plans of my own play set that I was selling to the public. Based upon the expert's comments, I suspended the sale of the plans. Even though the plans included all sorts of caveats and disclaimers, I didn't want to be held responsible in the event a child got hurt.

The Builder Bulletin that follows this column contains several photos of my play set - green algae and all! If you decide to build one, be on notice that the play set contains all sorts of hazards!

Every time a kid gets hurt or killed on even the safest play set, the experts learn more. A new weak link in the design is exposed. If you don't want to take any chances, then I suggest you don't let your kids play. You can also wrap them head to toe in 3 or 4 layers of sheets of plastic that have sealed bubbles of air (of course they will then suffocate or die of heat stroke). The point is this: Having fun usually involves risk. If you build my play set or one like it, then be prepared to roll the dice.

Column 261

Geothermal Energy

GeoExchange System

Your heating and cooling system loves outdoor conditions where the air temperature is in the 50 - 55F range. Imagine if your HVAC system had access to these temperatures 24 / 7? It can if you bury a large plastic loop in the ground and this loop is filled with a liquid that then connects to your HVAC system!

DEAR TIM: I am looking for an environmentally friendly heating and cooling system for my home. My fuel choices are limited and it appears I have to use a heat pump to achieve my goal. Are there other options out there? I have heard that you can use heat from the soil around you house. Is this true and if so, how is it done? Veronica T., Tifton, GA

DEAR VERONICA: You are right on target. If you combine the technology of heat pumps with the nearly constant temperature of the soil under your lot, you can save money and help preserve resources for our future generations. In my opinion you are a perfect candidate for the expanding use and acceptance of geothermal heat pumps. What's more, the Environmental Protection Agency and the Department of Energy are currently promoting this technology through their Earth Comfort Program.

Geothermal heat pumps transfer heat to and from the soil under your lot. Conventional heat pumps do the exact same thing except they transfer the heat to and from outside air. If you decide that a geo-thermal system makes sense for you, there will be no unsightly and noisy outdoor equipment.

Geothermal systems are quiet and compact. Often all of the equipment fits into one metal cabinet. When operating in the heat mode, the temperature of the air floating from the ducts is around 110 F. This is much more comfortable than the "cool" air that tends to waft from traditional heat pumps.

One type of geothermal system extracts or sends heat to the soil via a buried loop of durable plastic tubing. The tubing contains a liquid similar to automobile anti-freeze. Because soil temperatures below the level that frost penetrates often are constant through the year, it is not uncommon to find soil temperatures near 55 F in most parts of the USA. This is very nearly the perfect temperature at which heat pump technology will operate at maximum efficiency.

When you need heat in your home the solution inside the closed loop delivers heat from the soil to the indoor unit. The heat is extracted from the closed loop solution. Once the loop solution gives up all of its heat, it is pumped through the loop. The chilled solution begins to get warm again as it travels back towards the house. When you need air conditioning in your home the exact same process happens, only backwards. The heat transfer is extremely efficient. During the heating season you might experience savings of 40 to 70 percent and savings of 30 to 60 percent while using your air conditioner. Dense clay soils work best for geothermal heating and cooling systems. Dry, sandy soils transfer heat poorly. Wet, sandy soils are superb!

The buried loop in the soil can be done one of two ways. Relatively shallow horizontal loops can be used on larger lots with greater surface area. Vertical tubes are drilled for small lots. If you have a medium or large pond on your property that does not freeze solid in the winter you are really in luck. You can simply place the plastic tubing loop in the bottom of the pond for maximum heat transfer possibilities. Some people adjacent to large underground water sources can tap this resource and use it to heat and cool their homes.

The geothermal mechanical equipment used to heat and cool your home costs virtually the same as conventional heat pumps. You will experience added costs when you install the underground plastic loop piping. The current average cost is about $900 per ton of cooling load. This works out to about an up-charge of $3,150 (3.5 tons of cooling) for the average home.

Because of the deregulation of the electric utility industry many utility companies are offering rebates or other incentives to homeowners who choose to use geothermal heating and cooling systems. Existing homes as well as new ones can adapt to this eco-friendly technology. New technology is being developed that allows the loop piping to be installed with minimal disturbance to existing lawns and landscaping.

Author's Notes:

November, 2003

Geothermal systems work best in moderate climates. For example, those who live in the boundary between the South and the Midwest can really extract savings from the soil. People who can place the loops in a large pond or lake can also achieve maximum benefits. The soil type, depth of winter frost penetration and assorted other factors will determine how much money a geothermal system will save for you over the long haul.

Tim Carter

Column 262

Log Homes

Log home - log cabin

DEAR TIM: My husband and I have made up our minds. We are going to have a log home built for us. We don't want this dream home to turn into a nightmare. What should we look for in a log home builder? How do you know if the logs are OK? Do log homes need to be treated with preservatives of any type? Help us make a good choice! Lisa M., Moss Bluff, FL

DEAR LISA: Congratulations on your exciting new project! There is nothing quite like a log structure. They telegraph all sorts of feelings to me. Among them are warmth, stability, strength, simplicity and practicality. A log home built in the right setting will be the envy of everyone in your community. Tens of thousands of people move into new log homes each year. You are going to be in fine company.

Log homes were not the first homes built by Europeans who settled in the USA. The first arrivals off the boats made crude huts and slept in roofed over pits. The industrious Germans and Scandinavians who settled the Delaware Bay region in 1638 built the first American log structures. Many people just like you have recognized that log homes make wonderful primary residences. You get the feel of being on vacation year round when you relax at night in a cozy log home.

When you select a builder for your log home, you want experience. Find a builder who has built log homes for at least three to five years. Make sure that he purchases his log structures from a manufacturer who is a member in good standing of one of the national or international log home associations. Get the names of three or four past customers - especially ones who have been living in their homes for at least 3 years. Visit these people and ask if they have had any problems and how they were addressed. You do not want to be a lab rat for a first or second time log home builder.

The most important aspect of log home construction is the actual design. Logs that are protected from sunlight and rain by large overhangs and porches will resist rot and decay. Logs need protection from splashing water caused by roof runoff or snow melt. Pay attention to prevailing winds. Try to orient the structure so that the most frequent wind driven rains have a hard time hitting the logs. Hold the foundation out of the ground and slope the earth rapidly away from the home. This will keep the lower logs away from moist soil.

The logs that are used for your home must be certified and graded. The different associations created standards in 1984 that allow independent third party companies to sort and classify logs into three basic categories from lowest to highest: utility grade, wall grade, and header grade.

The structural design of the home is critical as well. You must make sure that the builder and the log home manufacturer know about log shrinkage. Log homes built with green logs can shrink dramatically. They can actually drop up to four inches for every eight feet in height. Kiln dried logs are not immune to shrinkage. They can shrink about one and one half inches in eight feet. 60 percent of this shrinkage is due to moisture loss while the remainder is due to the weight of the entire house bearing down on the logs. Windows and doors can bind and floors can heave if the builder does not compensate for this movement. In extreme cases window glass can break or pop unexpectedly.

The exterior of your log home needs to be treated with a penetrating synthetic resin water repellent. Avoid using water sealants that contain natural oils like linseed, vegetable, or tung oil. These products are food sources for fungi, mildew and algae. Be sure that the sealant you choose is not a film forming product. These will peel over time and the restoration cost will quickly make you feel like you have entered the Twilight Zone!

If you are looking for a book with invaluable information on tools and materials, detailed drawings and insightful text then Building the Alaska Log Home is it! This 175 plus page book is packed full of glossy color photographs and illustrations telling you everything you need to know about building with logs. Designed for the neophyte cabin builder, this book details, step by step, construction of log buildings, complete from turning trees into logs to the first fire in the wood stove. This book will really help you decide if a log cabin is right for you.

If you are like me you have dreamed of owning a home away from home. Imagine when the weekend comes, hanging out in a hammock at your own lakefront cottage, boating, antiquing in a charming little town, or whiling away an afternoon on your ocean-view porch. If you have imagined these things you need Better Homes and Gardens Second Home. This inspiring volume will help you turn your second-home fantasy into the real thing. This book will take you through tours of gorgeous homes to see how other people have created their own great escapes. Even though this book addresses cottages, there are expert tips on everything from real estate shopping to building, remodeling, and decorating that can help you. There are hundreds of spectacular color photographs of beautiful homes and great locations.

If you are looking for a great book on energy efficient homes then Energy - Efficient Houses is the book for you. This book is a collection of past articles that appeared in Fine Homebuilding magazine. Wait until you check out the glossy color photographs! They are spectacular. They are crisp, colorful and show you details that are tough to describe with words. The articles show how designers and builders have incorporated energy - efficient considerations into their creations. You'll see energy - efficient houses built for hot climates and cold climates, wet climates and dry climates. You'll find houses built in both traditional and modern styles. You'll learn about materials and techniques that can make a major difference in how much energy it takes to make your home comfortable. In, short, you'll discover that the house of your dreams can be built as an energy - efficient home. You must buy a copy of Energy - Efficient Houses, a neat hardback book published by Taunton Press.

Companion Articles: Log Homes & Sealers, Log Home Associations

Column 263

Fiberglass Doors Not Maintenance Free

DEAR TIM: I plan to install a new front door for my home. The fiberglass doors have my attention. They seem to have the look and feel of wood doors but not some of the problems. Some sales people tell me that the doors are basically maintenance free. Is that true? Can you really stain the doors to make them look like wood? What happens if the finish fails? Tony D., Leesville, LA

DEAR TONY: You are on the right track when you choose to use a fiberglass exterior door. They have captured all of the positive qualities of different doors and packaged them into one product. Wood doors appeal to most people because they are so beautiful. Unfortunately wood combined with water usually produces warpage, rot, and premature finish failure. Anyone who owns a fiberglass boat will tell you that you can soak your new door for days and have no problems whatsoever.

stain and finish kit

This is a typical stain and finish kit. It is easy to apply the stain and clear protective coating. But be sure to follow the manufacturer's recommendation for follow-up care. Photo credit: Therma-Tru Corporation

There are few totally maintenance free building products. Vinyl siding requires periodic washings because of air borne dirt, colorized concrete pavers can fade over time, and even your new fiberglass door finish will fail. Accept the fact that maintenance will have to be done. The trick is to keep up with it so that you can avoid a painful total finish restoration job.

The stains and clear coat finishes that are supplied with just about every fiberglass door are similar to regular oil stains and clear urethanes that are used on wood doors. Sunlight, rain and exposure to the atmosphere eventually degrade clear finishes on any surface. The fiberglass door manufacturers are continuing to work hard to produce clear water based top coats that offer excellent protection. Some are now available with 5 year finish warranties.

To extend the finish on your gorgeous fiberglass door, you need to carefully follow the instructions with regard to finishing the door. As with any coating, you must apply the stain to a clean surface. Use the cleaner provided in your specific finishing kit or an approved off the shelf cleaner. Do not use any other soap or cleaner. You may leave behind chemical components that could be incompatible with the stain and/or clear finish!

Pay attention to the air temperature. Most door manufacturers want their finish products applied when the temperature is between 50 and 90 F. Work in the shade if possible or erect a temporary sun screen so that you are not working in direct sunlight. The stain and clear coat products will be easier to work with. Try to avoid working on windy days. The components may dry too quickly or you will find it is hard to maintain a wet edge.

Be careful to follow the staining instructions to the letter. Some kits require that you wait different prescribed times for light and dark colored stains. Failure to do this can result in a blotched appearance. Usually the stain must dry for several days before you apply the final thin layers of clear coat.

Some manufacturers supply you with a cool fiberglass sample that you clear coat as well. Store this inside your house in a safe area where you can find it. Use it each spring to see how the gloss of the door's clear coat has succumbed to the elements. You need to apply a fresh coat of clear coat once the door feels rough or the gloss begins to dull. If you allow the clear finish to fail, you will be stuck with a massive restoration project.

If restoration becomes necessary, you need to remove the old finish with paint and stain removers. Most manufacturers tell you in the original door installation instructions which strippers are safe. You need to be careful as some parts of the door have special primers that can be softened by more than several minutes exposure to common paint strippers. If you allow this to happen, your visions of maintenance free products will evaporate into thin air.

Column 264

A Storage Loft in a Garage

Garage Storage Loft

This loft was built in an afternoon. I can easily move around on it.

DEAR TIM: The past owners of our home built, or I should say threw together, a questionable loft on one side of the garage. Thank goodness it hangs over my husband's car and not mine. He is hoping to build a more professional and sturdy loft on my side of the garage and possibly secure or rebuild the one on his side. We just haven't found any plans or directions to guide him. Help us Obiwan the Builder! Mary P., Streamwood, IL

DEAR MARY: The previous owners must have built that loft on the dark side of the garage. It is also possible that they were construction challenged as I tend to call it. In any event, I can help you build a superb garage loft similar to the one at my own home. It does a swell job of capturing all of the flotsam and jetsam that usually drifts from one corner of my garage to the other.

Garage lofts work well because they make use of the void space that exists over the hood of most cars. Typically you can build a 5 or 6 foot deep loft on the back wall of a garage that will not interfere with the windshield of your car. If your garage ceiling height approaches 9 or 10 feet in height, you can end up with hundreds of cubic feet of excellent storage space.

I constructed my loft as I would any exterior deck project. Because my garage ceiling height is 10.5 feet and I am short (5 feet 8 inches ), I was able to construct a loft that I can actually walk beneath. This is a great feature but it is not necessary in all situations. Believe me, the extra space you gain in the loft will more than offset the few times you have to stoop to go under a lower loft.

You begin the project by determining the height of your loft. Using 3/8 or one half inch diameter lag bolts, attach a 2x6 ledger board to the rear wall of the garage. Use a lag bolt at each wall stud and make sure the bolt penetrates at least 2 inches into the wall stud. Do not over tighten as you can strip the wood and create a poor connection.

Place the loft joists at 16 inches on center and have them project out from this ledger at a 90 degree angle. Use standard joist hangers and special heavy duty joist hanger nails for this job. Do not use roofing nails with joist hangers. They are not structural nails and the loft can fall apart if the nail heads pop off or the nail shafts shear off. High quality joist hanger and framing connecting manufacturers make these joist hanger nails. 3/4 inch thick standard sub floor plywood makes a great loft floor. Metal angle irons with holes can be used to construct a nifty pipe storage rack that is suspended beneath the loft.

garage storage loft

I used angle irons with holes to make a handy pipe storage rack. It is high enough so I can just walk beneath it.

The opposite end of the floor joists are supported by metal joist hangers that are attached to a beam that runs from one front corner of the loft to the other. This beam may be two 2x6's nailed together or two 2x8's. If your loft width or the spacing between 4x4 posts is greater than 8 feet, I would definitely use the 2x8's. This beam is through bolted to 4x4 posts that run continuously from the floor to the ceiling. Through bolts are ones that have threaded ends and use a nut and a washer to complete the connection. You can purchase very nifty metal post bases that allow you to connect the 4x4 posts to the concrete floor using an expansion anchor that is drilled into the concrete floor. Place the posts so that you will not hit them with your car.

Your existing loft can probably be salvaged. The key items to look at are the type and spacing of the lag bolts used at the wall ledger, the type of nails used with the joist hangers and the size of the beam that supports the front of the loft. Be careful of lofts that are suspended from the ceilings. There is a possibility that the roof structure was not designed for these concentrated loads. That is why I prefer to use 4x4 posts that transfer the loft load to the floor.

Companion Articles: Garage Storage - Loft Material List, Floor Plan for Garage Storage Loft, Garage Storage Loft

Column 265

Precast Concrete Foundation Walls

Precast concrete foundation walls are fantastic. They can be assembled in hours, have built-in insulation and wall studs and are strong.

Precast Foundation Walls = Fast Installation

DEAR TIM: A builder in my town has suggested that I use precast concrete foundation walls for my new home. I'm a little skeptical of this new process.

He says the walls do not require concrete footers. They use compacted crushed stone. Do you feel the precast walls are a good choice? Are there any other benefits? Are they code approved? Maria B., Paris KY

Related Content

Waterproofing Foundations Equals Bone-Dry Basements

Poured Concrete vs Concrete Block Foundations - Which One is Best?

DEAR MARIA: If the precast concrete foundation walls this builder is promoting are like the ones I've seen, they may be ideal for your new home. Precast concrete technology has been around for years in the commercial construction industry and only recently has it started to supplant traditional residential foundation construction methods. There are huge advantages in building with precast foundation components.

Free & Fast Bids

CLICK HERE to get FREE & FAST BIDS from local foundation contractors.

Precast Walls Built In Controlled Conditions

Precast Foundation Walls

This is an excellent example of a precast concrete foundation wall system. This one is by Superior Walls. Note how the corners are mitered, the closed-cell insulation and interior wall studs. Copyright 2018 Tim Carter

I have a traditional poured concrete foundation in my own home, but I also was fortunate and had the absolute best foundation company in my town install it. You might not be so lucky.

Here are a few things that can go wrong with a traditional block or poured concrete foundation system. A block foundation hod carrier may mix the mortar too weak. An inexperienced block layer may add water to stiff mortar and weaken it. The block foundation may not have any inexpensive reinforcing steel in it.

Poured foundation walls can have cold seams where one batch of concrete gets hard while the next concrete truck is mired in mud in the middle of the job site. The top of a poured in place foundation wall can be out of level.

If the forms are not checked and braced before the pour, the foundation can be out of plumb and out of square. Many poured concrete walls have no vertical steel in them. Excessively cold or hot weather can harm concrete or block walls as they are built in the field. Rainfall can stop the traditional foundation construction process in its tracks.

Crushed Compacted Stone is Strong

The precast foundation systems solve all of these problems and more. The fact that they do not require a concrete footer does not surprise me.

Virtually every roadway around the word uses crushed stone as a base. Railroad tracks are laid on crushed rock as well. Both of these support far more concentrated loads than the foundation of your home.

If the soil beneath the foundation is weak, the builder can increase the depth and width of the crushed stone. Frank Lloyd Wright used this method to support foundations on some of his works of art.

CLICK HERE to get FREE & FAST BIDS from local foundation contractors.

Precast Walls Built in Factories In Ideal Conditions

The precast systems appeal to me for many reasons. They are poured in controlled conditions in a factory. They use 5,000 pounds per square inch (PSI) strength concrete. Most traditional poured walls use 3,500 PSI concrete.

The precast walls are cured in the factory so they are guaranteed to achieve the intended design strength. The precast concrete walls are poured square. Once assembled your foundation will be plumb, level and square.

Closed-Cell Foam Means Warm Basements - Save Energy

The precast systems have 1-inch, or more, foam insulation built into the walls. This minimizes cold conduction problems in northern climates. Treated lumber nailers are incorporated in the walls as well. There is no need to build an additional wood interior wall if you desire to finish your basement.

Fast Erection Usually In One Day

Perhaps the best feature of a precast system is that it can be erected in most cases in less than a day. Once the crushed gravel base is in place, a crane and experienced crew set the panels like a giant erector set.

The wall panels come in heights from 4 feet to 10 feet. Any shape or size foundation can be built. You can have window or door openings included as well. The panels are bolted together and waterproofed with special high-performance urethane caulks. If you follow the manufacturers' backfill recommendations, you will not have a drop of water enter these foundation walls.

That said, I'd absolutely install a backup traditional waterproofing compound on the exterior to ensure water never enters your basement.

Precast Foundation Walls Meet All Codes

The precast concrete foundations should sail through your building department approval process. The precast system is recognized and accepted by many of the national model building codes. If your building inspector has a problem or has not worked with them before, the manufacturer will assist you in educating the building department in your town.

Photo Credit: Superior Walls

Companion Articles: Precast Concrete Walls, Precast Concrete Foundation Companies, Precast Foundation Wall Illustrations

CLICK HERE to get FREE & FAST BIDS from local foundation contractors.

Column 266

Window Film – It Works Well

DEAR TIM: The floor to ceiling windows in my new house are beautiful, but I feel like a turkey in an oven when the sun streams through them. It seems as if my fabulous oriental rugs are fading before my eyes. Will the window film products keep me comfortable? Do they really stop fading in carpets, drapes and furniture? Are these products do-it-yourself friendly? Sally P., Chicago, IL

DEAR SALLY: Solar radiation that comes through unprotected glass can be intense. I know this from all of the years of installing new windows on sunny days. If you think you have it bad, travel to the sunny southwest or southeast USA where solar heat gain is a serious issue. The window film industry is highly advanced and there are any number of window film products that will work to control heat gain, heat loss, ultraviolet (UV) infiltration and common glare.

window films

Here is a fan pack of the many different window films that are available. There are several manufacturers that make very high-quality films. Photo by: Tim Carter

The window film industry is one of those happened-by-accident stories. Back in the 1960's a person working for a greeting card company made several thin plastic films for a 25 year anniversary card series. He held the silver colored film up to a window to view it and noticed that it blocked significant amounts of heat energy. The window film industry was born!

Different metals are actually vaporized or sputtered onto thin polyester films. These metals work to reflect heat back to its source. Different amounts and types of metal can be applied to the films to achieve different heat blocking levels of performance. There are many different types of heat blocking window films. This allows you to choose one specific to your needs.

Special factory applied adhesives that do not distort visible light are used to attach these films to perfectly clean glass. The UV protection offered by the films is accidental. The films must be treated with a special chemical so that UV radiation doesn't breakdown and discolor the films. Old fashioned or low quality adhesive tape that yellows and becomes brittle is a good example of what UV rays will do to plastic films that don't have this special ingredient.

Colored window films can also be purchased. The color is actually imparted into the polyester film or adhesive with a dye. Some window films are one single layer while other specialized films can have up to 3 layers. The multi-layered products do a great job of protecting the ultra-thin metallic coatings.

The window films will slow down but not stop the fading process. Approximately 40 percent of fade problems can be attributed to UV radiation. The remainder is actually caused by visible light, heat, and components in the air. Your fabrics and carpets will continue to fade, but the window films do a swell job of retarding this process.

Window film installation is not a do-it-yourself project. Certain window films can not be applied to certain types and sizes of windows. Large expanses of glass can be subjected to extreme thermal stress if the wrong film is applied to a window that is too big. Some films should not be applied to clear glass thicker than 3/8 inch. Windows that are in concrete, solid aluminum or steel frames can sometimes cause problems. In other words, a professional needs to look at your windows and advise you as to what film can be safely installed on your glass.

Furthermore, the glass must be cleaned professionally for the films to be invisible once installed. Bubbles, wrinkles, and other imperfections can become a reality if an untrained person begins to install these special window films.

The window films can save you money in the long run. Most of them can be professionally installed for between $5 and $10 per square foot. Because the film colors are highly consistent, you might want to do a room or side of your house at different times if cost is an issue.

Companion Articles:  Window FilmWindow FilmsWindow Film FAQ, Window Film Companies

Column 267

Strip Finishes Off Decks

DEAR TIM: I really made a mistake. I applied a wood deck sealant several years ago that seemed great at the time, but it is now peeling! How can I remove this mess? What steps do I have to take to clean my deck? Should I power wash the stripper off the wood? Is there a product that will not peel but provide protection and beauty? Pam T., Hamlet, NC

DEAR PAM: Ouch! The pain isn't over yet as you now have to strip off the offending film former from your wood deck. The good news is that once removed and a penetrating synthetic water repellent is applied, your wood deck care problems will be minimal in the future.

Deck sealant products are available in two major groupings: film forming products and penetrating finishes. Film formers tend to look fantastic when applied. Some resemble highly polished furniture finishes. These products try to grab tenaciously to the surface of the deck lumber, but the sun's ultraviolet (UV) rays and repeated expansion and contraction of the wood caused by moisture gain and loss eventually cause the films to break down and peel.

Penetrating water repellents are finishes that deliver wood protecting resins and pigments into the top layers of the wood's cellular structure. Many of these finishes surround the wood fibers at the surface and do a decent job of repelling water and sunlight for several years. The best synthetic resin water repellents can provide protection and beauty for up to 3 years on horizontal wood surfaces.

To remove your existing film former deck product, you will need to use a stripper. Some wood deck strippers contain a chemical called methylene chloride. These are super powerful and should only be used with care. You need to protect all skin surfaces and avoid breathing the product's fumes. You may find other strippers that contain caustic chemicals like sodium or ammonium hydroxide or sodium metasilicate.

cleaning wood deck

Oxygen bleach (see link below) is deep cleaning this wood deck. The bad film forming finish was previously removed with a stripper.

Never mix these products with any other solution, chemical or chlorine bleach. You must neutralize the wood surface after using caustic strippers. Do this with lots of clear water or a 50/50 mixture of vinegar and water. The least toxic deck strippers are NMP or d-Limonene based products. These are not too toxic, but can sometimes be slow acting.

Deck stripping can take time. It is best to start in a small area to see what methods and products work best. Avoid working with the products on hot, sunny, windy days. An overcast, cool day with a temperature near 75F would be my choice. You will achieve the finest results if you follow the directions on the label of the product. Do not use a pressure washer on wood decks. The powerful stream of water that comes from these professional tools can easily erode the soft light colored spring wood that lies between the dark colored summer wood grain bands in your wood.

EB015 Cleaning & Sealing Deck eBoo Cover

Once the deck is free of the film former, you should clean it with oxygen bleach. This non-toxic powdered product mixes with water and cleans decks that have been coated with penetrating finishes or even unprotected wood. The foaming oxygen ions aggressively attack mildew, algae and dirt buildup on the deck, but do not harm the wood deck, metal connectors or vegetation surrounding your deck. You simply mop on a solution of oxygen bleach, let it sit for 15 minutes, lightly scrub it with a brush, and rinse with a garden hose.

Do not use chlorine bleach (sodium hypochlorite) or any product that contains chlorine bleach to clean your deck! Chlorine bleach blasts apart the lignin or glue that holds together wood fibers, it removes the natural wood color, it kills vegetation, and it can corrode metal deck components.

If you apply a semi-transparent synthetic water repellent on your wood deck, you will be very satisfied. These products contain synthetic resins that are not food for mildew and algae. Many common and highly advertised deck sealants are made using natural oils such as animal fat, tung, vegetable and other oils that are food for mildew and algae. I have used a synthetic water repellent on my own wood front porch for the past 4 years and it looks superb. I know your deck will look the same!

Message from Tim:

Years ago while researching a column about cleaning decks, I discovered the wonders of Oxygen Bleach. It is perhaps the 'greenest' cleaner I know of as it uses oxygen ions to break apart stains, dirt and odor molecules. There are no harsh chemicals, and it works on just about anything that is water washable.

I decided to create my own special blend using ingredients made in the USA. In fact, the raw materials in the active ingredient are food-grade quality registered with the FDA. I call my product Stain Solver. I urge you to use it to help clean your deck. You will be amazed at the results!

Companion Articles:  Wood Deck StrippersOxygen Bleach & Synthetic Water Repellents

Column 268

Metal Connectors Minimize Wind / Storm Damage

metal deck connector

The large metal connector is through bolted to the walls studs. the connector itself is connected to the foundation with the long black anchor bolt. Imagine how well these connectors hold instead of 16d nails!

DEAR TIM: I live in an area that gets just about every type of wind storm. Tornadoes have touched down very close to my existing home and I have been through several hurricanes. I am getting ready to build a new home. What can I do to hold it together as long as possible during violent windstorms? I can't build a basement. Is there a way to construct an internal shelter within my home that I can use in the event of a killer storm? Tracy G., Mobile, AL

DEAR TRACY: Anyone who watches the evening news knows that tornadoes, hurricanes and even severe thunderstorms can create winds that blast apart homes and families. Virtually every part of the United States can experience a weather event that can cause significant damage to a typical residential home. No one is really immune from a wind related personal or property loss.

Believe it or not, a majority of tornadoes produce wind speeds of 112 miles per hour or less. Residential homes that are constructed in strict accordance to most model building codes can withstand winds of this nature. The trouble is, it is virtually impossible for most building inspectors to insure that each and every nail, screw, anchor bolt, etc. has been put in exactly to code specifications.

The trick to making a wood framed structure extremely wind resistant is to create a continuous connection path from the roof rafters or trusses all the way down to the foundation. Many carpenters make an attempt to do this by using 16 penny hand driven nails fastened into all of the wooden framing components. If you want these nails to hold down the house in windy weather, they have to be driven in strict accordance with the building code. In many instances the wrong nails are used or the spacing between nails is too great.

Perhaps the best nails to use when building a home are ones driven by a pneumatic nail gun. These nails are coated with a special lubricating glue that melts as the nail glides into the wood. The glue hardens within seconds and produces greater holding power than an equal sized and shaped hand driven nail.

One of the best ways to attach walls, floors and roof structures directly to the house's foundation is to use readily available, inexpensive metal connecting plates and anchors along with approved structural nails. In a typical house, only the treated sill plate is firmly bolted to the foundation. There are numerous easy-to-install metal connectors that allow you to quickly bolt floors and walls to the foundation and then connect every other major wall, floor, or roof section to the components below. This provides a continuous metal connection path from the roof down to the foundation.

The cost for the nifty metal connectors in a typical house is less than $200. The labor to install them should average $300 or less. Although they may not keep your house together, if it suffers a direct hit from a very powerful wind storm, they may keep the roof on and the exterior walls from blasting apart long enough for you to seek shelter in a safe place.

Recent findings at Texas Tech University have shown that people who live in houses lacking basements can build interior storm shelters within their homes. The trick is to create a normal looking storage closet that consists of steel reinforced solid masonry walls, a poured-in-place concrete roof, vents to compensate for air pressure changes, and a well built pocket or sliding door that is made with several sheets of 3/4 inch plywood and covered with 14 gauge metal. This above ground shelter will resist wind blown debris, air borne missiles, etc. that can cause severe injury and/or death in a violent storm.

The size of an interior shelter depends upon how many people you want to place in it. It doesn't have to be extremely large, as most violent wind storms can last anywhere from several minutes to several hours in the case of a large hurricane. The point is you just need to be able to sit down and relax as much as possible during the storm. If you decide to build one, make sure it is stocked with several flashlights, a battery operated radio, and perhaps some bottled water and a first aid kit.

Companion Articles:   Interior Hurricane - Tornado Shelter, Fight Hurricane & Tornado Storms with Metal Connectors, Underground Tornado Storm Shelter, Tornado & High Wind Damage

Column 269

Bridges – Building in Your Backyard

bridge
DEAR TIM: There is a small 20 inch deep gully in my yard. This little valley prevents me from easily getting my riding mower to the other side of my lawn. Do you have any ideas on how to build a little bridge to span this ditch? What can I do to make sure it is not too bouncy? What is the best lumber to use? Doug R., Milwaukee, WI

DEAR DOUG: Building a miniature bridge is a really cool project. You don't have to be a structural engineer to design one since there is a very good chance you have existing bridges in your home. Anyone who has a basement, crawl space or a second story home walks across a bridge each time they pass through a room. I suggest that you study the underside of your existing floors before you build your outdoor bridge.

When you look at your existing floors you will see floor joists that span from one wall to another. In some instances they may rest upon a beam. The joists will probably be 16 inches on center. If you want a really stiff bridge, consider spacing the joists 12 inches on center. The depth or height of the joist is directly related to the length of the span. The greater the span (distance between supporting walls), the deeper a floor joist needs to be. You will incorporate these same principals in your simple bridge.

If the span of your bridge is exceptionally long, you can reduce bounce by installing vertical 4x4 posts under each bridge joist at the center of the span. These posts need to rest on 6 inch diameter concrete piers that extend to the frost line.

Because the bridge will be exposed to the weather, I recommend that you use treated lumber for the bridge joists. The decking for your bridge can be treated lumber or you can choose to use construction heart redwood or cedar decking for a more finished look.

The width of your bridge is important. Measure the width of your riding lawn mower with the most cumbersome accessories attached to it. You want to be sure the bridge is wide enough to accommodate your machinery without clearance concerns. A bridge 60 inches wide should work fine in most instances. A 4x4 curb should be incorporated at each edge of the bridge. Keep this in mind as it will reduce the overall operating width of the bridge by approximately 7 inches.

I would build the bridge just like a traditional wood subfloor. This means that a rim joist or band board is nailed to the ends of the bridge joists. This framing member keeps the joists from falling over like a house of cards when you walk or ride over it. It also allows you to build the frame for the bridge in the yard and drop it into position with the help of several friends.

The ends of the bridge joist should rest upon steel reinforced poured concrete grade beams. These grade beams need to be 6 inches wide, 8 inches thick, and as long as the bridge is wide. I like to dig two post holes under each beam that extend down to the frost line. The concrete flows into the holes at the same time as you pour the beams. These monolithic bridge foundation supports will prevent your bridge from shifting or twisting as you drive across it.

Before you pour your grade beam, be sure that you keep in mind the total height of your bridge joists and the decking. To permit a smooth transition from the grass to the bridge deck, the bridge joists ends and the grade beam must be below grade at each end of the bridge. Double check your measurements before you pour the concrete grade beam!

The decking for the bridge can be applied two ways. The simple way is to apply it perpendicular to the run of the bridge joists. If you do build the bridge 60 inches wide, you will be able to get 3 pieces of decking from each 16 foot length that you order. For a more decorative look, consider running the decking at a 45 degree angle to the bridge joists. This method will create more waste, but the diagonal look is stunning.

flat bridge

Companion Articles:  Bridge Building Tips, Bridge Joist Sizing, Bridge Planning

Column 270