Asphalt Driveways

asphalt driveway

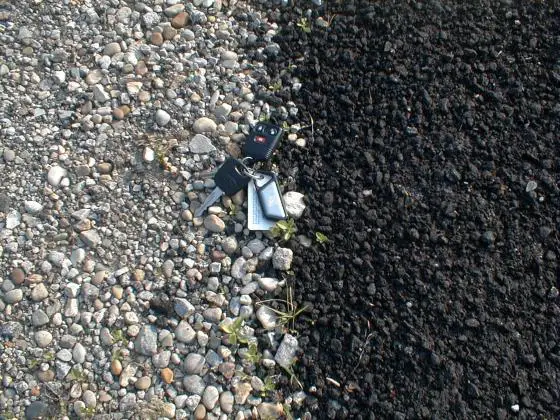
How to Install an Asphalt Driveway | That's fresh asphalt or blacktop on the right. Ford F-250 truck key and fob for scale.

How to Install an Asphalt Driveway - The Gravel Base is Most Important

DEAR TIM: We're building a new home and we are installing a blacktop driveway. There is conflicting information in the bids. One contractor wants to install a three-inch-thick blacktop surface on the hill leading up to the house. Another contractor says a two-inch surface is sufficient. My husband and I want a strong driveway that will last for many years. Which bid is better? Anna H., Danville, PA

DEAR ANNA: If you want a long-lasting blacktop driveway, don't concentrate too much on the thickness of the actual blacktop. The blacktop in and of itself is not the source of strength. The rich-looking smooth black surface that you walk and drive on is merely a top dressing that hides the muscle just below the surface. You should talk to both contractors and ask them questions about the type and thickness of the gravel base that will be installed under the blacktop.

What is Blacktop?

Blacktop is simply a form of concrete. It's typically a mixture of sand, stones of different size, and liquid asphalt. The sticky asphalt binds the sand and stone together and acts as a superior waterproofing material. This is why asphalt drives and roadways can withstand years of abuse from Mother Nature and still perform. But the asphalt binder has one slight drawback. Although it seems to be a solid material, it actually can flow or move when pressure is applied to it.

What's the best blacktop crack filler? Easy - epoxy. CLICK or TAP HERE to see the one I use.

Is Blacktop a Flexible Pavement?

This flexibility is often an advantage as blacktop can conform to subtle changes in the subsoil beneath the pavement that might otherwise cause cracks in a traditional concrete or brick driveway. But even blacktop can crack. Strong blacktop driveways are typically built using crushed angular gravel as a base.

How Thick Should the Gravel Base Be?

This gravel needs to be a minimum of six inches thick for light vehicle traffic such as cars and pickup trucks. If you expect larger commercial trucks to roll up and down your driveway, I would install a gravel base that is a minimum of eight inches thick.

What is the Best Gravel?

The best gravel for blacktop driveways is crushed stone. This is a mixture of irregular angular pieces of rock that may range in size from about 1.5 inches down to sand-sized particles. You want a blend of stones across this range. Roadways that will have heavy vehicles on them often have a 1-foot-thick layer of larger angular stones the size of softballs that lies beneath the crushed stone described above.

Never use rounded gravel as a base under blacktop or asphalt driveways. The rounded stone will move when pressure is applied to it much like marbles that would move about in your pockets.

Get FREE BIDS from local blacktop contractors in your city or town here.

 How Strong Should the Soil Be?

The soil beneath the gravel must also be of good quality. Once the driveway is excavated, the soil should be compacted before the gravel base is installed. If the driveway is located in an area of wet or marshy soil, you should consider installing a special Geotextile fabric over the soil before the gravel is installed. This fabric stops soil and silt particles from fouling the gravel. If silt and soil get into the gravel, it acts as a lubricant. The gravel loses considerable strength when this occurs.

How Should the Gravel Base Be Installed?

Install the crushed gravel in layers. The first layer should be three to four inches thick. It should be graded fairly smooth and then compacted with a heavy rolling machine. Once completed, install the second lift of gravel. The width of the gravel base is very important. It should extend six inches beyond the blacktop wherever possible. This extended gravel base prevents the edges of blacktop drives from cracking off when a car or truck tire kisses up against the edge of the pavement.

What Size Should the Stones Be in the Blacktop?

The size of the stones in the actual blacktop is important. Larger stones, up to 3/4-inch in the longest dimension, will make for a very strong surface. Once again, the blacktop or asphalt paving should have a blend of stones that range from large to sand-size. My own blacktop drive that's 20-year-old has these larger stones. Look:

blacktop drive electrical outlet

This blacktop is twenty years old and in very good condition. It’s got larger pieces of stone about the size of large grapes. That’s one reason it’s doing so well. (C) Copyright 2021 Tim Carter

Will Thicker Blacktop Last Longer?

Adding extra blacktop thickness will not significantly extend the life of the surface. The two-inch-thick layer of blacktop should be fine as long as the gravel base is installed correctly. Keep in mind that blacktop is available in many different blends and mixtures. Each mixture has its own recipe of the sand, gravel, and liquid asphalt components. Talk with each contractor and ask which blend is best for your area. If you get conflicting answers, then you better get a third opinion.

Should I Install Conduits Under the Blacktop?

Install several plastic conduits under the driveway in key locations. If any utility trenches cross the driveway, be sure they're filled with gravel or structural fill material. A soil-filled trench that has not been compacted can lead to a catastrophic driveway failure in future years.

Plan ahead for invisible dog fences and light posts. Be sure to put in any number of 1.5-inch or 2-inch blank PVC conduits under the driveway. These empty pipes will come in handy down the road when you find the need to install a cable or wire under the driveway. Finally, do not seal your new blacktop driveway for at least one year. The driveway needs to cure for months before it begins to develop a hard skin or surface.

Cost Overruns

bathroom sink

This seemingly innocent pedestal sink faucet could easily create a $900 cost-overrun headache.

DEAR TIM: I have had several new homes built for me. I was determined to stay within budget on my most recent project. I had a solid contract, an extensive cost breakdown provided by the builder, a decent set of blueprints and specifications and I still was surprised with a bill for nearly $57,000.00 worth of cost overruns. Please look at my documents and tell me what went wrong. Jim D., Cincinnati, OH

DEAR JIM: The autopsy report is in. There were multiple causes for the cost overruns. The blame can be traced to mistakes on your part and some on the part of the builder. Unfortunately, I have also discovered some evidence that may lead to an indictment on the part of the builder. It appears that there are several items that are being presented to you as overruns that are simply bidding shortfalls made by the builder. These mistakes should be paid for by the builder or deducted from his final payment.

Your contract appears to be very good. It is a fixed sum contract that locks in the total cost of the home. The wording of the contract clearly states that the builder will construct the home using the plans and specifications. The contract references the itemized cost breakdown sheet showing each phase of construction. Indeed there is a line item cost for many aspects of the job. The contract further states that the builder will receive a profit and overhead sum of 17 percent in addition to these specific costs. I have no trouble with this method of compensation.

The first problem that I see is that the plans and specifications are missing a considerable amount of detail. For example, I can see exterior trim boards and other woodwork, but the plans do not indicate the type of material nor its size. I see countertops drawn but no material type is mentioned. I see bathrooms but wonder if you are going to get shower doors or curtains, towel bars, toilet paper holders, etc. The plans show that you will have a brick exterior but there is no mention of the level of quality of the actual brick material.


How would you like me to build your new home? It's probably impossible for me to fit your job into my schedule, but I will gladly share hundreds of my tricks and building secrets with you and your builder. Check out my New House Specifications.


I see a line item in the cost breakdown for brick, but it is a big number. There is no separate breakdown for brick labor, sand, mortar, structural steel lintels, flashings, etc. This lack of detail allows a dishonest builder to play the classic shell game. When asked, the builder lowers the actual budgeted cost of an item by artificially puffing the costs of one of the other items within the group.

To avoid this problem area, the cost breakdown for a new home must have a line item for labor and many of the different materials for each phase of the project. This method allows you to see if material costs have been exceeded and if so, whose fault it is. For example, there were several areas where you blew the budget because you selected more expensive fixtures. Your lighting fixtures, plumbing faucets and kitchen cabinets all exceeded the allowance as specified by the builder.

This particular nightmare can be avoided by simply eliminating allowances. Clever builders can insert low allowances to make their overall bid number low. Once you sign the contract and start construction, this flaw becomes painfully apparent. In other words, preselect ALL fixtures and items and list them in the written specifications before the job is bid by the different contractors. If your bids come in too high, you can lower costs by choosing a less expensive fixture. The builder is trying to take advantage of you in several areas. He is trying to charge you $15,000.00 more for a retaining wall that is clearly shown on the site plan. You have not requested any changes to the wall and it appears to be a straightforward task. Based upon the line item for the wall in the cost breakdown, I feel the builder simply made a mistake and underbid this aspect of the job. He did the same thing with all of the exterior concrete work. I did a quick calculation and determined that you can barely buy all of the concrete for the amount he has provided for in the cost breakdown.

Finally, I see that you requested several changes during construction but that there are no signed change orders. That was a major mistake on your part. Never allow a change to be made unless you are presented with a written change order that both you and the builder sign. The change order should clearly show any additional charge or credit depending upon the nature of the change.

Special Gray Primer

paint primer

DEAR TIM: I have had all sorts of problems in the past with finished wall paint colors not being what they look like on the color chip. The end result is that I might have to paint the wall surfaces two and possibly three times even though the paint manufacturer claims one coat coverage. What am I doing wrong? Is there a way to get true one coat coverage and a perfect color match at the same time? Carol K., Pepper Pike, OH

DEAR CAROL: You are by no means alone. Your wall painting troubles are experienced by many homeowners and rookie painters alike. The causes of the poor coverage and color rendition problems can be traced to many things, not the least of which might be simple operator error. In other words, it is possible that you are putting too little paint on the wall. But residential paint technology has recently undergone a huge change. Color rendition and coverage problems are being overcome in a most unusual fashion.

Although it may not seem so to the average person, paint is a very complex product. But if I had to define paint in two words, I would simply say that it is colored glue. It can be formulated in many different ways so as to coat many different things. The pigments that produce color in paint are also very complex. The characteristics of both the paint and the pigments need to be finely tuned to produce different qualities such as hiding power, washability, fade resistance, etc. To further complicate the issue the paint needs to be easy to apply, meet Federal EPA guidelines, have exceptional durability, clean up quickly, etc.

Painting tools and application techniques further complicate the issue. You may have a superior paint product but it may not look good once applied if you use poor quality brushes, roller covers and spray equipment. Add to this the human factor. I have seen people paint walls in the most unusual ways. Typically they apply the paint too thin. Keep in mind that the volume of paint that you apply to the wall is not the finished volume once dry. The water or petroleum based solvents that give paint its liquid characteristic when wet evaporate into the atmosphere as paint dries leaving a much thinner coating than what you look at while applying it.

Up until recently paint manufacturers and store clerks have advocated using a white primer/sealer paint to cover new drywall, wood and plaster in homes. It was not uncommon for a store clerk to recommend tinting the primer a similar color as the finished wall paint. But even still paint coverage problems persisted. The use of a primer/sealer on both new and existing wall and ceiling surfaces is a very good thing. These often overlooked paints solve porosity problems where light and dark grains in wood or differences in drywall paper and joint compound soak up paint at different rates. The heavy pigment content of the primer/sealers also help to create a uniform finished texture. But even after using these products people still had trouble getting one coat coverage that yielded perfect color rendition as seen on the paint color chips.

Some very clever paint researchers discovered that tinting the white primer/sealers to various shades of gray solved the one coat color issue. A few colors worked fine over the white primers but a majority of the color palette that you see in the huge displays and color chip fans require a gray tinted primer to reproduce the exact color you see on a particular color chip. The paint manufacturers and retailers in certain stores know exactly what shade of gray to tint the primer/sealers so that the colored finish coat paint covers in one coat.

This technology of using a gray primer instead of a colored one is based in black and white photography. Have you ever watched an old movie? The actors and scenery were absolutely in vibrant color, but they only had black and white film. So what you and I see are different shades of gray except when a true black or white image was captured on camera. Each color, no matter if it's a shade of blue, yellow, green, red, brown, purple, etc. has a corresponding shade of gray! You can prove this by taking a photo with your digital camera in the black and white mode. Use the correct shade of gray that corresponds with your color, and magic happens.

There is a huge advantage in painting with this new system. Without the gray primer/sealer you may get the good coverage and true color rendition. But by not using a primer/sealer you very likely will see shadows on a wall or texture differences that detract from the beauty of the painted surface. Using a tinted paint with the appropriate gray primer will insure that the two coats will result in a perfect paint job. Visit your local paint store or a retail store that sells paint. If the store manager or head clerk is clueless about the special complimentary gray primer/sealers, you better walk out the door and find the right paint retailer!

Hanging Hammocks

hammock

Yes, that is me filling my backyard with lots of ZZZzzzzzz's. The sun somehow makes my blonde hair look gray in this photo.

DEAR TIM: I just received a splendid hammock as a gift and now I need to hang it. What is the best way to hang the hammock? What is the minimum and maximum distance trees can be apart from one another to make a hammock work? If my trees won't work, what are my alternatives? Allen W., Cheyboygan, MI

DEAR ALLEN: Just thinking about hammocks makes me sleepy. When the soft cotton ropes of my hammock gently cradle me on a summer afternoon, my troubles fade away as fast as a shooting star steaks across the night sky. I can't think of a more comfortable way to relax than in a hammock that is suspended properly and securely.

I still have the first hammock my wife and I purchased over 15 years ago at a small shop in Pawleys Island, South Carolina. While at the shop, I knew I had a great location to hang it, but I was unsure if it would work. Hammocks come in several sizes and the size you have controls, to a large degree, how it is hung. Since my hammock was a deluxe or two person size, I needed 15-feet of space between the two trees where I wanted to hang it. Believe it or not, when I arrived back home, the spacing was 14 feet 11 inches.

If you have a smaller one-person hammock, you probably can get away with a distance of 12-feet between trees. The way to check is to simply lay the hammock on a clean flat surface. Unfold the hammock on the ground as it will be suspended in the air. Measure the distance end to end from the circular suspension rings where the cotton cords are strung. The spacing between the trees should be about one foot more than the total length of the hammock. Once hung, the hammock develops a slight sag. This works to your advantage as you need some space for the hardware that is used to connect the hammock to the trees, wood posts or metal frame.

I prefer to use one half inch diameter eye bolts as the primary connector. Do not confuse these with eye screws. An eye bolt has a circular closed end loop at its end and fine machine threads that accept a standard bolt and washer. You drill a hole completely through the tree five to six feet above the ground. The threaded shaft of the eye bolt should be two inches longer than the diameter of the tree where you drilled the hole. Insert the eye bolt through the tree so that you can attach a washer and a nut to secure the bolt to the tree. If you have trees that are spaced farther apart than 15 feet or so, the eye bolts need to placed higher off the ground to account for the inevitable sag that will result when you suspend and lay in the hammock.

I feel it is very dangerous to use an eye screw. This hardware item has coarse threads and no nut or washer. An eye screw fastens into the tree as you would turn any screw into a piece of wood. Eye screws can strip and can pull out of the tree with little or no notice. If your hammock suddenly crashes to the ground with you or someone else in it, serious permanent back and neck injuries are a distinct possibility.

The hammock is attached to the eye bolt with a connecting-link chain connector. This connector allows you to safely connect the rounded loop of the hammock to the eye bolt. If the trees are too far apart or you want the hammock closer to the ground, you simply purchase some 3/16 or 1/4 inch sized chain and use it in between the eye bolt and the hammock loop. If you use chain, you will need two chain link connectors at each end of the hammock. Wooden six inch by six inch posts can substitute for trees if your trees are too far apart or too close together. These posts need to be placed in the ground and surrounded by at least eight inches of concrete. The post should extend a minimum of 24 inches into the ground. Be sure that the bottom of the hole is wider than the top diameter. This bell-shaped design prevents frost heaving from pushing your pole out of the ground over time if you live in a colder climate.

If you want to avoid the hassle of trees, hardware, posts and concrete simply purchase a hammock stand. These are made from tubular steel and fit most common hammocks. They assemble in less than one hour and are very sturdy. You can set them up anywhere and move them about in your yard as the sun creates new areas of shade during the day.

Column 418

Deck Support Columns

deck support column

Deck Support Column - This is how NOT to support a deck. There's no metal post-to-beam connector. Copyright 2018 Tim Carter

"Tall decks typically need larger diameter support columns than decks that are closer to the ground."

Deck Support Column Checklist

  • Wood is good but steel is supreme
  • 6x6 wood posts are best
  • 4x4 steel columns last forever
  • Local welders can make steel columns fast

Related Links

Wood Deck Post? Always Notch and Go Big - Secret Notching Info Here - Do NOT SHARE

Pro Deck Railing Connection Tips

Deck Support Column - Don't Kick Steel to the Curb

DEAR TIM: It's time for me to build a fairly tall deck. I've seen wood support posts twist and crack. I don't want that problem. What are my alternatives? I am looking for something that's sleek, simple and easy to install. Mark O., Scottsdale, AZ

What Causes Wood Posts to Twist and Crack?

DEAR MARK: The hot and dry climate you live in can quickly cause wood to shrink. This shrinkage creates all sorts of internal stresses within the wood that lead to twisting and cracking. Some wood species are much more resistant to these defects, but I doubt a lumber retailer would ever give you a bulletproof guarantee. I think you should consider another building material - steel.

treated lumber post

This is a treated lumber post that's been well cared for. Note the rot and the cracks. I know the homeowner. It's been regularly sealed yet it still rotted out! Copyright 2017 Tim Carter

Does a Steel Deck Support Column Make Sense?

steel column for a deck

This 4 x 4 steel column is about 9 feet long. Welded to the top of it is a U-shaped saddle that is just the right width to handle two 2 x 12s. The steel fabricator punched the 5/8 inch diameter holes in the saddle so it was easy to drill the beams and insert the through bolts to secure the wood beam to the steel.

There are several reasons steel makes sense in your situation. Tall decks typically need larger diameter support columns than decks that are closer to the ground. If you were to build with wood, a structural engineer might specify six inch by six inch or larger wood support columns instead of traditional four by four columns.

Switch to steel and I am quite confident a four by four steel column will perform as well or better than a six by six wood column of the same length. A structural engineer can quickly confirm this for you.

Free & Fast Bids

CLICK HERE to get FREE & FAST BIDS from local welders who can make the steel posts.

Do Steel Columns Look Sleek?

The smooth and uniform appearance of painted steel also makes it a good choice for you since you desire that sleek look. Steel keeps its shape and requires very little maintenance if you paint it correctly from the start.

EB015 Cleaning & Sealing Deck eBoo Cover

Have You Installed a Steel Deck Support Column?

I've installed steel support columns on more than one deck. The material is easy to work with and connecting the steel to the underside of the deck is a simple matter.

Making the connections to the concrete piers buried in the ground is also an easy task. Perhaps the hardest thing is taking accurate measurements to determine the height of the steel columns. A local welder can build the columns for you and should be able to help you confirm the accuracy of your dimensions.

How Do the Columns Connect to the Beam?

The steel columns almost always connect to a beam under the deck. You need to determine the thickness and height of this beam.

These dimensions dictate the width and height of the metal channel that will be welded to the top of the steel post. This U shaped channel cradles the beam. The welder will punch or drill 9/16 or 5/8 inch diameter holes in the U-shaped cradle. Once the beam is in place in the cradle, you drill through these holes and insert one half inch bolt and nut to permanently attach the wood beam to the steel column.

two level deck

Believe it or not, this is one 21-foot-long steel column! It passes through the first deck on its way to support the second triangular deck off the master bedroom. It was very cool to assemble this deck I must tell you.

The steel column is connected to the concrete piers with one half inch diameter stud anchor bolt. The welder should install a 12-inch square 1/4 inch thick steel plate to the bottom of the steel column.

A similar 9/16 inch diameter hole should be punched near each corner of this plate. Once the steel column is perfectly plumb and resting on the center of the concrete pier, you drill through the holes in the steel plate into the concrete below. Hammer in the stud anchors and tighten the nuts. Be sure the nuts and washers are installed on the stud anchors before you strike them with a hammer. The hammer blows can damage the uppermost threads of the anchor preventing you from installing the nuts.

CLICK HERE to get FREE & FAST BIDS from local welders who can make the steel posts.

Should the Steel Column Be Pre-Painted?

The steel column assembly should be completely primed and painted before it is installed. Painting it this way minimizes any future rust problems. I prefer to use special rust inhibitive primers that are formulated to bond well to bare steel. There is a very good chance your welder will have some high-quality primer for this purpose. Many welding shops deliver primed fabricated steel to job sites. It may make sense for you to have the welder prime the steel and you apply the finish coat.

Should a Drain Hole Be in the Base Plate?

Be sure the welder produces good solid welds at the top and bottom of the column. Ask if he can punch a drain hole in the middle of the bottom steel plate. This hole allows any water that may one day find its way into the column a place to drain from the column. Water that gets trapped inside the column can cause the column to prematurely rust from the inside out.

CLICK HERE to get FREE & FAST BIDS from local welders who can make the steel posts.

Adhesive Remover

flooring adhesive

The adhesive under this cork flooring is thin and impossible to scrape up without some type of liquid adhesive remover.

DEAR TIM: I recently removed some old plastic wall tile and floor tiles. There is a rock hard layer of adhesive that needs to come off before I can install new flooring and wall coverings. What is the best way to chip off this hard material? I struggled to remove the floor tile. Is there a trick to removing vinyl floor tiles? Veronica M., Atlanta, GA

DEAR VERONICA: Wow! Now here are two jobs I would make excuses for all day long. The thought of doing both projects back to back is true mental anguish. There are some tricks I have discovered that will make the jobs progress somewhat faster. The good news is that the hard adhesive residue can almost always be softened and disposed of.

Adhesive removal can be a chore. The primary reason is that there are so many different types of adhesives. Reversing the chemistry to make the rock hard deposits soft again can only be accomplished by using the correct adhesive remover. Fortunately, there are many superior products that are readily available. What's more, many are job specific. The product label frequently describes exactly what they will do.

Adhesive removers are very closely related to paint strippers. The reason is very simple: paint is simply a colored glue. Many of the companies that produce paint strippers manufacture adhesive removers. The products soak into the adhesive transforming it back to the paste or liquid state. Once it is softened, you can usually remove it with a hand scraper.

The most user-friendly adhesive removers are made with citric acid technology. Look for the word "citrus" in the label and be assured the product will be fairly easy to use. These products often are water washable and are low-odor. Some are liquid and others are a paste. You simply apply them to the hard adhesive, stand back and let them work. The paste products work best on vertical surfaces.

Another user friendly product is a soy-based adhesive remover. This product softens a wide range of old adhesives. It also rinses off with water. Keep in mind that these products often have a dwell time of several hours. This means that you apply them and wait for them to soften the glue. The product labeling usually gives you a good idea of the minimum dwell time. If you get impatient and try to remove the adhesive before the remover has had sufficient time to work, you will just add to your workload. Let the remover soften the hard adhesive completely, before you start to scrape.

Pay attention to recommendations regarding sunlight and wind. Direct sunlight and wind can evaporate the products. If you apply certain adhesive removers and neglect to follow instructions, the adhesive may get soft and then re-harden before you have a chance to remove it. It is a wise idea to try a small test section to get a feel for how quickly the adhesive remover works.

Tough adhesives sometimes require a solvent based adhesive remover. These products are more toxic than the water based adhesive removers. Pay very close attention to all label warnings. These products are often highly flammable and the fumes can be very dangerous to inhale for a period of time. Work in a well ventilated space.

The adhesive removers can be found in many hardware stores and large paint stores. The Internet is also a good place to shop for specialized adhesive removers for unique projects. Keep in mind that most of the paint stripper manufacturers also have a companion adhesive remover line. A particular store may be able to order the product if it is not a stock item.

Several years ago, I read about a technique to remove vinyl floor tile one piece at a time without breaking the tiles. All you need is a block of dry ice. Slide the dry ice over a tile and within a few seconds it will contract just enough to release itself from the adhesive bond. Frequently, you will hear the tile "pop" loose. You move the ice block to the next tile and pick up the full tile that is now floating free above the adhesive layer.

If you decide to try this method, be aware of certain dangers. The dry ice is simply solid carbon dioxide. You must ventilate the space you are working in very well to dissipate the gas. Failure to do this can cause serious injury or death. The carbon dioxide can also kill any animals that might be nearby. As long as you can open some windows and bring in outdoor air, you should be fine. Wear thick gloves as well. The dry ice can cause instantaneous frostbite if it touches exposed skin.

Column 421

Handicap Showers

Handicap Shower
DEAR TIM: I am building a bathroom and want the ceramic tile shower to work with a wheelchair. Since a curb of any type will hinder access into and out of the shower, the floor of the shower needs to be flush with the floor of the bathroom. Can this be done in a typical home? If so, what do I need to know to make the shower and bath floor leakproof? Earl B., Sacramento, CA

DEAR EARL: You bet you can do this. It is far easier to do it in a new home rather than a remodel, but even in an existing home, a top quality remodeling contractor working with an expert tile setter can accomplish this task. Perhaps your biggest obstacle will be creating a large enough space for the shower area. Rotating a wheelchair in a confined space requires a floor space that measures 54 inches square. A 60 by 60 inch space would be ideal.

Many people are familiar with gang showers in high school where all sorts of shenanigans happened after each physical education class. Some modern day gym and workout businesses also have showers where the floor is flush with the changing room. Accessible showers are nothing new, not by a long shot. But as the population is aging, there is indeed a growing need for them in average residential housing.

A typical ceramic tile shower has a cement mortar base that is just beneath the tile. The thickness of this mortar system can be as little as 1 to 1.5 inches. If you have ever used one of these showers, you know the slope does not have to be significant for water to find its way to the drain. The shower floor area simply needs to slope 1/8 inch per foot to achieve excellent drainage. The rest of the bathroom floor should have a very slight tilt back towards the shower stall so that water spray from the shower into the bathroom could work its way back into the shower area.

The subfloor system needs to be designed so that the shower area is 1.5 inches lower than the subfloor in the main area of the bathroom. If the subfloor is a wood based system using traditional joists, you create a small, dropped flooring area using joist hangers and smaller sized floor joists. If your house is built on a concrete slab, the concrete in the shower area needs to be lowered the same amount. In both instances, the tile setter will add a sufficient amount of cement mortar to raise the floor within the shower to the same level as the remainder of the bathroom.

A special liner is placed on the subfloor of the bathroom and the shower area before the cement mortar is installed. This waterproof membrane is permanently connected to the shower drain and it laps up the side walls of both the shower and the bathroom walls. Any water that seeps through the tile and mortar is collected by the membrane and directed to weep holes within the body of the shower drain. I prefer to use a membrane that is made with chlorinated polyethylene. This material comes in rolls and has a special solvent that allows you to weld seams together so that you can protect the entire floor area. This membrane is commonly sold at ceramic tile specialty stores and full service plumbing supply houses.

There are several other issues that you need to be aware of when building this shower area. Soap dishes and shelves for shampoo need to be at a comfortable height for those using the shower. The actual shower valve control needs to be positioned so the challenged individual can easily turn the water on and off. A hand held shower device attached to the main shower head is also a must.

The shower valve is very important. Many shower valves are anti-scald. In fact, the modern building codes mandate it. Most anti-scald valves are designed to sense pressure differences. That is fine in most instances. But if you desire the best valve to protect against scalding, consider installing one that is both temperature and pressure sensitive. These valves allow you to preset temperatures so that people using the shower have little risk of getting burned.

Finally, be sure to install one, or possibly two, shower curtains to prevent water spray from getting into the main bathroom area. These shower curtains need to extend down to the floor and have weighted corners. One curtain should be well within the shower area so that water spray can't find its way onto the main bathroom floor.

Column 422

Stucco Repair / Patching

DEAR TIM: The removal of an old fan left a large hole that needs to be patched in my stucco home. What type of backer board is used to close up the hole? I assume the stucco just sticks to it and all is well. How does one match the existing texture? I also have many different sized cracks to patch. How do I tackle those? Andy N., Apple Valley, CA

DEAR ANDY: Patching stucco so that you don't see the repaired area is as difficult as patching a hole in a piece of fabric using scrap from the original bolt of cloth. It is virtually impossible to do. A stucco mason can create an infinite amount of textures depending upon the materials used to create the stucco and the tools used to finish it. Blending the new texture with the original is a true art and craft. If you succeed in creating the illusion, go out and immediately purchase a lottery ticket!

Stucco Repair

To get fantastic results on your job, I urge you to build several small test boards that are slightly smaller than the size of the existing hole. Practice your technique on these. Once you think you have the texture matched, insert the test panel in the hole and step back 20 or 30 feet to view it. Things tend to look different when viewed from a distance. If your existing stucco is painted, paint the test panel as well.

The repair process begins by simply looking at how your existing stucco was installed. Stucco is applied differently in many parts of the nation. In some localities, tar paper is applied over the wall studs and then wire mesh is nailed to the studs. In other areas, wood sheathing is nailed to the studs before the tar paper and mesh is applied. Look at the exposed edge of the hole to see how your stucco was applied.

To make the repaired area waterproof, you need to remove some of the existing stucco to expose the tar paper beneath the stucco. Remove the stucco slowly and carefully so as not to tear the tar paper. The new tar paper needs to slide up behind the tar paper at the top of the opening. One inch of overlap will work, but two inches would be better. The tar paper overlaps the sides and bottom of the existing opening the same distance. This important detail prevents water that may seep behind the stucco from rotting the wood sheathing and structural wood framing.

Galvanized chicken wire or plastering mesh is then nailed over the tar paper. Use galvanized nails that penetrate 1.5 inches into solid wood. The stucco sticks to this wire mesh, not to the tar paper.

The stucco is applied in either two or three coats. Typically a thin scratch coat is applied to the wire mesh. Once dry, this coat stiffens the wire mesh so the weight of subsequent coats does not create waves in the final finish. The thickness of the second coat depends upon the type of final finish you are trying to copy. If the final finish is very rough, then the second coat must stop just short of any indentations that are created when you apply the final coat. Be sure you use a stucco comb to create grooves in the wet second coat. These lines help bond the final coat to the middle layer of stucco.

Try to work in the cooler part of the day if possible. Be sure to wet the edges of the existing stucco before you apply the second and final coat. These edges must also be dust free. Keep the patched area damp to prevent shrinkage cracks. You can mist the repaired area or tape plastic over it to hold in the moisture. Stucco that dries too quickly can crack and never attain full strength.

Patching stucco cracks is not too hard, it just requires some patience. Cracks less than an 1/8th inch in width can usually be successfully patched with a high quality siliconized acrylic caulk. Remove all loose debris and dust from the crack. If the crack is deep, apply the caulk at two different times as one thick layer will shrink and cause an unsightly depression. Let the first layer of caulk dry for several days before applying the second coat. Quickly scatter sand that matches the existing finish into the final bead of wet caulk. This will help disguise the crack repair.

Wider cracks can be patched with the cement stucco mixture you created for the hole repair job. These cracks must be undercut for the stucco to hold. Use a grinder or hand-held chisel to make the crack slightly wider at the base than at the surface. This is the same technique dentists use when filling cavities in our teeth. This dovetail design will permanently lock the repair stucco mixture in place.

There is an updated column dealing with Repair Stucco Walls. CLICK HERE to read this column.

Column 423

Ceramic Tile Crack Prevention

DEAR TIM: Cracks are beginning to appear in the floors of our three-month old new home. The tile was laid directly on the concrete slabs that make up the sub-floor of my home. The day after the slabs were poured the concrete block walls were erected. Could this be the cause of the cracks? What could have been done to prevent the cracks? Do the tiles have to be taken up and replaced or is there another solution? John D. Hallandale, FL

DEAR JOHN: Tile loves to be installed over concrete because concrete is such a hard, durable substrate. But concrete does have an Achilles' heel - not only does concrete crack, it wants to crack. As concrete makes the transformation from the liquid state to a rock-hard material, it shrinks ever so slightly. In fact, concrete slabs can shrink 1/16th of an inch for every ten linear feet of distance. This shrinkage creates a significant tension force within the slab.

This tile is cracked. It is a very fine crack, but should be filled with clear epoxy before repainting begins.

This tile is cracked. It is a very fine crack, but should be filled with clear epoxy before repainting begins.

The concrete slab cracking process is very similar to what happens prior to and during an earthquake. As the plates of the earth move, they often get wedged against one another. This stored force is relieved naturally the by-product being a violent earthquake. Similar forces build within the freshly poured concrete slab. As soon as they exceed the strength of the concrete, the slab pops and cracks. Cracks can appear within hours of the concrete pour, but typically you begin to see them within 30 days. I doubt the block laying activity caused the cracks. In all likelihood, they would have happened with or without the concrete blocks.

Ceramic tile is a dense building product just like concrete. Both materials are very strong when you compress them, but they typically only have one tenth the strength when tension forces successfully pull them apart. To make matters worse, cracks that happen in the slab below ceramic tile will often telegraph through the tile because the organic or cement based adhesives make the tile and concrete one monolithic material.

You can prevent cracks in ceramic tile that is laid over concrete in any number of ways. The first thing to do is add steel and fibers to the concrete slab. While these materials will not insure a crack-free slab, they will hold the concrete together such that small harmless hairline cracks occur instead of cracks in excess of 1/8 inch or more. Quality builders will place inexpensive one half inch diameter steel reinforcing bars in the middle of the concrete slab. These bars should be placed in a grid pattern with the bars on two foot centers in both directions. The bars must be supported during the pour so that they end up in the center of the concrete. In addition, the concrete can be ordered with special fibers that will help prevent shrinkage and tension cracks.


Restore the "clean" to your grout. Just go to STAIN-SOLVER to see the beautiful, quick results.


The ceramic tile installer could have also installed crack isolation membranes under the tile. These membranes are available as a liquid coating that is applied over the concrete slab or an actual synthetic fiber fabric. They allow the concrete floor below to move independently of the tile that is laid just above. The membranes work well if there is slight cracking but will not prevent cracks in tile should there be significant structural movement caused by a foundation, soil, or construction defect. These membranes are often sold at ceramic tile specialty stores that cater to real ceramic tile professionals.

Since your home is still within warranty, I would write a letter to the builder informing him of the defect. Hopefully, you have extra tiles left over that are from the same run or batch. If not, try to get some matching replacement tiles immediately. Purchase matching tile grout at the same time. I would wait another six months or so before I would initiate the repair. Additional cracks may appear between now and then and all broken tiles can be replaced at one time. If the grout gets dirty before the repair, it should be cleaned just before the workmen arrive. Doing this will insure that the new grout will match the existing grout perfectly. Dirty colored or white floor tile grout can be successfully cleaned with a solution of oxygen bleach.

Existing floor tile cracks can be patched with clear epoxies. Apply the epoxy carefully and add additional epoxy until the dried epoxy is flush with the tile surface. Using a fine artist's brush, apply oil based paint that matches the color of the tile to the epoxy. Once this dries, use the same brush to apply three coats of clear water-based urethane over the repaired crack. This urethane will protect the paint for several years. Apply additional maintenance coats of urethane every two years.

Message from Tim:

Years ago while researching a column about cleaning decks, I discovered the wonders of Oxygen Bleach. It is perhaps the 'greenest' cleaner I know of as it uses oxygen ions to break apart stains, dirt and odor molecules. There are no harsh chemicals, and it works on just about anything that is water washable.

I decided to create my own special blend using ingredients made in the USA. In fact, the raw materials in the active ingredient are food-grade quality registered with the FDA. I call my product Stain Solver. I urge you to use it to help with cleaning your ceramic tile grout. You will be amazed at the results!

Column 424

Outdoor Rooms Create Extra Living Space

DEAR TIM: My growing family needs more room but a traditional room addition is out of the question. Our budget is very tight and local zoning laws prohibit us from building what we need. My wife quickly rejected my idea of putting the kids up for adoption and has hinted that perhaps I am the one who needs to leave. Surely you have a solution that will keep us together! Brad L., Scottsdale AZ

DEAR BRAD: If I didn't know better, I would bet money that you had a very bad case of cabin fever. Marital counseling is not my forte, but I think the solution to your restlessness is just outside the rear windows of your home. I think you can satisfy the local zoning department and avoid deep debt by simply creating an outdoor room or two in your back yard.

Cast a glance eastward over the Atlantic Ocean and you will discover that this concept is not new by any means. People in Great Britain are experts at transforming an ordinary back yard into a private outdoor room where one can work and relax. You need to think outside the box and develop some patience. Instead of using traditional building materials to create walls and a roof that protect you from the elements and create privacy, you will use plant materials, low walls and fencing, and garden structures that should allow you to pass undetected under the radar of many zoning codes.

Perhaps one of the best kept secrets of the home improvement industry has been the rapid expansion of products that are available for patios, decks and other outdoor spaces. The time spent on decks and patios is increasing because many of the creature comforts found indoors are now available for outdoor use. Some traditional barbecue grills have transformed into actual outdoor stoves and ovens. Fixed counters with faucets, sinks and cabinets are a reality. Retractable awnings, and attractive screened tents can provide shelter from sun, rain and insects.

Creating a comfortable environment outdoors is quite possible. Wood burning or gas appliances can provide you with wonderful radiant warmth if the temperature drops. A simple fire pit will accomplish the same thing and offers the retro feel and aroma of a Boy or Girl Scout campfire. Those who live in hot climates can cool an outdoor space with modern water misting devices. These systems dramatically drop the temperature as the misters broadcast un ultra-fine screen of heat absorbing water.

You do not need to go indoors as the sun sets. Significant advancements in low voltage outdoor lighting allows you to cast a soft glow on surrounding vegetation and garden structures that make up the outdoor room. Specialized task lighting fixtures allow you to work and read with the same comfort as any indoor light fixture.

The key to creating a spectacular outdoor room that will add value to your home begins with planning. Develop an overall plan for what you want and need and begin to build it in stages as your budget allows. Consult with outdoor plant experts and choose vegetation that will create privacy and beauty at the same time. Keep in mind the size of the vegetation as it reaches maturity. The plants must be placed in strategic locations that will not interfere with the function of the room.

Be sure to include water features in the outdoor room. Fountains, small pools, waterfalls, etc. add beauty and will produce a much needed calming force in your life. Do not underestimate the power of bubbling or trickling water. It is a subtle feature that produces pleasing background sounds that add to the overall ambiance of the outdoor room. Water features also attract butterflies and birds. These living creatures will add even more beauty to this new room addition.

Before you get started I suggest that you spend time looking at magazines and websites that feature photographs of completed outdoor rooms. Pay attention to the different features and how different materials and plants compliment one another. Look for patios that have different shapes or secondary smaller patio extensions that could be built in phases. Develop a final plan and pass it by your local zoning department before you start to work. The extra time you spend planning and exploring options will yield enormous dividends down the road.

Column 425