Wet Bar – Plans and Construction Tips
Certainly you have sat or stood at someone's basement or family room bar and wondered about having one for yourself. As you might imagine, I have built many bars over the years for customers. In fact I remodeled real bars in drinking establishments! Finally, I have one of my own!
Simple Job
Building a wet bar is fairly simple. The tough part of the job is selecting finish materials. There are just so many possibilities! I happened to select cherry wainscoting for the front of my wet bar. This product matched perfectly some wonderful cherry Merrilat cabinets that I have in the same room. The wainscoting was supplied by New England Classic. This is a wonderful company that has all sorts of natural wood and paint grade wainscoting that is custom designed for your personal application or job. You simply send them the dimensions of what you want to do and they come up with a design using their standard parts.
A wet bar wall needs to support a top and shelves that might be on the bartender side. It is not a big deal. The biggest hazard or challenge is offsetting the possibility of tipping the bar over. A U-shaped bar is obviously the best design. A curved wall is also very strong but presents all sorts of challenges to build. My L-shaped bar with a short wing wall turned out to be very stable.
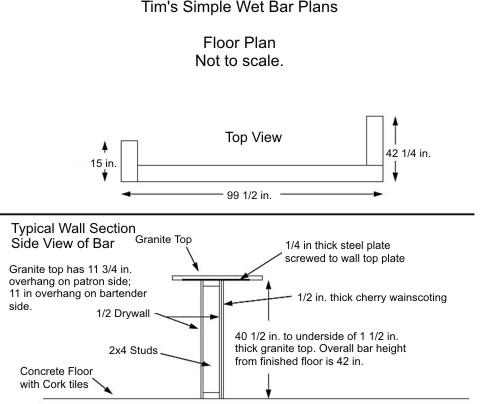
Critical Dimensions
The finished height of a bar should be 42 inches. Try not to deviate from this too much. The front overhang for the patron side of the bar should be 12 inches if you intend to have bar stools. If it is just a standing only bar, a 6 or 9 inch overhang will work fine.
The overhang for the bartender side is a function of your overall design. But keep in mind the rotational force of the bar top if it is a heavy stone product! If the top is not balanced to a large degree, it can exert a force on its own that would make the bar want to lean or tip over. I centered my top on the bar wall for the most part.
Wall Thickness
If you can afford the space, construct the bar wall from 2x6's or better yet 2x8's. I had to use 2x4's because of space problems at my home. The wider the wall the more stability you produce.
Electrical Needs
Don't forget to plan for electrical appliances, mixers, refrigerators, phones, etc. Make sure you have outlets at the right places for anything you intend to have behind the bar.
Lighting
Indirect lighting, hanging fixtures, recessed lights, etc. are all possibilities. Creative lighting can really enhance a wet bar. Visit a true lighting showroom, not a big box store, and get some suggestions from the salespeople. I'll bet they can give you plenty of ideas!
Granite Tops
I love natural stone! My granite bar top gets all sorts of compliments. It is a deep green granite with large quartz crystals. There is a hint of blue in my top as well. Dark granites are easy to care for. If you decide to go with granite you MUST meet with the granite fabricator before you build your walls! The granite supplier will tell you how he intends to mount the top and what the rough height of the wall should be.
In my case, I had to attach a special 3/16 inch thick solid steel plate to the top of my wall. This steel plate was screwed to the wall and the granite was epoxied to the steel. The advantage of the steel is that it supports the stone and makes it virtually impossible for the stone to crack as people lean against it. I have thick granite, but you never know how many high school football players might lean against the edge of the bar or foolishly sit on the edge! You must plan for these crazy events.
Column B410
Tim built custom homes and did ultra-custom remodeling for 20+ years before launching his Ask the Builder media presence. He was selected as one of the Big 50 by Remodeling magazine in 1993. This award gave birth to Ask the Builder in October 1993. Tim also operates https://DrawPlumbingPlans.com. His @askthebuilder YouTube channel was the first home improvement channel on YouTube.
I am getting ready to begin building my wet bar in my finished basement. The cabinet design has been done by the cabinet provider. I plan on building a wall for the front of the bar with 2x6s, just as youre commend and for the same reasons. However, my front bar will actually consist of two separate walls because I have columns in my basement that will have to be incorporated into the bar. This is a good thing (sort of) because it will allow me to connect my bar wall to the wall on one end and the column on the other and the second section will be connected to a column on each side. I plan on using a granite top but was wondering if I need to steel plate or if I can use wood corbels and maybe steel brackets?
My kitchen island is granite and the overhand is carried by wood corbels. You'll be fine if using granite top stock and not the cheap 3/4 overlay.