DIY Wood Preservatives
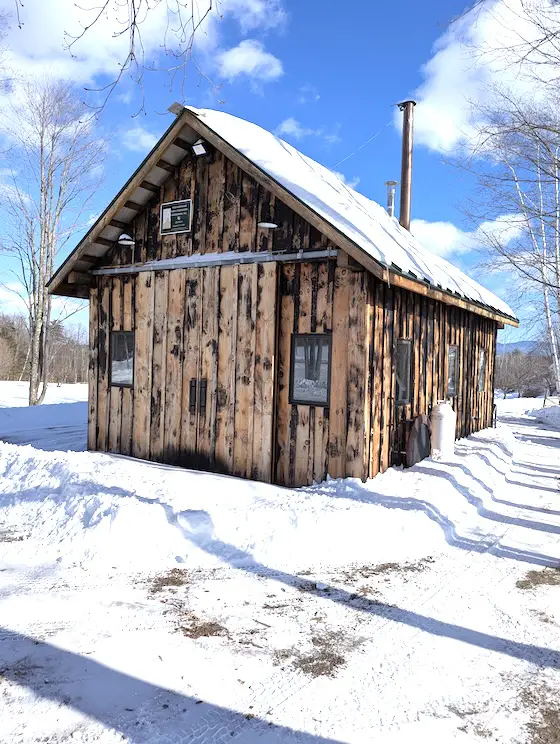
Those black blotches are not mold and mildew. The owner used a large propane-fueled blowtorch and charred the siding. Charred wood resists insects, rot, and ultraviolet light damage.. Copyright 2026 Tim Carter
DIY Wood Preservatives
There’s a very good chance you own something made of wood that’s exposed to the weather. It might be a fence, a deck, a dock, patio furniture, wood siding, a shed, etc. Wood is a marvelous material. It’s favored by many because it’s easy to cut, shape, and install. Wood can also be quite affordable because it’s nothing more than a crop, just like corn or blueberries. Timber companies often plant one or two new trees for each one they harvest.
The downside of wood, when used outdoors, is that it requires maintenance. Some wood species require much more maintenance than others. Redwood and Western Red Cedar are two species grown in the USA that require minimal maintenance. Both have a substantial amount of natural preservatives locked into the wood fibers. Even so, you can’t expect them to resist weathering like you would a structure made of stone or a roof covered in slate.
Water and sunlight are the two primary enemies of wood. Water triggers wood rot. Water that soaks into untreated wood causes it to swell. When the wood dries, it shrinks. This movement creates cracks, much like when you bend the aluminum tab back and forth on an aluminum soda can. Repeated wet/dry cycles cause the cracks to get bigger and bigger, allowing water to penetrate deeper into the wood.
UV Light = Cruise Missiles
The ultraviolet (UV) rays in sunlight mimic miniature artillery shells. The UV rays that strike untreated wood break apart the lignin in the wood. Lignin is the glue that holds wood fibers together.
You may have witnessed this UV damage after you’ve pressure-washed an outdoor deck. The previously smooth wood becomes fuzzy once it dries. The fuzz is sun-damaged wood fibers that are still barely hanging on.
UV rays add further misery by changing the color of your beautiful outdoor wood. New teak is a rich, deep brown. That same teak left outdoors with no protection soon becomes battleship gray.
Paint is Great But...
Knowing what you’re up against, you’re tasked with stopping water from getting to the wood, and applying some sort of sunscreen to prevent UV damage. Paint fits the bill. Paint is nothing more than a colored glue. Some glues (resins) are much stickier than others. Think of the simple white glue kindergarteners use versus strong carpenter’s glue or epoxy.
I’ve found that paint that has a urethane resin component can bond well to wood for decades. I painted my redwood siding almost thirty years ago. Not only does it still look great, but it’s also not peeling. Keep in mind my redwood was squeaky clean, and I painted the siding employing all the best painting practices.
Should you decide to paint your outdoor wood, you should paint each piece on all sides and edges. This is not practical in many situations. That said, when you do an autopsy on peeling paint, you’ll often discover water was able to find its way to the unprotected surfaces, soak in, and then cause the wood to swell. This movement often exceeds the holding power of paint, and it peels and blisters.
Penetrating Non-Film-Former Sealers
You can choose to use penetrating sealers to protect wood. The best ones, but they’re almost impossible to find, are ones that are made with synthetic oils, and are not film formers like paint. Film-forming sealers eventually peel. They become a maintenance nightmare as you need to sand off the old sealer or use chemical strippers to achieve a stunning, new perfect finish.
Avoid sealers that contain natural oils. Tung and linseed oil are examples of these natural oils. These products are scrumptious food for both mildew and algae. Sealer manufacturers often add mildewcides to their sealers to prevent this growth, but the chemicals can and do leach out or break down over time.
You can also coat exterior wood with copper napthenate. Copper is a natural biocide. It helps to ward off wood rot, mildew, and algae. The issue is that this liquid produces a greenish cast on the wood. It’s a great product to coat the cut edges of treated lumber.
Japanese Wood Char
I’m intrigued by what the Japanese builders have done for centuries. They use fire to char new wood. This technique creates a natural surface that requires a minimal amount of maintenance.
The charred layer at the surface is identical to the black leftover log from the night before in your campfire ring. Have you ever noticed that charred log never seems to rot? You don’t see algae growing on it either. This is because the charring removes the food component of wood that fungi, mildew, and algae eat!
A homeowner just a few miles from my house used this method to protect the new wood siding on his maple-syrup sugar house. Five years ago, I watched him use a propane-fueled large blowtorch to char the new wood siding.
He was very wise and made sure the wood closest to the ground was charred the most. Water splashing up from the ground gets the wood closest to the ground very wet. The charring was not uniform, and you could see lightly charred wood in many areas. It created a very unique look, in my opinion.
I stopped by this sugar house just a few days ago to inspect it. I couldn’t find any signs of wood rot or algae growth. It turns out the Japanese are very clever to have observed what happens to burned wood and use that basic technology to protect the siding and trim on new houses!
Column 1650