How to Concrete Planter DIY Hypertufa Planter
Quick Column Summary:
- Need to fix a planter
- Can it be ground down and leveled
- Easier to start over
- Link to video series
Barbara Mandese, who lives not to awful far from the San Andreas fault in Monterey, CA, reached out for a life preserver after throwing out her back mixing concrete. Read what her dilemma is:
"Hi there!!! So glad I found this site. Here's my question. I made this "Hypertufa" planter (in case you don't know it is cement, peat moss and vermiculite). I've included some photos for you.
I had to dig a hole in the ground then cover with plastic to make a mold for it. But the one thing I neglected to do was to see if it was level on the bottom!!
After 24 hours, I took it out to let it start to dry, but because my back went out I had to wait a few days to start working on it. NOW it's completely dry. It fell down last night in some winds or because of a raccoon, and it didn't break. That's how dry it is.
Anyway, it's not level on the bottom and I need to fix it somehow, hoping if I add more cement mixture if that is possible. Is it possible to add my cement stuff to the already dry pot? I have been using a sander and some of my carving knives to try and get it down a bit, but it only goes so far.
Also in the middle where the drainage hole is - well, the water wouldn't drain in its current condition. Do you have any suggestions other than starting over? 🙂 The person I am doing this for wants it to be somewhat organic looking so much of the shape and outside lines and creases don't matter. It's just leveling it.
I would be so grateful if you can give me any suggestions. I'm female with a bad back, so if you have an "easy" suggestion that would be awesome otherwise I'll take what I can get. I'm off to like your FB page too. Can you look at the photos of my issues and tell me what you would do? Thank you so much if you can help. 🙂 And honestly I have no idea what improvements you can make to your site. I'm finding what I need so far. 🙂 So I'm just gonna click one to get to the next window. K?"
My answer is below the photos.
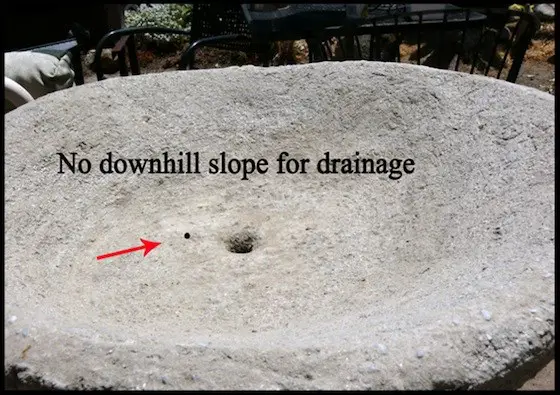
No downhill slope for drainage
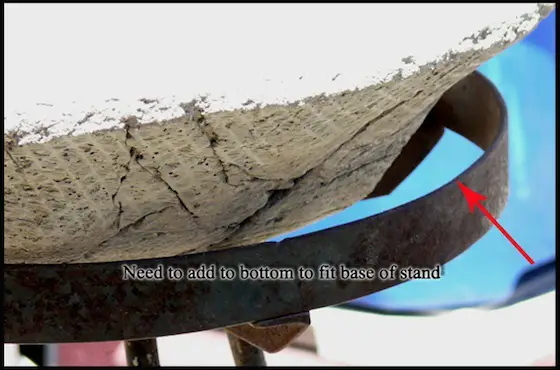
Need to add to bottom to fit base of the stand
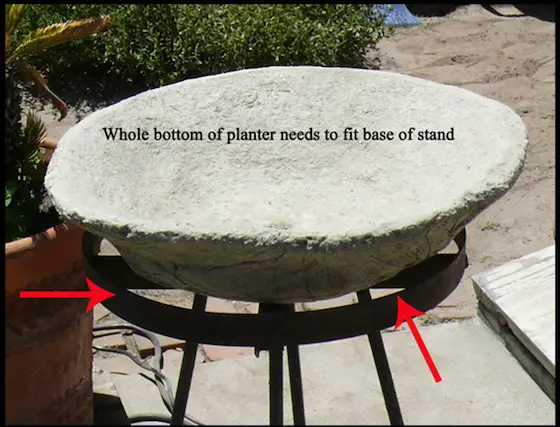
Whole bottom of planter needs to fit base of the stand
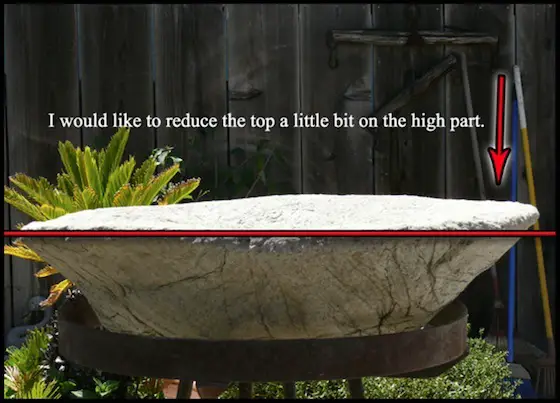
I would like to reduce the top a little bit on the high part.
Here's my answer to Barbara:
Barb, don't OD on Advil. I've heard too much of that is not good for the liver.
First, I feel you did a commendable job on this project! I respect people who make an attempt to do things themselves.
But you made some mistakes like I did years ago when I was a young pup. This is why I developed my AsktheBuilder.com motto: Do It Right, NOT Over!
Guess what? You can salvage the planter and correct all the imperfections. But in the time it takes you to do this, you could have made three new ones.
Yes, you can add more cement to the areas that need it. Watch my three-part video series about how to do this. Pay attention when I discuss the magic compound you use to ensure the stucco never peels off.
You can buy or rent a grinder to remove the excess you don't want, but it will ruin the look of the planter.
You can rent or buy a drill to enlarge the drain hole.
Do you have a high school kid looking to make a fast $20 for an hour's work? Or a male friend who owes you a favor?
Enlist one of them to mix the new hypertufa compound and pour it into a new mold you've created that will produce the results you're looking for.
You're going to cut out a piece of old plywood that's just one-half inch less in diameter than the iron ring base. That will ensure you'll get the base the correct size and when you put this disc in the soil at the base of the in-ground mold, you'll use a torpedo level to get it LEVEL in both directions.
You're then going to build a square form using scrap 2x4 material for the top of the planter. This will nestle in the soil too. You'll get it level both directions too. Fill in the corners of this square with soil to create the rounded shape you want. Double check the plywood disc and the form for level in both directions.
Add a stub of 1.5-inch PVC pipe in the center to create a real drain hole. Make it as long as the base of the planter will be thick.
The only thing you'll be doing is supervising the mixing of the lightweight concrete mixture and shaping it once your helper shovels it into the forms. Shovel it into the forms SLOWLY so you don't disturb the disc or the outer form.
Cover the planter with plastic for THREE days to allow it to cure properly.
Send me a NEW photo of the masterpiece once you complete it.
Tim built custom homes and did ultra-custom remodeling for 20+ years before launching his Ask the Builder media presence. He was selected as one of the Big 50 by Remodeling magazine in 1993. This award gave birth to Ask the Builder in October 1993. Tim also operates https://DrawPlumbingPlans.com. His @askthebuilder YouTube channel was the first home improvement channel on YouTube.
Thanks Tim. I appreciate the time you took to help me get it right. It may take awhile for me to buy stuff...but when I do I'll be sure to send a pic. I'm sorry for the long email. I tend to get a little wordy. I have to try and make this one work, most of the rest of this I cannot afford. But will In time. 🙂 Barbara Mandese
Tim, two things. I know where the 1:15 PM sunset and 10:00 AM sunrise are. Edmonton, Alberta, Canada. I was there on business in both mid-summer and mid winter. Not only is there only 4 or so hours of sunlight, the temperature hits a cool minus 40 degrees, an oh, how the wind howls. There is an underground city so folks can move about without their skin freezing. In the summer, if you go on top of a tall building to watch sunset.....at midnight, the sun almost goes totally under the horizon, but not quite.
Please let Barbara know that I also had a bad lower back but no longer do. I got an inversion table. For the first time in over 30 years, no lower back pain for me. And tell her she only needs to invert about 60 degrees. She won't believe how good it feels as your hip flexor muscles stretch to their proper lengths, and equally I might add. I got mine on Amazon for $120. I love it and invert 7 minutes every other day.
Have tons of fun doing your train job. I am a big railroad fan and have built my train table for an N-Scale layout. It has folding legs for transport. If you have the train bug, you should know that Union Pacific 4-8-8-4 BigBoy number 4014 has been towed from its display in Pamona, Ca to the UP Steam Shop in Cheyenne, WY, and is being restored to running condition. This huge steam engine will once again ride the rails in a few years.
Barbra could sell the other one that did not fit the frame to someone who did not know it needed a frame or have the kids at the local shool shop class make a custome frame. Asking a teacher at school could help you find a nice teenager to help you too.
To add holes, try place corks in locations where you want the holes. This would work best if you are pouring on top of plywood. Use 1¼" deck screws to fasten the corks.
Spray the plywood and corks with WD-40 to act as releasing agent.
Once the tufa has harden, unscrew the plywood. If the corks don't easily pop out, simply drill them out.
Barbara - You are trying too hard!!! Try working upside down. Get some cardboard from a local grocery store and put it on your work surface. Then get a plastic dishpan or storage container. Cover it with a plastic garbage bag. Flip it over and start adding your hypertufa mix from the bottom to the top on the outside of the mold. Check to ensure that the depth is uniform by sticking a skewer in the side. Make sure the corners are sufficiently thick. Poke 2 holes in the middle for drainage. Check for level now. Cover with plastic and let it cure. You can wire brush the outside when it's almost dry for a nice effect. When it's time to unmold, pour a little water between the garbage bag and the concrete and it will easily pop out. Continue to let it cure off of the mold, and don't plant in it for a few months. You can also use the inside and the outside of flower pots for nice containers, and display boxes covered in plastic make some great large, shallow containers. Forget this "dig a hole' stuff.
I'm not sure why I never ever saw all of this feedback Tim!! Wondering...I must have sent you the finished product picture..did I not???
Thanks for all the added comments here as well. Truth is I enjoyed making my creation in the ground. It felt more organic and I had more control over the outcome (after this first one anyway). This project was my first attempt at making anything hypertufa, and I didn't throw my back out while making the project. I just have a bad back. (I will look into that inversion table though Jeff...thanks for that info!!)
Its interesting, I'm not one to start over until I've exhausted all my options and I'm glad I didn't on this one because it ended up being perfect in the end. Tim please let me know....did I send you a pic of the finished piece?