How to Finish a Concrete Porch Floor
Kristina Rowan, who lives in Bryan, Texas, has an excellent question about the magic of placing and finishing a concrete porch.
"Hi Tim! My husband and I are planning to replace our concrete front porch. I'm not sure if it was originally poured and patched poorly, but it is cracking and crumbling terribly.
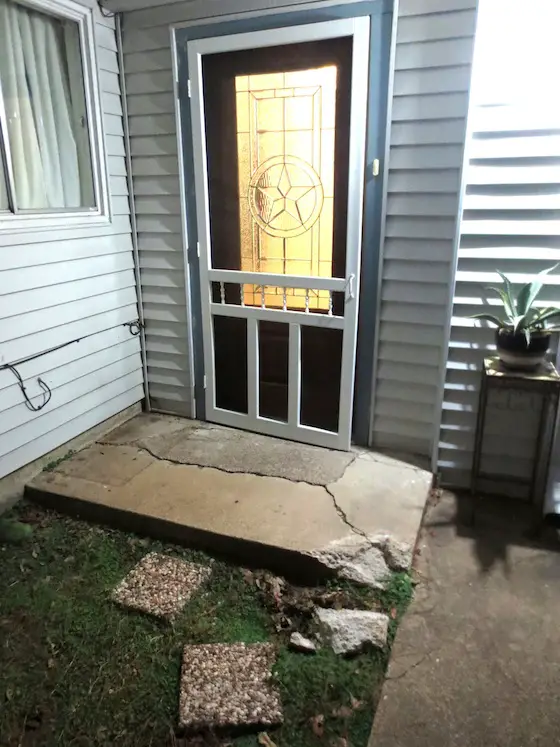
Here's Kristina's crumbling porch stoop. Photo credit: Kristina Rowan
The roof overhangs about 3 feet and there is no gutter here, so when it rains we have a waterfall hitting right where the porch ends. We usually end up with a huge pool of water off the porch. I'm wondering if maybe this is causing the porch to crack, if the soil beneath it is eroding away. We are considering making the porch extend a few extra feet away from the house, maybe 5 or 6 feet instead of only 3.
I searched your website, read your projects, and watched your videos. However, I wasn't able to find an answer to the specific issue we are facing. Our front door is at a corner of our house such that two sides of the porch meet the house. Since we will only have an 'L' shaped cement form, how will we level the cement after we pour it? Everything I see uses a 2x4 to level by scraping across the forms. How would we do this in the corner where two sides hit the house?
I read that we should use a piece of fiber board against the concrete of the house to create an isolation joint. Will it be possible to use this to rest the 2x4 on to level out the cement?
The other option we were thinking is to level it with a hand float. We would have to stand in the wet concrete to reach the corner, and just work our way out?
Any advice is much appreciated. Thanks!"
Kristina, you've got two problems to solve. The first one is to install gutters on this portion of the house, and maybe the entire house, because this splashing water from the concrete up against the house is very bad.
Now for a quick primer on placing and finishing concrete and what I'd do if I were helping you.
You always want the concrete to slope away from the house. This is NON-negotiable. The slope should be shallow, about 1/8 inch per foot.
Once the old slab is removed, be sure to compact the soil under the old slab and wherever you'll add new concrete.
You want 1/2-inch steel rods 2 feet on center in both directions in the center of the concrete. The steel would look like a crossword puzzle grid. The first pieces should start 6 inches from the edge of the house and stop about 4 inches from the wood forms. Put this grid of steel on small pieces of brick or stones to ensure the concrete flows under the steel. This steel will ensure you'll NEVER have the horrible large cracks you now have.
The slab should be 5 inches thick. Order 4,000 PSI strength with a 5-inch slump.
Yes, you can put the fiberboard isolation joint material against the house. It's not easy to attach it to the house foundation.
Yes, you'll be wearing rubber boots and stepping in the wet concrete to screed it. Just step carefully between the reinforcing steel.
As for leveling the L, it would help if I had an overhead shot of your situation, but you have two choices.
Looking at your photo, if the right side of the L is the piece with the small table on it, I'd make the concrete level across the length where it touches up against the wall with the door in it. It appears the vinyl siding is different levels, so you need to stay 2 inches BELOW the lowest row of siding.
Then, the concrete that's the other part of the L simple falls away at the same rate.
Your second choice is to have both legs of the L where they touch the house to be level creating a tiny valley where the inside of the L is. This is not to tough to do, but it could be a challenge for a rookie like you.
As for finishing the concrete, just read all my past columns on that topic. I take you step-by-step through the process.
Tim built custom homes and did ultra-custom remodeling for 20+ years before launching his Ask the Builder media presence. He was selected as one of the Big 50 by Remodeling magazine in 1993. This award gave birth to Ask the Builder in October 1993. Tim also operates https://DrawPlumbingPlans.com. His @askthebuilder YouTube channel was the first home improvement channel on YouTube.