Truss Uplift and Ceiling Cracks
Truss Uplift and Ceiling Crack TIPS
- Wood trusses move as the seasons change
- Bottom of truss lifts up taking drywall and walls with it
- Simple metal clips can prevent truss uplift
- Clips can be installed in existing homes.
- CLICK HERE to Get Tim's FREE & FUNNY Newsletter!
DEAR TIM: Cracks have begun to appear where the walls meet the ceiling in the top floor of my home. These cracks are most prominent along the walls in the center of the house.
I've also noticed that the baseboard has lifted up from the floor in other places. These cracks seem to close up on a seasonal basis.
Sturdy, prefabricated wood trusses were used to build my roof. What's happening? What if anything can be done to prevent the unsightly cracks? Ben - Traverse City, MI
DEAR BEN: There are a multitude of things that can be causing these cracks.
Trusses Move
The first thing that comes to my mind is a phenomenon called "truss uplift". Although truss uplift causes approximately 20 percent of problems like yours, it's something you should consider.
Undersized beams, expansive clay soils, wet floor joist lumber that shrinks, and other structural problems also can cause the cracks you see.
Flat Bottom Chord Curves
Most simple roof trusses consist of a flat horizontal member called a bottom chord. The sloped portions of the truss that form the roof surface are called the top chords.
However, the bottom chord can develop an upwards curve as the seasons change.
Temperature & Humidity Battle
The bottom chord in your house and many others like yours is probably buried in insulation. Because the truss is touching the warm ceiling drywall below and the temperature of the insulation close to the ceiling is far warmer than the attic air temperature, the wood truss is none too happy.
Meanwhile, the upper portion of the truss is exposed to cool and drier attic air. Since wood is a hygroscopic material, any of the wood that makes up the truss that's exposed to the air in the attic releases moisture in the winter months.
The bottom chord that's buried in the insulation tends to have a higher moisture content because it thinks it's much warmer in the attic than it actually is.
Bottom Chord Bends
The differences in moisture content cause the truss to bend. The lumber of the truss exposed to the cold, dry air shrinks and pulls up on the flat bottom chord causing it to lift and curve upwards.
The greatest amount of upwards movement is in the center of the truss. As the truss moves upwards, it takes the drywall ceiling with it.
This might explain why your cracks are larger as you get closer to the center of the house.
Up Go The Walls
If, for some reason, the interior walls are nailed more securely to the truss than the floor, the truss will actually lift the entire wall. This will account for gaps you might see at your baseboard trim.
Preventing Truss Uplift
There's a way to prevent this problem. If you're building a new house, don't allow the carpenter to nail the roof trusses directly to any interior walls
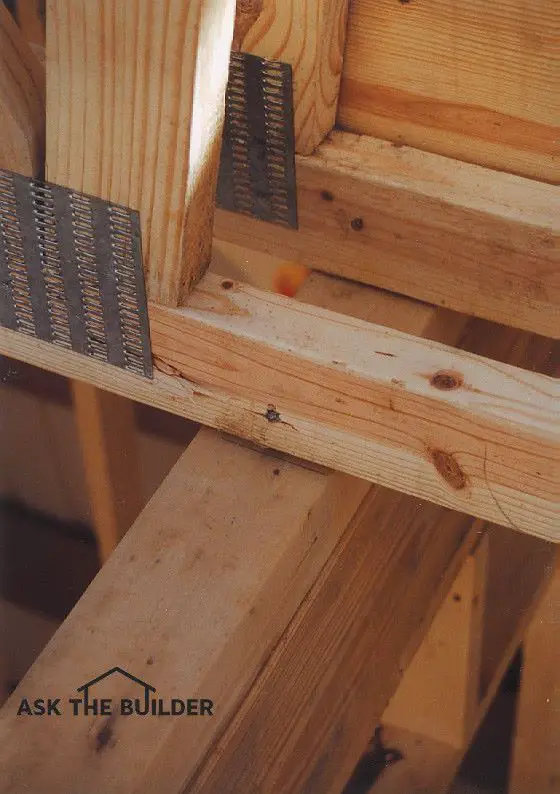
Instruct him to use handy metal L-shaped truss clips. These simple, inexpensive devices attach directly to the top of interior walls.
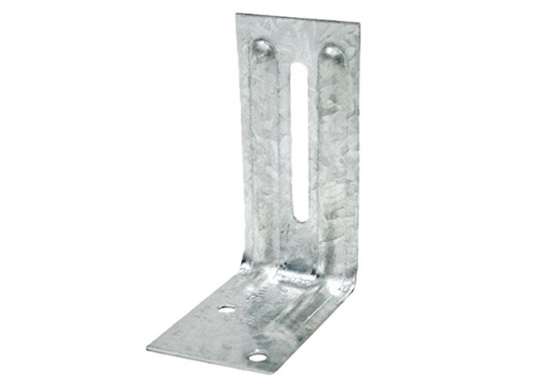
This simple clip is all that's needed to prevent truss uplift. The bottom is nailed to the top wall plates. A nail is driven through the slot into the side of the bottom chord of the truss. Be sure this nail is NOT driven tight. You want the truss to be able to flex up and down without pulling up the wall with it. CLICK THE IMAGE NOW TO HAVE THESE CLIPS DELIVERED TO YOUR HOME WITHIN DAYS.
The long leg of the clip contains a slot. A nail is driven through the slot into the side of the truss. The head of the nail is driven so it is just short of touching the metal clip.
This allows the truss to move up and down independently of the wall.
Drywall Hanger ALERT!
The drywall hangers must cooperate as well. Don't allow them to nail or screw the drywall directly to the trusses within 16 inches of an interior wall.
They can fasten the drywall to pieces of wood that fit between the trusses or metal clips that attach to the top of the interior walls.
Because the upward truss movement occurs over a period of weeks or months, the drywall will flex at the corners. Cracks should become a thing of the past.
Repair Existing Homes
If you have an existing home that suffers from truss uplift, it can be corrected with some effort. You need to climb into the attic area and get to work before it gets too hot.
Use a cat's paw tool to remove nails which connect trusses to interior walls. Install the L shaped clips in their place.
After the truss clips are in place, nail a board on top of each interior wall which overhangs the wall by at least 1 inch on each edge. This will act as a bumper when the truss attempts to lift the drywall next year.
Fix The Nail Pops
When this occurs, you will probably see nail pops develop near the interior partitions. Take a large nail punch and drive these nails completely through the drywall.
This will release the drywall from the trusses at each partition. Patch these holes with regular joint compound and hope that the problem disappears.
Column 169
Tim built custom homes and did ultra-custom remodeling for 20+ years before launching his Ask the Builder media presence. He was selected as one of the Big 50 by Remodeling magazine in 1993. This award gave birth to Ask the Builder in October 1993. Tim also operates https://DrawPlumbingPlans.com. His @askthebuilder YouTube channel was the first home improvement channel on YouTube.
We're having problems with truss uplift but it seems to have taken over our entire home. I'm worried it's beyond repair at this point. Our home is 3 years old and we have had truss uplift that was exacerbated by a poorly ventilated attic. We have fixed the attic issue but now we're dealing with floorboards on both floors that pop loudly when stepped on, nail pops that go across walls an ceilings that come right back out after they're fixed, and water piping having come loose from the walls they're affixed to. I feel like our home is falling apart. We can also see the outline of floor joists/ drywall on the ceilings but I'm not sure I that's related. Any advice?
Joanna, Walter, this is what my 500-Second Consult is all about. Click the Shop icon at the top of the page!
Is it possible to have rafter uplifting with old style rafters? Mine are just triangular with one horizontal brace about three or four feet down from the peak. The roof line members and that horizontal brace connecting them are exposed to outside temperatures, while the main horizontal member is entirely covered by about R-44 in insulation.
The house is about 6 months old.It started with small cracks then ceiling like a bulging . They repair it . Now they replaceing more than half house ceilings n to place more wood studs n joist. I think it's a strut ire failure on the builder. I'm looking to go to court n sue. What's your opinion. Thank you.
With having moisture, would there be a concern for mold? I too have cathedral ceilings that pop in the morning and at night.
Would truss uplift cause hardwood floors to shift, door framing to come loose and cracks from the top of door framing to the ceiling.
Can you add vertical supports to the trusses, to prevent trust lift?
Would the uplifting stop if I shim the trusses at the highest point that's there now and add metal clips to secure?or would this cause another problem?
John,
Sorry I'm not a contractor but what you are doing makes sense to me. This is something I'm seriously considering doing as I have the truss uplift problem on all my interior corners on the sencond floor wall/ceiling joint. I don't know why it wouldn't work. I guess my concern would be would this raise and lower the studs from the bottom base plate? If it does, wouln't wider case molding just cover the potential crack here? Seems to me it would be much easier to deal with here than up at the corners. Have you tried this yet?Let me know of any more thoughts or attempts at this as I'm am trying to fix and re-mud my upstairs prior to repainting.
I have 12" of fiberglass insulation and 18" of blown in insulation in the ceiling, one story house. I have truss uplift. This is in the kitchen area only. If I take down the drywall and put in wood I beams between the trusses, they are on 24" centers, and then screw the drywall to the I beams only, would this solve the problem? It would make the ceiling independent of the trusses.
I have a truss uplift problem in my 6 year old home. I was looking at installing crown moldings but a contractor says I should use metal straps to secure the trusses to the inside walls. I am concerned this will simply start lifting the wall and cause more problems. I have two questions:
1. What are the 'metal clips'. What do they look like and how do they work.
2. Will nailing wider lumber to the top of interior walls in the attic force the ceiling to remain in alignment with the interior walls, and will nail pops that result in the ceiling be simple to fix.
Seems like a good plan but I have concerns.
Thanks for the great information on this site.
When the truss are at their peak height of uplift which is in winter, can you place shims under the truss, nail them to top of wall plate but not the truss which if I'm thinking right will stop the truss from dropping in summer and stop them from lifting since the shims will now keep them at the peak uplift point . Then I can use this special 4"
Corner tape which the angle is plastic extremely durable . Will that stop the movement ? And by doing it this way could I be causing any issues in the future
I'm having trouble visualizing this: "After the truss clips are in place, nail a board on top of each interior wall which overhangs the wall by at least 1 inch on each edge. This will act as a bumper when the truss attempts to lift the drywall next year." are any videos/photos available on how this should be done and what the end product should look like?
Thanks for all the good information. I also have trouble visualizing where to place the extra overlapping boards on the top of the wall that are supposed to act like bumpers.
Perhaps I could make it clear on a short phone call: https://shop.askthebuilder.com/15-minute-phone-or-video-conversation-with-tim/