Laminate Countertops – Repaired
Laminate Countertops - Repaired
DEAR TIM: We have a spot in our laminated countertop where a hot pot severely damaged the laminate. Rather than buy a new top I would like to remove the burned area and inlay tile into the countertop. The tile would be a great place to set pesky hot pots and pans. Have you done anything like this before? How do I waterproof the exposed particle board that is under the laminate? Are there pitfalls I should avoid? Ken Taylor, Phoenix, AZ
DEAR KEN: Laminate countertops can take large amounts of abuse but as you have discovered they are indeed sensitive to heat. I think your recycling idea is splendid. In fact, if you are highly motivated you can change the look of any other countertops by adding tile accents or borders. I have installed tile inlays in countertops on several occasions and the results can be magnificent. The key to success is attention to detail during the entire process. The good news is that you can do this job in less than 6 hours if you have all of the tools and materials at hand.
Spend some time selecting the right tile. Obviously, you want something that will compliment your current top color and the decorating theme in your kitchen. Consider a tile that has a dull glazed finish. Tile with a high gloss glaze will more readily show scratches over time. Try to select a tile that is set with a one quarter inch grout joint instead of the thin grout line that you find in common bath wall tile. This larger grout line allows you to be slightly less precise when you create the recessed area for the tile. If you use a tile that has a 1/16th or so grout line, your layout and cutout work must be perfect. Select a tile that allows you to use full pieces to cover the burned area.
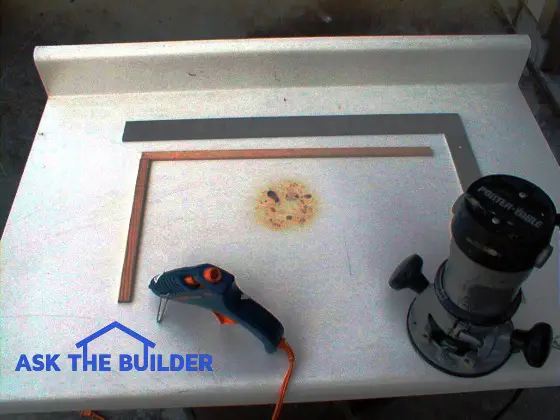
Once you have the tile, lay it out on the countertop making sure the spacing between the tiles is uniform. Use a framing square to keep the layout perfectly square. Check that the tile is parallel with the front, back and sides of the top. The cutout lines need to be marked so that a grout line surrounds the inlay. This grout line should be identical in width to the lines within the layout. Keep in mind that the router that creates the recessed area can get only so close to the front and back edge of the countertop!
Before you create the recessed area, I feel it is a good idea to reinforce the top. The removal of the plastic laminate and part of the substrate can weaken the top. A simple way to reinforce the top is to attach a scrap piece of plywood to the underside of the top directly below the inlay. The piece of plywood should overlap the cutout by at least 4 inches on all sides if possible. Use construction adhesive that comes in a caulking tube for this job. Use a brace or shims to hold this plywood in place for at least 24 hours. If shims are used, there is no need to remove them.
The recessed area is created using a router with a 1/4 inch bit. Do not try to create perfectly square corners with a chisel in each of the four corners. There is a good chance the plastic laminate will crack. The small diameter router bit creates a perfect stress-free corner. You can glue thin strips of wood to the top with a hot glue gun that act as a guide and keep the router from wandering past your marked lines. The strips of wood can be removed easily and the hot glue will not harm the laminate. The depth of the cutout should be 1/16th inch greater than the thickness of the tile. This allows just enough room for the tile adhesive.
Once the recessed area is created, you should waterproof the exposed particle board. I like to use water based polyurethane because it dries rapidly. You can apply three coats of urethane within two hours. Be sure to coat the vertical edges of the cutout well. Once the final coat of urethane is dry you can immediately proceed with the tile installation. After the tile has set up and will not move with moderate pressure, you can carefully grout it using a sanded grout. Let the grout cure for 5 days before applying a sealer.
Column 350
Tim built custom homes and did ultra-custom remodeling for 20+ years before launching his Ask the Builder media presence. He was selected as one of the Big 50 by Remodeling magazine in 1993. This award gave birth to Ask the Builder in October 1993. Tim also operates https://DrawPlumbingPlans.com. His @askthebuilder YouTube channel was the first home improvement channel on YouTube.