Cutting Crown Molding Inside Corner
Cutting crown molding is hard because of that void space behind the molding. All other moldings you work with don't have this missing wood. (c) 2018 Tim Carter
"What you're forgetting is the crown molding, once installed, is not laying flat. The cut lines on crown molding are compound cuts just like roof rafters that contact a hip or valley rafter."
Cutting Crown Molding - Inside Corners
- Cutting crown molding requires a compound cut
- Simple miter saw will work well
- WATCH videos below step-by-step
- Cut scrap test-fit pieces
- CLICK HERE to Get Tim's FREE & FUNNY Newsletter!
DEAR TIM: I need to know how to cut crown molding. So far, I have wasted four long lengths.
The joints look good once cut but when held up in the corners of the room there are huge gaps. I have a high-quality power miter box saw so the problem is obviously me.
Once the molding is cut correctly, how do you easily and securely fasten the crown molding to the walls and ceiling? I don't want to mess up my new paint job. Chuck W., Port Huron, MI
DEAR CHUCK: I must admit this is one area of finish carpentry that's very similar to a magic show.
How to Cut Crown Molding - Is it Hard?
It's not hard to cut crown molding. You just need to hold the molding up against the fence a certain way in a standard miter box saw.
I can't tell you how many homeowners have watched me and a helper install crown molding easily and quickly. Then, several months later, I get a frantic call from them as they are trying to mimic my performance.
They're stuck just like you. Just like with most magic tricks, the secret is simple and it just takes a little practice to master the illusion. Soon you'll amaze yourself, your friends and neighbors with your skills.
CLICK HERE to get FREE & FAST BIDS from local carpenters who specialize in crown molding.
This is a compound miter saw you can use to cut crown molding. It's not required as a normal miter saw will work just fine. CLICK THE PHOTO NOW to have this saw at your home in days. Copyright 2017 Tim Carter
Crown Molding Requires a Compound Cut
You're having trouble because you're cutting the crown molding in the same fashion as you'd probably cut baseboard or window or door casing. I can see why this happens.
What you're forgetting is the crown molding, once installed, is not laying flat. The cut lines on crown molding are compound cuts just like roof rafters that contact a hip or valley rafter.
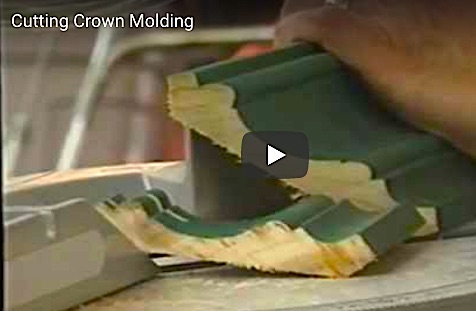
Cutting Crown Molding Videos
Watch all these videos. Each one has some different info and tips. Make sure you watch the one below about fancy corners. WOW!
They were taped some years ago, but the information is rock solid. Once you watch them, you'll understand everything else in this column. If not, I owe you a mocha chip ice cream cone from Aglamesis in Cincinnati, Ohio.
Do You Cut Crown Molding Like Baseboard?
Baseboard trim and window and door case moldings are flat pieces of wood stock with a profiled face. Crown molding looks nearly identical. But look a little closer.
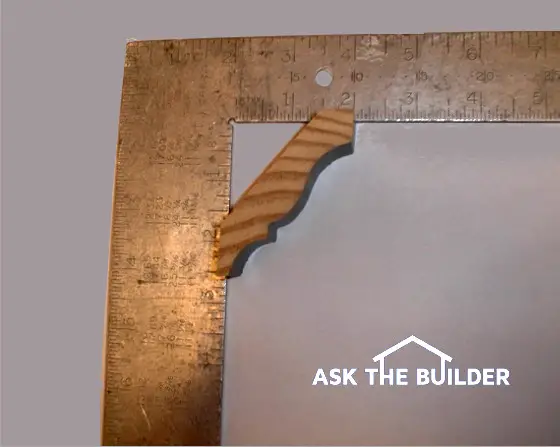
Crown molding has small angled faces as well as a large flat spot on the back of the profiled face. This is done by design.
I happen to call these small flat areas the foot and shoulder. Other carpenters may have a different name.
What is the Foot and Shoulder of Crown?
The angled cuts on the back of the trim are actually oriented at 90 degrees to one another. The foot is supposed to rest on the wall and the shoulder contacts the ceiling.
CLICK HERE to get FREE & FAST BIDS from local carpenters who specialize in crown molding.
What's the Best Way to Practice Cutting Crown Molding?
The best way to practice is to cut a few scrap pieces of crown molding. Do this until you get the hang of it.
Take one of your ruined pieces of molding and cut a one-foot-long piece. Get on a step ladder and hold the piece of scrap up to the ceiling and look down the back of the small scrap.
Adjust t so the foot and shoulder touch the surfaces with no gap at all.
Note how the back of the crown molding does not touch the wall surface. Once you understand this relationship, the rest of the job is easy.
Does the Miter Box Resemble My Ceiling and Wall?
Your miter box has a flat machined table area and a vertical fence that you use as a guide. The vertical fence happens to be oriented at 90 degrees to the flat table surface.
In other words, your saw mimics your wall/ceiling relationship. The issue is, the saw is upside down as the table of the saw represents your ceiling.
How Do You Cut Crown Molding Corners?
You cut and inside and outside crown molding corners at the exact same time when you hold the molding in the miter saw the correct way. It's magic I tell you!
When you cut the trim that frames windows and doors, you typically put the back of the molding flat on the table of the saw.
In this case, the flat bottom of the saw is representing the wall of your home. You swing the saw to 45 degrees and make the cut.
When you do this on another piece of trim cutting the opposite 45-degree angle, the two pieces of trim will meet nicely at the upper corner of a window or door.
If you're installing baseboard that's not tall, you place the back of the trim against the vertical saw fence. This vertical face now represents the actual wall the baseboard will be nailed to. You make your 45-degree cuts and all is well.
Note when the casing and baseboard are against the wall, there's no massive void space behind them. That's why they're so easy to cut in the saw.
If Crown Was Solid You'd Get It Right all the Time
If crown molding was solid, it would be easy to cut. But it's not.
You need to hold the crown molding in the saw as if it was solid. That's where the foot and shoulder come in.
Those two flat areas represent the flat faces of the crown molding that would meet at a 90-degree corner if all that extra wood was still there.
How To Cut Crown Molding Inside Corner
You cut a crown molding inside corner the exact way you see me do it in this video. Watch it:
To create perfect crown molding cuts, you just hold the crown upside down in the saw as if the saw fence/table represents the ceiling/wall intersection. WATCH THE ABOVE VIDEOS to see how this is done.
Do You Need a Nailing Strip?
It's a good idea to install a triangular nailing strip in the corner behind the crown molding. It should be secured to the ceiling joists, not the top wall plate.
I always install an angled filler strip along the entire length of each wall that fills up the hollow spot created by the angled crown molding.
You can almost always make a perfect strip cutting a 2x2 piece of lumber at a 45-degree angle with a table saw.
Drive a test nail about one-half inch below the ceiling at random locations to see if you can find this top plate. With this strip in place, you can easily and quickly nail the crown molding in place without using a divining rod or mystic powers to locate wall studs or ceiling joists.
CLICK HERE to get FREE & FAST BIDS from local carpenters who specialize in crown molding.
Remember, my Crown Molding eBook has complete step-by-step instructions with tons of color photographs that show you exactly how to cut crown molding. 100% Satisfaction Guarantee!
Column 234
Tim built custom homes and did ultra-custom remodeling for 20+ years before launching his Ask the Builder media presence. He was selected as one of the Big 50 by Remodeling magazine in 1993. This award gave birth to Ask the Builder in October 1993. Tim also operates https://DrawPlumbingPlans.com. His @askthebuilder YouTube channel was the first home improvement channel on YouTube.

Thank you for the very good tutorial on cutting crown molding.
Hi. I'm contemplating installing crown molding in one room. But--the ceiling is sheet rock under rafters and follows a rather steep angle down to the next room. So, my molding would have to be less than 90 deg. Does anyone make this, or will I have to measure the angle and cut it myself?
The sharp angle between the wall and the angled ceiling is a dirt trap, and the sheet rock tape is coming loose. Always something weird at my place...
Thanks!
Raleigh, NC
Love the nailing strip idea.
I've never found a corner that is 90 degrees. Ever. In any house I've owned. So cutting 45 degree miters leaves a gap.
I "cut and cope" my joints. Butt one (square) length of the crown against the corner, then I cope the other length. Not as quick as the upside 45 joint, but allows adjustment for the unsquare corner.
keep up the good work.
i get the cutting process- i struggle with measurements.