Fixing Toilet Drainage Problems
Fixing Toilet Drainage Problems
DEAR TIM: My toilet leaks at the floor level. I am convinced it has something to do with the fact that it rocks side to side each time it is used. Upon removing the toilet I noticed the metal ring is rusted and the toilet bolts have nothing to grab onto. I would prefer not to cut into the drain lines if possible. What is the best way to fix this? Steve W., Lawton, OK
DEAR STEVE: Toilets are not supposed to act like rocking horses, that's for sure! It is vital that toilets are securely attached to the drainage system and that there is a seal in place between the toilet and the drain system. The seal prevents sewer gas from invading your home and it insures that all toilet waste goes down the drain and not into your home. Toilet seal problems are significant health hazards and require immediate attention.
Plumbing drainage systems have special fittings that make the transition from the pipes to fixtures. Beneath sinks plumbers use a fitting called a "desanko". This fitting has a nut and a washer on it that allows you to connect the P trap pipe to the drainage system. As you tighten the nut, the washer compresses around the P trap pipe and creates a waterproof and airtight seal. Unfortunately, we can't do the same thing with toilets.
Toilets are connected to the drainage system using a toilet flange. The flange fitting should be set so that the top of the flange is about one quarter inch above the finished floor surface. The flange contains several holes that allow you to securely fasten it to the wood or concrete floor beneath the flange. It is very important that the rim of the flange is supported by the floor. The weight of the toilet and anyone using it should never be transferred to the drainage pipes.
This flange fitting has special slots in it that toilet bolts fit into. The toilet bolts extend vertically through the flange and pass through the holes in the base of your toilet bowl. Using nuts and special washers you then tighten the bowl to this flange.
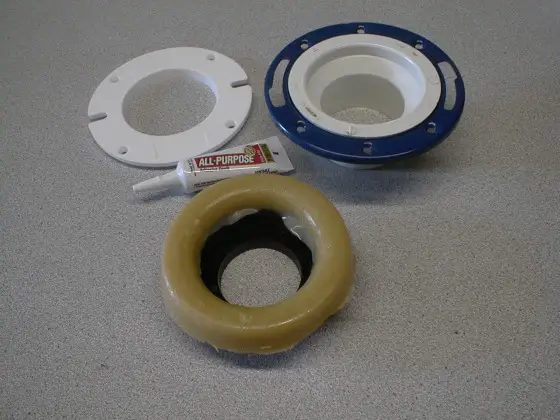
You can purchase a flange extender ring that simply fits over your rusted metal flange. These extenders usually come with a special paste gasket seal. You must use this sealant or silicone caulk between the new flange extender and the old rusted ring. This joint absolutely must be water and gas proof. Visit a traditional plumbing supply house to obtain this flange extender.
Once your new flange is in place, you must make the connection between the toilet and the flange water and gas proof. This is accomplished by installing a wax ring on top of the flange. Wax rings come with or without a horn. A horn is a plastic diverter that directs water into the drain pipe. I prefer wax rings that have this horn. The wax is very sticky and works very well as long as the toilet does not move once the bowl is in place. This is where many rookie plumbers and homeowners make a critical mistake. They move the toilet to some degree after it is in position.
 Click here to watch a toilet flange installation tip video.
Toilet bowls should be installed so that they are level side to side and front to back. The trouble is most bathroom floors are not level. Once your flange extender is in place I want you to set the toilet on top of the flange without the wax ring in place. Use wood shims and a two foot long level to get the toilet so that it is indeed level. Gently lift the toilet off the flange without disturbing the wood shims.
Place the wax ring onto the flange with the horn pointing down into the drain pipe. Be sure the toilet bolts are sticking up through the special slots in the flange. The wax ring often will hold these bolts in place. Slowly and carefully position the toilet onto the wax ring. A helper is handy at this stage and will make sure the bolts make it through the holes in the base of the bowl. Lower the toilet slowly until it contacts the wood shims. Tighten the toilet bolts and grout the space between the floor and the base of the toilet. When the grout sets carefully remove the wood shims and fill these holes with the same grout. You will enjoy years of leak free performance!
Column 359
Watch this video to see how Tim SOLVED a problem in minutes!
CLICK here to learn more on how Tim can help solve your problems.
Tim built custom homes and did ultra-custom remodeling for 20+ years before launching his Ask the Builder media presence. He was selected as one of the Big 50 by Remodeling magazine in 1993. This award gave birth to Ask the Builder in October 1993. Tim also operates https://DrawPlumbingPlans.com. His @askthebuilder YouTube channel was the first home improvement channel on YouTube.
I inherited a first storey lavatory which exits via a macerator - how and who should I contact to get this onto the mains sewage? Neighbours and I believe a sewage pipe runs between our houses, about a meter from both buildings, the inspection trap further back indicates the drain is certainly running toward the main sewer in the street. I have a ground level lavatory which is on the mains but the drain runs away in the opposite direction to join my neighbours on the other side of the house.
Hope you can advise
Keith West
Keith,
Lots to discuss. This is why I developed this: Tim's 15-Minute Phone Call