Wet Bars Require Some Thought
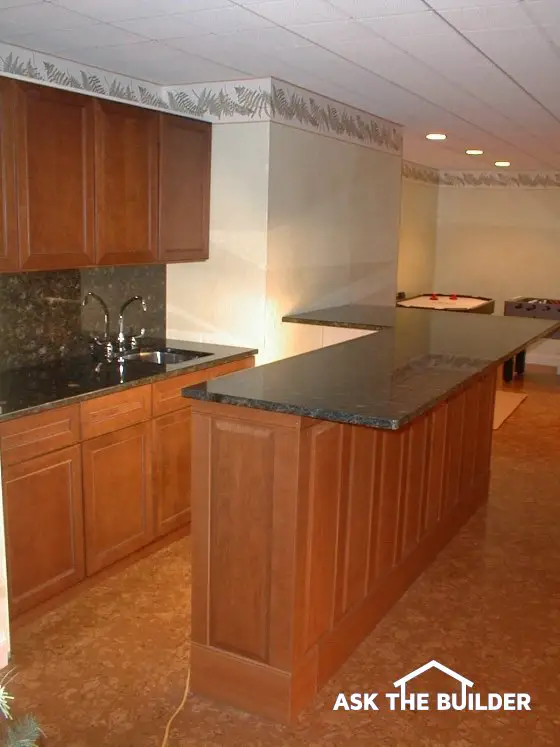
The short wall facing you at the end of the bar is very important. It keeps the bar from tipping over.
DEAR TIM: I want to build a traditional refreshment bar with a wet bar behind it. What are some good dimensions for a bar/wet bar? How do you make the bar stable so it does not tip over when people lean against it? What is a preferred bar height? Can you recommend some high performance surfaces for the face of the bar and the actual bar top? Randy C., Boulder, CO
DEAR RANDY: Timing is everything. It just so happens I just completed an identical project in my own home. My bar has been a labor of love and my family and I are very pleased with the final results. It is not hard to design and build a durable and functional wet bar. I believe the hardest part will be selecting the finish materials. There are simply many wonderful products from which to choose.
The dimensions of a typical bar are fairly standard. A finished bar height surface that works well for the average height person is 42 inches. The bar top should be at least 18 inches deep. 20 to 24 inches is better if you have the room. My bar ended up being 28 inches deep so that it would completely cover a rear shelf that is used to store bottles of soda, beer, glasses and supplies. Without the protection offered by the enlarged bar top, spilled drinks and food could easily contaminate these supplies.
The front overhang of the bar is very important. If you intend to use bar stools, the overhang should be 12 inches. This depth will allow people to sit comfortably and not have their knees scrape against the face of the bar. If you must have a smaller overhang, do not make it less than 10 inches.
Bar stability is very important. A simple straight bar wall is strong where it connects to an adjacent wall but becomes very unstable as you approach the end of the bar. Several inebriated friends leaning against a flimsy wet bar can indeed cause it to collapse. I have found that several things can be done to make a bar very stable.
If the bar is built on a concrete floor, a small 14 inch long return wall can be built at a 90 degree angle at the end of the long bar wall. Face the outside of this wood wall with 3/4 inch thick plywood. The plywood adds enormous lateral strength to the small wall. Use six inch long by one half inch diameter sleeve anchor bolts to attach the bottom wall plate to the concrete floor. This tiny wall prevents the end of the wall from moving.
If the bar is built on top of a wood floor joist system, the wall can be stiffened in a different manner. A 4x4 post can be bolted to the end of the wall. This post projects down through the floor into the floor joist cavity. If you are lucky the post will rest alongside a joist. Use long lag or through bolts to securely fasten the post to the joist. If the post falls between two joists, install solid blocking between the joists and fasten the post to the blocking.
You can use handsome paint grade or wood finish wainscoting to finish the front of the bar. I happened to use cherry wainscoting. Regular paneling, acrylic plastic block, stone, brick, salvaged barn siding, etc. or a mixture of these materials are all viable candidates. These materials can be attached to a standard 2x4 wall that forms the bar wall. The inside of the bar wall can be finished with regular drywall.
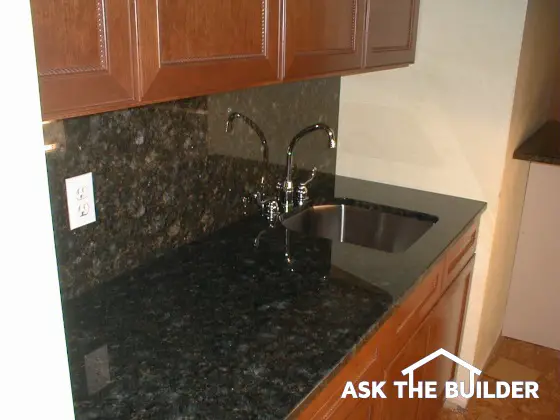
The granite backsplash is the only way to go. It adds a tremendous amount of character.
Granite was my choice for both the bar top, the wet bar top and the back splash behind the wet bar. This material is durable, gorgeous and has gotten many compliments. Other choices are solid surface materials, plastic laminate, tile, marble, etc. Keep in mind that the bar top must be securely fastened to the bar wall so that the top does not flip when people lean against it. I used a large piece of flat steel that I bolted to the wood bar walls. The granite was then epoxied to the steel. You can use plywood in lieu of steel depending upon which finish material you choose to use.
If you can add a wet bar behind the regular bar, be sure to incorporate as many base and wall cabinets as possible. The storage space they provide will come in handy if you happen to do lots of entertaining.
Column 410
Tim built custom homes and did ultra-custom remodeling for 20+ years before launching his Ask the Builder media presence. He was selected as one of the Big 50 by Remodeling magazine in 1993. This award gave birth to Ask the Builder in October 1993. Tim also operates https://DrawPlumbingPlans.com. His @askthebuilder YouTube channel was the first home improvement channel on YouTube.
I am building a wet bar in our den. It will have concrete countertops. It will have a flip up door. I need to know what the best hinges to use and how I they will attach. I need to know before I start on the frame for the countertops, is there prep work I need to do there? Thank you, Ms.
Eve
I forgot to mention, the flip up door will be made of wood and I do not want the hinges to show. Ms, Eve
We are working on adding a section of countertop in our kitchen to use as a bar. How deep is the counter with the prep sink and how deep are the cabinets above the prep sink? I am repurposing upper cabinets that are 14-inches deep and was hoping to have a counter depth of only 18-inches.
Thank you!