Deck Railing Post
DEAR TIM: I am rebuilding my front porch, steps and the sidewalk leading to the porch. The porch will be made from wood and the steps and sidewalk made from natural stone. How do I fasten the stair handrail post to the stone steps at the bottom and the wooden porch at the top so they are as strong as my interior staircase newel posts? It seems no matter what I conjure up, the connection makes for a very wobbly post. Paul G., Dorchester, MA

DEAR PAUL: Your dilemma has been, and continues to be, the bane of many a do-it-yourselfer and even professional tradesman if the stair posts I have wiggled over the years are the rule and not the exception. When I grab a stair railing, I always test it. All too often, the wooden stair post at the bottom of a set of steps moves as easily as the sloppy floor gearshift knob in my 1969 Volkswagen Beetle.
A stair post or deck post is simply a lever. Your challenge is to lock this lever into position so that the bottom end of the post barely moves at all.
There are many different ways to accomplish this goal. But here are some half-baked solutions that I have seen, that just don't work well. Never just nail or bolt a stair post to the side of the staircase framing lumber. Placing the post in the ground and surrounding it with concrete is better, but over time, the concrete can crack and/or the post can shrink causing the post to wiggle and move.
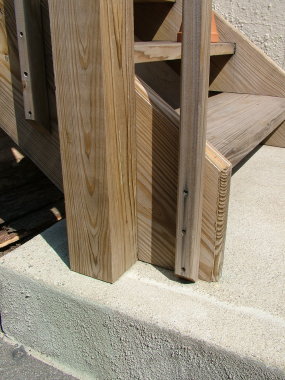
This large railing post does NOT extend into the concrete. It may start to wobble once the treated lumber dries out or enough people push against it. PHOTO BY: Tim Carter
The reason your interior staircase newel post is solid, and doesn't move when you push against the top of it, is because the post extends well beyond where you see it contact the floor. I would venture to say that the interior newel post is actually 12 to 16 inches longer than what you see above the floor line. This extra length of post fits snugly into solid blocking inside the first stair and additional solid-wood blocking that may be inside the flooring system below the staircase.
I have had great success creating solid exterior stair posts. The post at the top of the stairs is the easiest one to deal with in my opinion. This post should actually do double duty as a stair post and an additional support post for a beam or ending floor joist that may run parallel with the front wall of your house.
The post should be one continuous length of lumber that extends from the top of the railing to a special metal connector that is solidly anchored into a concrete pier at ground level. The post extends upward from the pier and continues past the beam or floor joist. Where it touches the beam or floor joist, you should through bolt the post to this framing lumber. This dual connection method locks the post into position so it can't rotate where it touches the porch flooring.
The post at the bottom of the steps is a little harder to engineer. If you can use a 4x4 wood post, the solution is easy. You have to first build the set of steps to ensure that the post will be perfectly located. Visit a local metal shop or a business that does welding. They will probably have a handy scrap piece of 4x4 steel tubing lying around. Purchase a two-foot long piece and try to get one that has the thickest sidewalls possible. Ask them to quickly weld onto the sides of the tube a few scrap pieces of small round pipe or other smaller scrap metal.
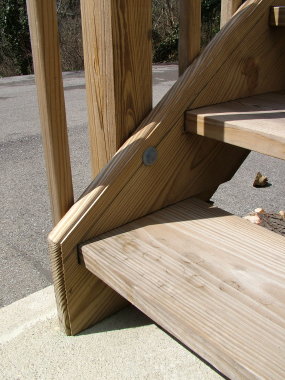
A lag bolt was used to bolt the large deck railing post to the stair tread. It is the worst connector the builder could have used. PHOTO BY: Tim Carter
You will discover that the 4x4 wood post will easily slide into the metal tube. But it will wiggle. This will be dealt with in due time. Dig a ten-inch diameter hole next to the bottom of the stairs where you want the post to be. The hole needs to be 28 inches deep measured from the top of the finished paved surface at the base of the steps.
Place three inches of rounded gravel in the bottom of the hole. Insert the metal 4x4 tube into the center of the hole and place the wooden post into the tube. Position the post exactly where you want it and secure some temporary bracing to the top of the post to hold it in place. Pour concrete around the metal tube and fill the hole completely with concrete. The scrap metal welded to the tube will interlock with the wet concrete to ensure the tube will not wiggle, or slide up and down as time goes on. The gravel at the bottom of the hole allows water to flow freely away from the tube.
After waiting 24 hours, remove the bracing and pull the wood post out of the tube. You can cut small slivers of treated lumber to add to the bottom sides of the post to make it fit snugly into the tube. Use waterproof urethane glue to secure these wood shims to the post.
The metal tubing needs to be protected from the long-term effects of rust. Before it is surrounded by concrete, you should paint the square metal tubing with a high-quality metal primer that claims to prevent rust. Paint both the exterior and interior of the metal tube. Let this primer dry for 24 hours and then apply a second coat of exterior finish paint that is made to coat exterior metal. The color does not matter since the metal tube will never be seen after it is installed.
The metal tube offers many advantages. It locks the bottom of the post so it can't rotate in any direction. The tube acts as a sleeve that allows you to remove the wood post with relative ease at some point in the future.
Tim built custom homes and did ultra-custom remodeling for 20+ years before launching his Ask the Builder media presence. He was selected as one of the Big 50 by Remodeling magazine in 1993. This award gave birth to Ask the Builder in October 1993. Tim also operates https://DrawPlumbingPlans.com. His @askthebuilder YouTube channel was the first home improvement channel on YouTube.
Your suggestion for using the metal 4x4 tubes was great. However, what is the best method for securing a stair rail post on to a concrete slab that was already in place?
we put in new wooden stairs to replace the rotted ones. our problem is there are brick stoops on either side of the stairs. each has a concrete slab on the top. how can i secure my post for the railings with worrying about them falling over after a while.
It's very complex. I can't tell you here in the comments all the steps.