Patching Plaster Walls
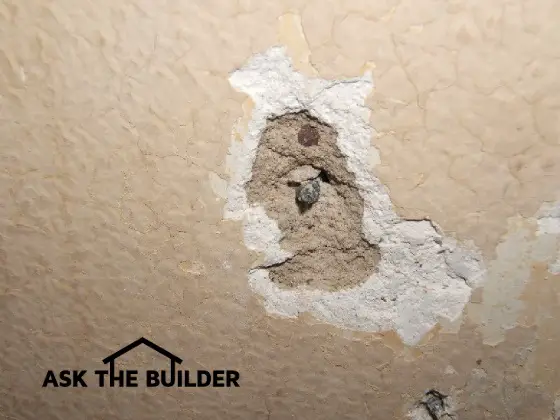
Because of the depth of this hole, it will require two or more applications of patching plaster. PHOTO CREDIT: Amy Caroli
Patching Plaster Walls
DEAR TIM: My husband and I are trying to restore our apartment in an old prewar building. The walls have small to medium-sized areas where some of the plaster is missing and there are numerous jagged cracks in the walls. In some areas I can see down to a rough, sandy brown-colored plaster. Do you think we can repair these defects on our own using skim coat plaster or other tools? All of the paint came off the walls easily to expose the original white-plaster walls. How hard is it to work with plaster? Amy C., Brooklyn, NY
DEAR AMY: My biggest concern at this point is that you may have created a serious health issue in removing the paint from the walls. Because of the age of the building, I would be willing to wager significant money that the paint you removed contained lead. If this is so, there may be significant amounts of small lead paint chips in the rooms and significant amounts of visible or invisible lead dust in the rooms.
Before you do any plaster patching, I urge you to rid the rooms of any residual lead. If you try to vacuum up chips or dust, you must use a special HEPA filter-equipped vacuum cleaner. Some tool rental stores rent these. Change and wash the filter regularly and dispose of the wash water down a toilet. Mop the floors and wash down walls making sure to change the wash water regularly and dispose of the contaminated water down a toilet. Obtain all approved cleaning procedures and cleaning products from the EPA's website: http://www.epa.gov/lead/.
I think you can successfully patch the plaster if you have some patience and a fair amount of hand-eye coordination. To obtain professional results you will need to practice and use the correct products. Many old plaster patching jobs fail because people use the wrong materials for the job.
Do not use the common drywall joint compounds you often find in home centers. These products are only meant to be used with paper-faced drywall. They bond poorly to traditional plaster. Plaster patching must be done with patching plaster and sometimes plaster of Paris for the best results. You can achieve moderate success with setting-type joint compounds and these might be a good product to use to practice your repair techniques.
Setting-type compounds are powders that mix with water. The water starts a chemical reaction that causes invisible crystals to begin growing. These crystals interlock within the coarse open plaster to create a strong bond. The advantage to using this material is that it is often sandable. If you make a finishing mistake, you can sand down any excess material. Traditional patching plaster and plaster of Paris are not sandable.
Before applying any product to the walls, they must be clean and free of any dirt, grime or grease. All loose plaster must be removed and all cracks should be enlarged so that the top of the crack is at least one-quarter inch wide. If at all possible, try to make the bottom of the cracks wider than the top. This will take extra work, but the patching compound will interlock into the old plaster like a dovetail joint once it hardens. Slightly dampen the areas to be patched with water just before applying any patching compound.
The trick to patching plaster is to start with small holes that are no bigger than two inches in diameter. If the hole is deeper than one-half inch, then only fill the hole halfway with patching material. The patching material may harden within several hours and then you can mix new material to finish the job.
Use regular drywall finish tools to work with the patching materials. I prefer to use different knives, my favorites being five-inch, ten-inch and twelve-inch flexible broad knives. These tools held at a 30 degree angle to the wall allow you to spread the patching compounds much like you spread icing on a cake.
Both the setting type compounds and the patching plasters can be finished with a sponge as they harden. Professional plasterers will often use a small amount of water on their trowels to make the setting plaster slick as a piece of glass. It takes great skill to perfect this method. You can try to do this as the compounds set, but you have to time it just right.
The best way to practice is to mix some of the patching plaster and use it to fill a small hole that might be hidden behind a piece of furniture once the remodeling is complete. Use your drywall knives to apply the compound and get it as smooth as possible with little or no excess on the wall. Make sure you use a knife whose blade is longer than the hole is wide. With the blade spanning the hole, make repeated light strokes over the wet patching compound until no excess material collects on the knife blade. If you press too hard, you might create a slight depression in the patched area.
Use the sponge to wipe any excess patching compound off the adjacent, sound plaster. As the patching compound gets quite hard, gently stroke it with a damp sponge to make it smooth.
Column 603
Tim built custom homes and did ultra-custom remodeling for 20+ years before launching his Ask the Builder media presence. He was selected as one of the Big 50 by Remodeling magazine in 1993. This award gave birth to Ask the Builder in October 1993. Tim also operates https://DrawPlumbingPlans.com. His @askthebuilder YouTube channel was the first home improvement channel on YouTube.
should I use setting type joint compound, patching plaster or plaster of paris to fix my cracks in plaster ceiling? Thanks.
Are yoouuu kidding me That’s right Oh no lead in the paint Maybe we should go in for a lead test before we start the fff plaster patch Wwoooowww !!!!!!!!!!!!!!
I was looking at this post, and have a somewhat different repair to make. In repairing tub plumbing, the plumber had to remove a lot of plaster around the edges of an access panel, leaving a gaping hole. The house is 1932 vintage so the plaster had lath (now cut away) sand coat and finish coat. It is open at the back to allow access to the plumbing in the wall behind the tub. My guess is that I need to add 2" on the sides and bottom and up to 6" at the top. Looking for how to do this
Ted, fill out the form here and I can call you. I'll have you plastering in no time. https://www.askthebuilder.com/tim-carter-calls-you/