Brick Patio Mortar Repair
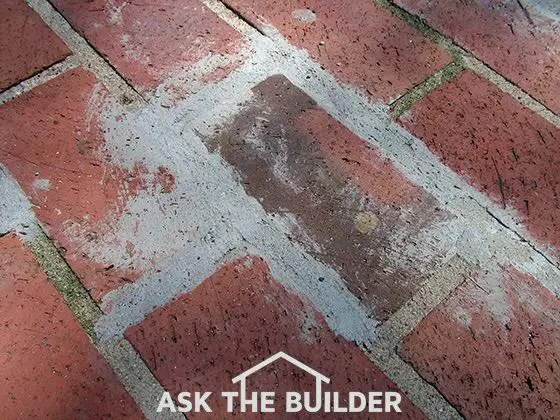
Brick patio mortar repair | This repair job could have been done with less mess, but in a week a mild acid wash will get rid of the cement stains. Copyright 2018 Tim Carter
"The first thing you need to do is look very closely at your existing mortar joints. Look at the color of the sand."
Brick Patio Mortar Repair Checklist
- Matching sand is the top priority
- Use hydrated lime in the mortar
- A mortar bag is a must-have tool
- Mortar must be rich to flow from the bag
DEAR TIM: I have a lovely brick patio that has mortar between the brick. After pressure washing it this past weekend, I noticed several locations where the mortar has disintegrated.
Most of the mortar is in excellent condition, but a few places need to be repaired. Some of the voids are 1 inch deep, while others only need perhaps one-eighth inch of mortar. How do I mix the new mortar, and what tools do I use so I don't make a mess of things? I have lots of free time, so what are the best weather conditions to work in so the repairs last a long time? Holleay P., Kitty Hawk, NC
Related Links
Matching Mortar Perfectly - SECRET Information - Do NOT Share
Best Brick Patio Repair Practices
Free & Fast Bids
CLICK HERE to get FREE & FAST BIDS from local masons who can repair your patio mortar.
DEAR HOLLEAY: Brick patio designs are as plentiful as blossoms in spring, but a traditional brick patio that has been mortared in place is one of my personal favorites. These patios are like a brick wall that is lying flat on the ground, and the mortar becomes an interesting design element because of its texture and color. I have two brick patios just like yours, and they get compliments each time a friend or neighbor sees them for the first time.
What is the Best Brick Patio Mortar?
The best brick patio mortar, in my opinion, is one that contains hydrated lime, Portland cement, and a medium sand.
When I am building a brick patio like the one you and I have, I use a special mortar that will withstand years of Mother Nature's abuse.
It sounds like your builder did the same thing, but the mortar in a few locations was defective. That has happened to me in a few spots on my own patio. I traced the defects to excessive water from a rainstorm that happened soon after one section of the new brick was grouted.
What is the Best Mortar Recipe?
I suggest you repair the defective joints in your patio with the same type of mortar mix I used when I installed my patio. It's extremely durable, and will last for 40 - 50 years if you cure the joints once they are installed.
- three 5-gallon buckets of dry sand that matches existing sand in patio mortar joints
- 6.38 gallons of Portland cement
- 1.12 gallons of hydrated lime

This is excellent hydrated lime. It's a fine white powder and it's going to look great on your home. CLICK THE IMAGE TO ORDER SOME RIGHT NOW.
How Do I Match the Sand for the Mortar?
You match the sand by paying attention to the color and size of the individual pieces of sand in the old mortar.
Your biggest challenge is going to be matching the color and texture of the existing mortar. You did the right thing by thoroughly cleaning the brick and mortar first. All too often, people try to match mortar colors and fail to clean the surrounding mortar first. Mortar on walls, and especially on flat patios, can get very dirty.
The first thing you need to do is look very closely at your existing mortar joints. Look at the color of the sand.
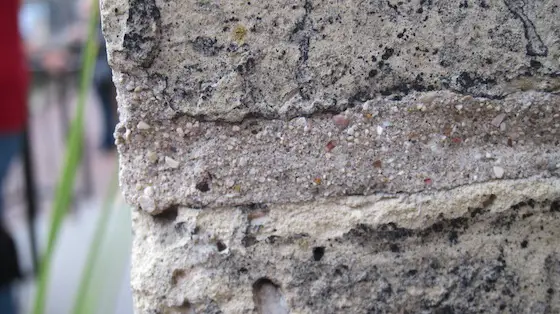
Look at the colored pieces of sand. Note the size and different colors. I see white, black, orange, and some gray pieces of sand.
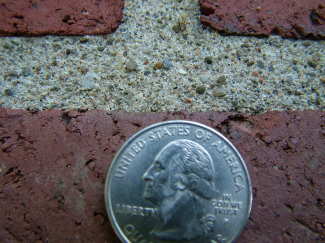
Check out the different colored pieces of sand. Each grain is a small piece of solid rock. The sand for the repair job should match the existing sand as close as possible in grain size, shape and color. Copyright 2018 Tim Carter
Is All Sand the Same?
Believe it or not, not all sand looks the same. Sand is simply a collection of very small rock particles, and the color of individual sand particles can be vastly different if the particles come from a variety of black, red, white and gray rocks. Visit different building supply businesses and/or sand and gravel pits, and try to find sand that matches both in color and particle size.
Once you have the correct sand, mix your brick patio mortar using my recipe you see above. This will make a very rich mixture that will be exceedingly strong.
You need this strength, even though you do not get too many extremely cold days.
CLICK HERE to get FREE & FAST BIDS from local masons who can repair your patio mortar.
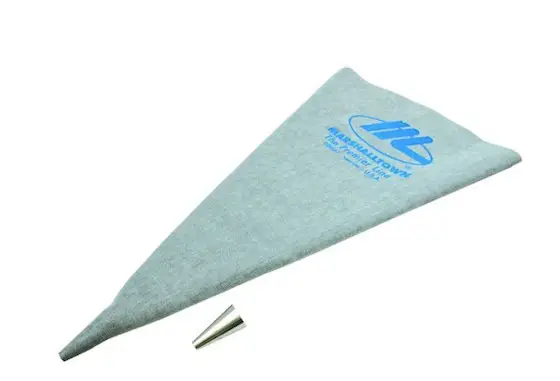
What is the Best Tool to Install the Mortar?
A grout bag is the best tool to install the brick patio mortar.
Extra cement and hydrated lime in your mortar help make the mortar flow easily from the tip of the special grout bag you'll use to fill the defective mortar joints.
This is a great mortar repair bag. I own one and it's installed thousands of feet of mortar into joints. CLICK THE IMAGE NOW to have one delivered to your home.
Mortar grout bags are just like icing bags used by professional cake decorators. They are larger than an icing bag, and have a metal cone tip that has a one-half-inch hole at the end.
What's the Best Weather to Repair Brick Patio Mortar?
I prefer to work on cloudy days when the temperature is in the 50 - 65 F range. Do not work on a hot, sunny windy day. The mortar will dry too rapidly, especially where you are filling slight depressions in the existing mortar joints.
How Do You Install the Mortar in Between the Brick?
Once you have the mortar mixed, lightly spritz the mortar joints you are going to fill. Do not get them too wet, just slightly damp.
Fill the grout bag half way with the mortar mix, and apply slight pressure to make the mortar mix flow just as toothpaste oozes from its tube. If you can't get the mortar to flow, you need to add more cement and/or slightly more water. The mortar mix needs to be fairly wet so that it doesn't clog the grout bag tip.

These deep joints can be filled with new mortar using the special grout-bag tool. Once the mortar is stiff, scrape off excess with the small trowel. Copyright 2018 Tim Carter
Carefully guide the grout bag tip so that you apply new mortar only to the joint. Move the bag along and make sure you apply mortar so it rises above the level of the brick by about one-quarter inch.
The fresh mortar needs to touch the top edges of all the brick. Let it set until you see it change from wet and glossy to a flat gray color. Use a small triangular trowel to gently scrape off the excess mortar so the top of the mortar is flush with the brick. Keep the fresh mortar damp for three days so it cures well.
When Do You Scrape Off Excess Mortar?
If you scrape the excess mortar too soon, it will smear onto the brick. You do not want this to happen, especially if the brick has a rough texture or grooves created by the wire-cutting process as the brick is manufactured. If mortar gets in these grooves, it is a nightmare to remove.
You also have to be careful about waiting too long to scrape off the excess mortar. If the mortar gets too hard, you run the risk of breaking the bond between the new and old mortar. If this happens, your new mortar may fail in a few years.
CLICK HERE to get FREE & FAST BIDS from local masons who can repair your patio mortar.
Column 621
Tim built custom homes and did ultra-custom remodeling for 20+ years before launching his Ask the Builder media presence. He was selected as one of the Big 50 by Remodeling magazine in 1993. This award gave birth to Ask the Builder in October 1993. Tim also operates https://DrawPlumbingPlans.com. His @askthebuilder YouTube channel was the first home improvement channel on YouTube.

Will this work on patio next to block wall?
Seam leaked down wall.
Tim , is there a sand mix that hardens over time after being brushed into the joints between bricks? If so this might prove to be a solution to this problem.
I have an existing brick patio and after only 6 years the joints are falling apart. I brought part of the joint to home depot and the associate told me that it wasn't mortar but cement that I had. Can I use cement or concrete between brick patio joints? Or is mortar the material to use?
Patrick,
I tell you in this column exactly what to do. Why the confusion?
Tim, your article is specifically about mortar joints on a patio. He is asking about Cement and Concrete in an existing installation. Why the confusion?
Thank you for the instructions on doing this repair. My brick patio is laid over concrete, over 20 years ago, and I need to repair some of the joints! I remembered using Portland cement when we put it in but could not remember what we mixed with it! I do have one question. Some of the bricks are sunk because the concrete underneath has crumbled. Would you use this same mix underneath those bricks to build it back up? Thanks!
Hmm, scraping the mortar "not too soon" - but don't wait "too long" either...
So on your ideal 50-65F day with your mixture as described, how long in actual minutes do you think that would be?
My patio was built with dry sand as it's base. Occasionally the ocean reaches a portion of the patio during the winter storms. The patio just caved in.can I repair the patio by using mortar so that it will be less likely to cave?
THANKS!!!! Excellent(boy you get some crazy questions-lol But it takes all types)
We recently bought a 108 year house which has a brick front porch/patio. The surface of the porch consists of the varying size brick pieces (I might describe the brick as "chipped edge pieces"). In-between the brick is mortar, and the brick pieces are equi-distant, forming a sort of "brick puzzle". The edges are formed with whole bricks, as are the steps. The mortar at places along the edge has worn away. How might a person 1) properly remove and clean the old mortar away, and, 2) reapply mortar in gaps, as required? Should the gaps and loose pieces and dust be sprayed well with clean water? If my suppositions are correct, would I be able to then apply new mortar, as/per directions on the mortar product?
House built in 1986, brick walkway to the door. 3 yrs ago I used the wrong kind of salt on the walkway - ate away at the grout. I live in the woods, no sun in the summer & bricks got slick with the unusual amounts of rain we have had so yesterday I pressure washed the walkway - and about 1/2 of the bricks now need new mortar - some just a little, some all the way to the ground and all the way around. I have put in brick walkways before - but never repaired one... is my situation doable with your repair techniques?
Yes, it will work. The repair mortar needs to be at least 1/2-inch thick.
Thanks for these great instructions Tim! I have a couple of questions: you say to keep the grout damp for a few days so it cures. What is the best way to do that? Also, our mortar is a cream/off-white color, not grey. What is the best way to match a mortar that doesn't have a grey cement base? Thank you!
Kitty,
Cover it with 6-mil plastic sheeting and weight down the edges so no wind gets under it. Water the grout under the plastic if need be once a day to ensure it's nice and damp.
Read the following column to explain how to match grout colors perfectly.
https://www.askthebuilder.com/pepe-corona-daltile-los-angles-ca/
Hi, and thanks for your informative article. I am in the process of laying a patio of reclaimed brick over a concrete pad. Despite what my initial research told me (to mix in lime) I was told by my local builders supply to use a mix of Portland cement and sand only, that I didn’t need any lime. And, to make the color lighter just add more sand. In the small corner I laid, the color of the mortar is WAY too dark for my liking. I ended up ripping it all up a few days later (today) because it was so dark and not what I want. From what I understand, lime lightens the mortar, as well as softens it. Would your formulation be good to use for reclaimed, red clay brick patio? And should I use it both for a mortar base AND grout? Also, do you have a smaller scale recipe?
Kristin,
Far too much to type. This requires one of my phone consult calls. https://shop.askthebuilder.com/15-minute-phone-or-video-conversation-with-tim/
We have 2 brick patio’s. The bricks were placed in a “ square “ spiral pattern. The mortar was done the same as one would do with a wall ( depressed groove) so it all needs to be re done ( I assume) (It holds water). Is there a way to remove all that grout? Was thinking a circular saw but what kind of blade?