Paint Cedar Shakes
DEAR TIM: My husband and I have a home covered with cedar shakes. We are going to be building a smaller room addition soon, and will match the outside cedar shakes. To save money, I will paint the new cedar shakes. I am dreading this job as I have already painted the existing house, and know what a nightmare it can be to get the paint in between the shakes. How would you tackle this painting job? There have to be some tricks pros use in this situation. Anne R., Long Beach, CA
DEAR ANNE: Oh, I know exactly how you feel. Many years ago, I started a small business with a friend of mine. We painted houses in the summer to pay our way through college. One of the houses we bid on had cedar shakes. It took us forever to paint the house. We ruined lots of brushes trying to dab the paint into all those gaps between the shakes. Drips were a constant headache as excess paint in the gaps would regularly run down the face of the cedar shakes.
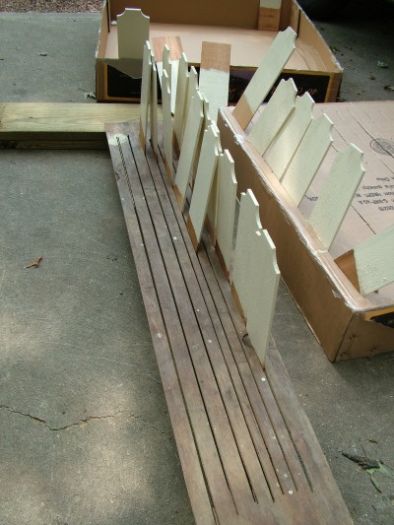
A scrap piece of plywood makes an excellent rack to hold painted cedar shakes. PHOTO CREDIT: Tim Carter
There are any number of ways to make this job really easy. I can think of two right off the top of my head. You are extremely lucky to have thought about this problem before the shakes are installed. Painting bare cedar shakes that are already installed is very hard, and can lead to other pesky problems down the road.
One of the issues of painting cedar shakes after they are installed is that you don't get paint on critical parts of the shakes that can get wet. The gap between the shakes acts like a miniature funnel in a driving rainstorm. Water can only go down or sideways and often does penetrate under the cedar shakes. When this happens parts of the shakes that are covered with other shakes get wet, really wet.
When the water soaks into the bare cedar wood, it dissolves chemicals in the cedar. This colored water often runs down out of the shakes after the storm is over causing pesky extractive-chemical stains on your beautiful shakes. This moisture can also cause the paint to bubble and flake off at a later date.
Your best bet, at this time, is to paint the cedar shakes before they are installed. There are any number of ways to do this, but you may find that spraying or dipping the shakes is the most productive method.
There are some very good airless paint sprayers that will do this job very quickly. The challenge is creating a spray-paint booth to minimize paint over spray. This can be done inside a garage with a few large-appliance cardboard boxes or draping sheets of plastic to create a small room.
The other method is to take a five-gallon bucket and pour four gallons of the paint you will use into the clean bucket. You then take each shake, holding it at the thin top edge, and dip it completely into the paint to within two inches of the top of the shake. Using a paint brush, you then remove the excess paint from the shake as you are holding it above the bucket.
It is vitally important that the front, back and all edges of each shake get painted no matter if you use the dipping or the spray method. This complete coverage solves the issue of trying to paint the edges once the shakes are installed, and it completely seals each shake against the water penetration.
The biggest challenge in painting the shakes in this fashion is how to get the paint to dry without the shakes touching one another or something else. I have solved this problem with a scrap piece of plywood. Using a circular saw or a table saw, I cut grooves in the plywood that are one-quarter-inch wide by six-feet long. The grooves are separated by one and one-half inches each. I set the plywood up off the ground about three inches on each end.
After a shake is painted, you insert the thin end into the groove. The shake sticks up in the air and can dry rapidly. You can place many shakes in a single piece of plywood. By the time you fill up one piece of plywood, the shakes that were first painted are usually dry to the touch and can be moved to another location where they can be tilted up against a wall.
Never stack the shakes against one another for at least two or three days as the paint needs to totally cure. If you stack them too early, they will stick together.
Often the shakes need two coats of paint. Try to apply both coats of paint within 24 hours for the best results. This ensures the first coat is still clean and tacky. The final coat of paint will bond much better if the first coat is still slightly sticky. Follow the instructions on the paint can, and always paint as soon as you are allowed.
Column 687
Tim built custom homes and did ultra-custom remodeling for 20+ years before launching his Ask the Builder media presence. He was selected as one of the Big 50 by Remodeling magazine in 1993. This award gave birth to Ask the Builder in October 1993. Tim also operates https://DrawPlumbingPlans.com. His @askthebuilder YouTube channel was the first home improvement channel on YouTube.
Like the rack idea.