Ask the BuilderAsk the Builder
Ask the Builder's on:

Subscribe to askthebuilder's videos

Air Conditioning
Asphalt - Blacktop
Brick
Building Tips
Cabinets
Caulk
Ceilings
Ceramic Tile
Checklists
Chimneys
Concrete
Concrete Defects
Concrete Installation
Condensation
Countertops
Deck Construction
Deck Maintenance
Design
DIY
Doors
Drainage
Drywall - Plaster
DVDs
EBooks - EDocs
Electrical
Energy Savings
Engineered Wood
Fences
Fireplaces
Flooring
Foundation
Garage Doors
Glue
Hardware
Heating Design
Home Builders
Home Depot Stories
House Plans
Hurricanes
Insects
Inspections
Insulation
Interior Walls
Kitchen
Lighting
Lots
Miscellaneous
Mold
New Construction
Newsletters
Online Courses
Outdoor Projects
Painting - Staining
Patio
Payments
Plumbing Design
Plumbing Supplies
Projects
Radiant Barrier
Remodeling
Retaining Walls
Roofing
Rough Lumber
Screened Porches
Sheds
Siding
Specialty Accessories
Stone
Storage
Structural
Stucco - EIFS
Tools
Trim Lumber
Vapor Barrier
Ventilation
Videos
Walk Throughs
Wallpaper
Windows
Glossary


Drywall Repair

By Tim Carter
©1993-2008 Tim Carter
Summary: Repairing holes in drywall is easy with these tips. You don't need special drywall repair kits for the drywall repair. With just a few drywall tools and some drywall taping, those holes will be gone.

DEAR TIM: My testosterone-filled son was practicing some self-defense punches, and now I am left with a pesky drywall repair. Should I go look at the drywall repair kits, or is there a better way? I can't afford to hire any of the drywall repair services. Can you teach me how to repair drywall? Cindy R., Racine, WI

DEAR CINDY: Drywall patching and repair is not a difficult job. In my opinion, this is what I would have an apprentice drywall finisher do for the first week if I were in charge of training. The steps required to repair drywall are few and not too challenging.

If I had a dollar for every drywall repair kit I have seen at the various conventions I attend, I would be a very rich man. Many of these drywall repair kits are wonderful, and a few border on genius. I have always liked the one that was a thin perforated piece of aluminum. It had adhesive on one side. You peeled off a layer of protective paper, stuck the metal over the gaping hole making sure the edges of the metal lapped over solid drywall at least one-half inch and you were 80% finished!

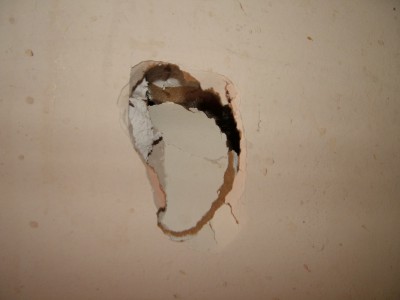
This nasty-looking hole in the drywall can be completely repaired in three hours or less with the right products. PHOTO CREDIT: Tim Carter
All that was left to do was cover the metal with two coats of drywall topping compound. The first coat would ooze through the holes and once dry would make the flimsy metal patch quite stiff.

But as much as I am smitten with many of the drywall repair kits, I usually prefer to do drywall repair using a small piece of drywall. This ensures there is a solid piece of drywall where there was moments before a hole. Be aware that there are many ways to do drywall repair using a small piece of drywall, but the method I am about to describe has never failed me.

Start the job by trying to rip out the dangling piece or pieces of drywall from the hole. Then carefully insert your finger into the hole trying to probe and feel if there are any pipes or wires behind the drywall.

Assuming there are no wires and pipes in the way, you now need to use a pointed drywall saw that resembles the spear on a sailfish. Create a square or rectangular hole using this saw. The hole should be at least 3 inches wide and at least 3 inches tall.

Explore your garage or workshop and come back with a piece of wood that is at least one-half-inch thick, one inch less than your hole is wide and three inches longer than your hole is tall.

Unless you are incredibly talented, you may need a helper for the next step. Carefully insert the piece of wood into the hole pulling it against the back side of the drywall. Adjust the piece of wood so that there is an equal amount of wood above and below the edges of the hole. Insert a total of four one and one-quarter-inch long drywall screws through the drywall and into the wood strip; two screws at the top and two at the bottom.

Cut a small piece of drywall that fits snugly into the hole. Attach it to the wood strip with a few drywall screws. It is now time to tape and finish the drywall patch.

I suggest you use the rapid-set powder joint compound that gets hard in as little as 30 minutes. This allows you to apply two coats and wet-sand the patch with a grout sponge in just an hour. If you then use a hair dryer to accelerate the drying process, you can paint the repaired area within minutes.


If pipes and wires prevent you from using a wood strip, you can still do the repair with a scrap piece of drywall. The scrap piece should be three inches wider and three inches taller than the hole.

Flip the scrap piece over and use a sharp razor knife to make straight-line cuts that are parallel with the edges and in from each edge one and one-half inches. Make repeated cuts with the razor knife being very careful you do not cut through the facing paper of the drywall. Carefully peel off the thin strips of drywall leaving the front facing paper intact on the repair piece. The strips of facing paper will overlap the hole in the drywall and act as the tape to hide the four seams.

Apply drywall taping compound to the edges of the hole, press the drywall patch into place and proceed finishing the area as if the repair had been taped with regular drywall tape.


Author's Notes:

Gerald Mitchell emailed this helpful repair tip.

Tim,

I recently read your article in the Toledo Blade about repairing drywall. One tip, you might want to remember, is to even take a piece of drywall that can fit behind your square hole, and put latex caulk on the front side of this piece you are inserting through the hole. This will help hold the piece of wood up or drywall. To pull the patching material forward and snug to the back side of the hole, simple drill a hole big enough to put a piece of string, or even some electrical wire, through this hole and secure on the back side of the new piece of drywall. Use this string or wire to pull the repairing piece snugly against the back side of your existing wall.

Cut the string or simply push the electrical wire through the back side when the caulk dries. The latex caulk will hold the repairing piece in place and will dry so when you spackle over the hole, the spackle stays in place for the first fill, which is obviously the most important one. Then, subsequent applications of joint compound can be made. Wasn't sure if you knew this or not. Take Care and thanks for your advice on important home matters.


Comments

John Sakakeeny
26 Nov 2007, 18:14
Very good advice, but it would be better if it had advice on how to spread and sand the joint compound.
ATB
26 Nov 2007, 19:36
John,
I have that exact advice in several past columns *and* videos here at AsktheBuilder.com! :->
Jeff
27 Nov 2007, 15:38
John,
He was asked how to repair a hole, not how to mud the drywall.
Very great advice!

Thanks Tim!
Ken Weddle
07 Dec 2007, 17:03
I've hung new drywall in a basement stairwell that had flooded. Some of the new sheetrock - with tapered edge, butts up to the existing sheetrock that had already been taped & mudded so it is thicker than the new rock. Do I still run tape over the existing sheetrock at these seams and, if so, won't that create a big ridge by the time I have applied 2-3 coats of mud?
AsktheBuilder
07 Dec 2007, 17:10
Ken,
You tape that joint and feather the second and third coats so the finished seam is perhaps 30 inches wide.....seriously.
kathy
02 Jan 2008, 19:47
Tim,
The drywall tape in my four-year old house has begun to separate in places along my lower-level ceiling. It is not extensive but it is enough to be noticeable. Apart from hiring someone to come in and re-texture my ceiling, can I do spot repairs somehow?
Kathy
AsktheBuilder
03 Jan 2008, 07:43
Kathy,
Yes, you can trim away the failing parts of the tape and touch those up.
Hector
05 Jan 2008, 16:16
I have ceiling gypsum board that has the top layer peeling away from the insides. There doesn't appear to be any water infiltration from above; the gypsum is dry. Is there some recommended adhesive to paste the outer shell to the gypsum? What would you recommed as an easy, yet lasting repair?

Thanks,

hector
AsktheBuilder
06 Jan 2008, 08:59
Hector,
Just cut away the failing paper and skim coat the damaged area.
Cheryl
09 Jan 2008, 10:23
Hi! We have a problem in a room addition that is approx. 5 years old. All of the seams where the drywall meets have developed cracks which we have attempted to fix by re-coating with first, drywall compound in thin coats, sanding between each coat, and painting;the cracks came back within months. We then tried acrylic caulk, and again, the cracks are back.We have a raised cathedral ceiling and crack is running down the center from wall to wall! Can you offer some suggestions on what to do?
Thank you in advance!

     View all comments
*Name:
Email:
Notify me about new comments on this page
Hide my email
*Text:
Security Image:

Visual CAPTCHA


Ask the Builder Comment Help

Helpful Comment Tips: If you need help with a problem, please try these things now before you type in a comment. You could discover your answer in just minutes.
  • Read ALL Comments Before Submitting One: If there are lots of comments that are already part of this column, there is a very good chance your question has already been answered by me or someone else.
  • Read Similar-Titled Columns First: The column above is almost always part of a two-or-three-part series. The answer to a question you may have is probably in a related column or in comments that are part of that column.
  • Read Columns in a Category: Take the time to read many columns in a category. The amount of information you will discover will amaze you.
  • SHARE a Story: Please share any tips or amusing tales of glory! Tell others what has worked for you. Maybe you have a disaster you want to discuss. Let's collaborate so we all learn together.
Don't show this alert again.