Ceramic Floor Tile
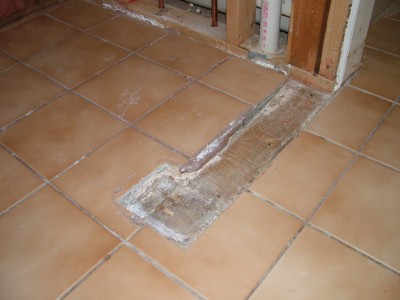
Ceramic floor tile can be repaired with the right tools and some patience. PHOTO CREDIT: Tim Carter
Ceramic Floor Tile Installation
DEAR TIM: I have ceramic floor tile in my kitchen. We removed a wall to open up the floor plan, and now I must replace the cut tiles with full ones to make the ceramic tile floor look perfect. Lucky for me my builder left behind a box of the original tile, so I have the pieces I need.
Can you tell me how to install ceramic floor tile in this situation so it looks superb? I am worried about matching the height of the existing tile and getting the grout to match. Alicia R., West Fargo, ND
DEAR ALICIA: Laying ceramic floor tile can be challenging, but repairs to existing tile can really be a test for a seasoned pro. You are going to need a large bucket of patience as well as a few simple tools to heal the wound in your floor. Lady Luck is already with you since you have the original tile on hand. That is a good omen of what is to come.
The first step in the process is to carefully remove the old cut tiles. There are any number of ways to do this, but I discovered long ago, that you must remove the grout around a tile so you do not crack an adjacent ceramic tile. You can chisel out the grout with a hammer and a small cold chisel, or you can try to use a powered grinder to help cut away the grout. Be very careful as you work near the ceramic tile you want to save. Never chisel towards tile you want to save. Chip away from the tile.
Once the grout is removed, you can try to pop the cut tile from the floor using a wide stiff putty knife that is driven at a low angle under the tile. Start the knife under the cut edge that was against the old wall. Tap the putty knife with a hammer. If you are lucky, the entire tile will lift at once. You may end up shattering the tile and it will come out in pieces. That is fine, just be careful you do not cut yourself as ceramic-tile shards can be very sharp.
When the old tiles are removed, you need to scrape off any adhesive. If the original installer used an organic mastic similar to cake icing, you may be able to use an adhesive remover to soften the old glue. If the adhesive is cement thinset, you will need to chisel or grind it off with a power tool. Use a wet-dry vacuum and pipe its exhaust outdoors as the thinset will produce silica dust which is not a good thing to breath into your lungs.
The space where the old wall was needs to be brought up to the level of whatever underlayment was used by the installer. If the tile was installed on a concrete slab, you may have to do nothing. But often a ceramic tile floor is installed over wood. You may have to install a strip of matching underlayment made from cement board or a gypsum-based underlayment. The new product you install must be at the same level as the rest of the underlayment. Under no circumstances can it be higher than the existing surface immediately beneath the adjacent ceramic tile.
At this point the hard work is complete. Laying the ceramic floor tile in this small area is no different than doing an entire floor. You apply an adhesive to the same thickness as the original and set the tile into it. Use a straightedge or a level that rests on the existing tile and the new ones to ensure the replacement tile are not high or low with respect to the full tile already in place.
Matching the tile grout may be slightly problematic. Even if the builder saved some grout, it may not be usable as it could have hardened in the bag after several years. To match tile grout you must clean the existing grout well to see what its color really is. You can clean ceramic tile grout fairly easily using a solution of oxygen bleach. This is a powder you mix with water. Once mixed, you apply the solution to the grout, let it soak for about 15 minutes and then scrub with a stiff brush. Years of dirt come up with ease.
Once the grout is clean, let it dry well for two days so you can start to match it. Ceramic-tile stores usually sell many different grouts and matching a color is not too hard. Your existing grout must be dry to get a perfect color match. Remember not to fret when you mix the grout you buy. When wet, it always looks darker, so you may think the color is way off when in fact it is just right. Mix up some test grout and let it dry before you grout your replacement tile.
You can ruin the grout by adding too much water in the mix. The wet grout should be the consistency of wet clay. You should be able to form the wet grout into a ball with ease and it keep its shape without sagging.
Remove all excess grout from the tile as you grout. Use a damp sponge to do this making sure all water is squeezed from the sponge as you wipe across the tile. Wipe with very light strokes to make sure you do not remove grout from the joints. Change the rinse water frequently so you are not leaving a grout haze on the tile.
| Message from Tim:
Years ago while researching a column about cleaning decks, I discovered the wonders of Oxygen Bleach. It is perhaps the 'greenest' cleaner I know of as it uses oxygen ions to break apart stains, dirt and odor molecules. There are no harsh chemicals, and it works on just about anything that is water washable. I decided to create my own special blend using ingredients made in the USA. In fact, the raw materials in the active ingredient are food-grade quality registered with the FDA. I call my product Stain Solver. I urge you to use it to help with cleaning your tile grout. You will be amazed at the results! |
Column 720
Tim built custom homes and did ultra-custom remodeling for 20+ years before launching his Ask the Builder media presence. He was selected as one of the Big 50 by Remodeling magazine in 1993. This award gave birth to Ask the Builder in October 1993. Tim also operates https://DrawPlumbingPlans.com. His @askthebuilder YouTube channel was the first home improvement channel on YouTube.
The tile in that picture (pink/beige) is the EXACT tile that i need a few replacement pieces of.... any idea where I can get about 4 pieces/tiles?