Ceramic Tile Shower
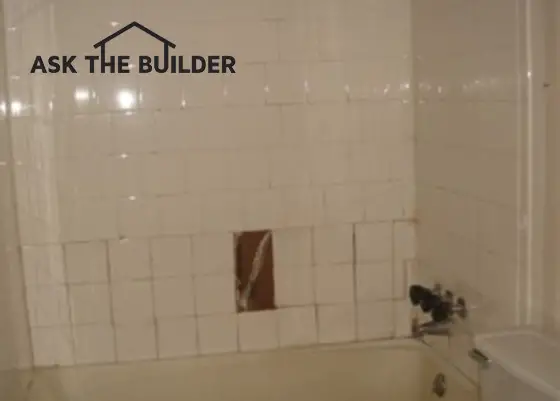
This ceramic-tile shower is on life support. It needs a complete overhaul to prevent long-term structural damage to the house. PHOTO CREDIT: Diana Cordero
DEAR TIM: My ceramic-tile shower has severe water damage. I was cleaning the ceramic tile in the shower and it caved in creating a hole in the wall. How can I install ceramic tile in the shower so this will never happen again?
Do you think ceramic tile shower installation is a job I can really do by myself? What are some of the most important steps I must do to get long-lasting results? Diana C., Norcross, GA
DEAR DIANA: Wow, your situation reminds me of a nightmare I had many years ago. Water-resistant drywall was just coming into the marketplace, and it was being touted as the miracle product.
You could easily install it, and apply ceramic tile right over it. The core of the drywall was treated with silicone, so it wouldn't fall apart.
Six years later while cleaning my own shower, I pushed my ceramic tile into the wall cavity. Other tiles near the hole fell off the wall like paint chips on an old house. It was a mess.
If you were to visit an old home in your area that was built prior to the 1940's, my guess is you would discover the ceramic-tile showers would be in really good shape.
CLICK HERE to get FREE & FAST BIDS from local ceramic tile contractors.
The primary reason is the ceramic tile was installed directly on top of concrete. The master craftsman tile setters used to apply cement plaster on wire mesh that was nailed to the wall studs.
They would then install the ceramic tile the next day using a pure Portland cement paste. This putty bonded to the uncured concrete mixture on the wall making a permanent bond.
Water can and does soak into concrete, but not as rapidly as it might into paper, wood, drywall or many other building materials. Your ceramic-tile shower failed because the gypsum board turned to mush after years of water seeping through the grout joints.
Tens of thousands of homeowners have suffered the same fate. I feel you can tackle this job if you feel you can follow directions.
If you want to repair your shower just one time, you need to strip all the ceramic tile down as well as the rotten drywall. If there is any wood rot, you may have to install new wood wall studs.
Take the time to install the wall studs perfectly plumb. This will make the ceramic tile installation go that much quicker. This is also a great time to make sure the tub or shower base is level front to back and side to side.
Use galvanized metal shims cut from metal ductwork for this task. Wood shims can rot over time or compress from the weight of the tub.
I prefer to install a one-piece vapor barrier on the wall studs before installing the ceramic tile backer board. It is important for this plastic to lap over the tub or shower-base flange.
This membrane protects the wood wall studs from getting wet in the event of a catastrophic leak. Be sure you tuck the vapor barrier membrane into the corners tightly as you install it.
The wall studs are then covered with a cementitious or totally waterproof gypsum-based backerboard. These products are often the exact same thickness as regular drywall.
They are often easy to handle and cut. Simply follow the written instructions that come with them as to the proper fasteners to use. Some allow you to use hot-dipped galvanized nails and others require screws.
CLICK HERE to get FREE & FAST BIDS from local ceramic tile contractors.
I prefer to hold these backerboards up from the tub or shower deck about three-sixteenths of an inch. I do the same at corners and horizontal seams. After the backerboard is installed, I then vacuum up any dust and caulk the gaps with pure silicone caulk.
Some written instructions will also tell you to tape the joints with a special tape and thinset mortar. If you do this, you need to be really careful about not creating a hump at any of the corners or horizontal seams. If there is a hump in the wall, you will discover the ceramic tile will rock back and forth at these high spots on the wall.
The first row of tile must be perfectly level. I achieve this by installing the second row of tile first. I nail a straight board to the wall that acts as a ledge for the tile to rest on as subsequent rows of tile are added. Once the mastic or thinset is firm, I remove the boards and install the missing row of tile just above the tub or shower.
Tile Tools
The tools required to install a ceramic tile shower are minimal. You can purchase a tile cutter, a rod saw, mastic or thinset trowel and grout float for very little money. The key is to take your time making sure the wall studs are plumb and in the same plane. With the walls straight and plumb, the ceramic tile installs very easily with minimal effort.
What tools do you need to complete a simple tile job? Here's a list:
- tape measure
- pencil
- tile cutter
- nippers
- a 1/4 by 1/4 inch v-notched trowel
- a hammer
- some 6d finish nails
- 8 lineal feet of straight 1/4 inch wood lattice strip
- putty knife
- 3-inch wide-bladed scraper
- grout sponge
- rubber grout float
- several buckets
- accurate 4 foot level
Click the image below to BUY all, or some, of the tools in the above list.

CLICK THIS IMAGE NOW TO ORDER ALL THE TOOLS YOU NEED TO DO CERAMIC TILE.
The joint between the first row of tile and the tub or shower should not be grouted. That joint should be filled with a high-quality caulk. As you grout, you will get grout into this joint.
Don't fret as you can scrape this grout out of the joint with a toothpick as you go or with a putty knife as soon as you sponge the grout lines. Wait a day for the grout to cure before you caulk the joint.
CLICK HERE to get FREE & FAST BIDS from local ceramic tile contractors.
Column 746
Tim built custom homes and did ultra-custom remodeling for 20+ years before launching his Ask the Builder media presence. He was selected as one of the Big 50 by Remodeling magazine in 1993. This award gave birth to Ask the Builder in October 1993. Tim also operates https://DrawPlumbingPlans.com. His @askthebuilder YouTube channel was the first home improvement channel on YouTube.