Cabinet Installation
DEAR TIM: Can you give me some tips about cabinet installation? I’ve never had to install a cabinet, and need to ensure that mistakes will be minimal as I install cabinets in my kitchen. I’m attempting this after getting a bid from a cabinet installer that took my breath away. He said my kitchen cabinets install job was not that hard, so I expected a lower number that I could afford. What tools do I need for my kitchen-cabinet installation? Kelly K., Beloit, WI
DEAR KELLY: DIY cabinet installation jobs can range from simple to extremely difficult. Without seeing the plan of your kitchen and the cabinet layout, I can’t say whether you’ll be able to successfully complete your kitchen cabinets installation. I’ll tell you right now that the odds are against you, but every now and then the long shot crosses the finish line first. I’ll help you in this very short column be the filly that finishes this job to the amazement of all!
For your job to go as easy as possible, you’ll need an assortment of cabinet installation tools. I recommend these basic tools: accurate 2 and 4-foot levels, a power drill with bits up to 1/4-inch in diameter, several squeeze clamps with jaws that open at least 6 inches, a power screw gun and a belt sander. You may discover you need a table saw or other power saws to cut trim lumber and filler strips.
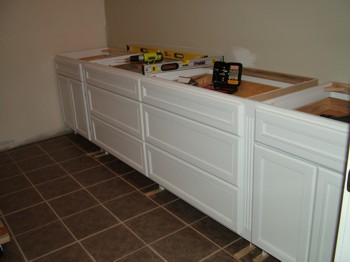
These cabinets are perfectly level side to side and front to back. That’s mission critical when natural stone tops will rest on them. PHOTO CREDIT: Tim Carter
Your cabinets may come with their own screws. If they don’t, follow the written instructions from the cabinet manufacturer with respect to the screws needed for all your wall and base cabinets. Wall cabinets must be mounted to the walls so they will not fall when loaded with heavy dishes. Avoid the temptation to use common long drywall screws. These are typically not strong enough to secure wall cabinets. Three-inch screws are needed to mount wall cabinets to wall studs. You’ll use smaller screws to fasten cabinets to one another and for other purposes.
Every carpenter will have his own tips for wall-cabinet installation, but I discovered long ago that it’s infinitely easier to install wall cabinets first. If you have the base cabinets installed, you have to reach over them and constantly worry about scratching the base cabinets. It’s possible to hang wall cabinets with no help, but I’d recommend getting two helpers to hold them up while you fasten them to the wall. Always remove the cabinet doors while attaching them to the wall. This makes the cabinets lighter, and it prevents damage to the doors, hinges and the cabinet frames. Make sure the wall cabinets are level as you install them.
For a professional fit and finish, you should screw the cabinets to one another so the face frames are flush and the gap between individual cabinets is closed. You’ll use the squeeze clamps to align and hold the frames in place as you screw the boxes to one another.
Once the wall cabinets are installed, you can start on the base cabinets. These cabinets must be installed level both side to side and front to back. This means that you must locate the highest point of your floor and start there with your first base cabinet. If you fail to do this, the only way the top of the cabinets will be level is if you shave off the bottom of the cabinets. I wouldn’t wish this fate on my worst enemy.
Wood shims are used to level base cabinets. These thin wedges of wood allow you to easily adjust the height of the cabinets. As you get the cabinets level, you screw them to each other making sure the face frames are flush and the gap between cabinets is closed. The squeeze clamps will become your best friend. Make sure they have rubber tips so the cabinet frames are not damaged. Keep the clamps in place until all screws are driven between the cabinets. Once all the base cabinets are screwed to one another and in the perfect position, you can screw them to the walls.
Most cabinet installation jobs require that filler strips be used. These are normally up to 3-inches wide, and are the same material and finish as the cabinets. If cabinets fit tightly between two walls, you’ll commonly need to install a filler strip on each side of the cabinet that’s closest to the wall. This centers the cabinets on the wall to make for a professional look.
These filler strips require great skill when installing them. They frequently need to be custom cut and scribed as they are rarely shaped like a perfect rectangle. A table saw and belt sander come in handy when trimming and fitting filler strips.
Be sure that the screws used to secure cabinets to walls penetrate into the center of the wall studs. Take your time locating the center of the studs. Wall-cabinet screws need to penetrate at least 1 and ½ inch into the actual stud. You’ll discover that you need at least a 3-inch screw to achieve this requirement.
Column 775
Tim built custom homes and did ultra-custom remodeling for 20+ years before launching his Ask the Builder media presence. He was selected as one of the Big 50 by Remodeling magazine in 1993. This award gave birth to Ask the Builder in October 1993. Tim also operates https://DrawPlumbingPlans.com. His @askthebuilder YouTube channel was the first home improvement channel on YouTube.
I've never attempted a cabinet installation myself, so this guide should be helpful to me. I'll have to keep your advice in mind that it's better to install wall cabinets first for convenience in the installation. Also removing the cabinet doors should make the installation easier, like you said. Thanks for the helpful post.