Window Seats
Window Seat TIPS
- Simple seat can be built in one day
- Kitchen cabinets can be used for extreme DIY
- Birch plywood is best for painted seats
- Use pocket-hole jig for strong and pro joints
- CLICK HERE to Get Tim's FREE & FUNNY Newsletter!
DEAR TIM: I have to have a window seat. I’ve searched everywhere and can’t find any kits, so I’m beginning to believe I’ll end up with a custom window seat for my family room.
How hard is it to build a storage window seat? What special tools and materials do I need?
How do I compute the size when I know I want window-seat cushions to sit on? What else do I need to know to end up with spectacular window seating? Beth P., Westerly, RI
DEAR BETH: If you have moderate building skills and a few common tools, you’ll have a completed window seat bench in just a couple of days.
Window Seats In Hours
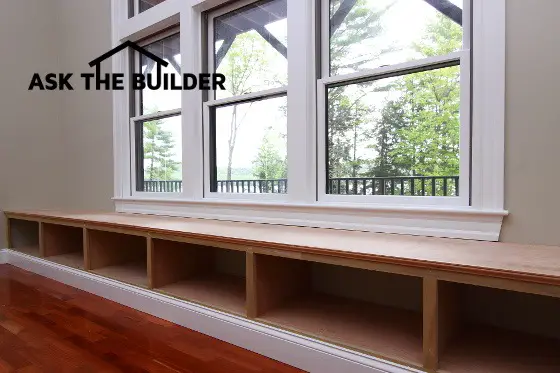
I can say this with confidence as I just completed the largest window seat of my career this past weekend. It’s over 15-feet long, and it’s going to get all kinds of compliments once it’s painted and is stocked with books, a window-seat cushion or two or three and other decorative items.
The inspiration came from my daughter Meghan who envisioned the built-in window seat that would allow her to cozy up and read a book while gazing out upon the lake.
Free & Fast Bids
Box Design Is DIY Easy
The easiest window seat to construct is just one that looks like a box. It would have a vertical wall or face and then a flat top. But a window seat with storage is really the thing to have, as you’ll not only get the function of the seat, but the space beneath the seat will not go to waste.
You can have hidden or open storage. A window seat with hidden storage that’s concealed with doors or a flip-top seat adds significantly to the cost and complexity of the project.
Step-by-Step Photos
Fortunately, I had my helper take hundreds of window-seat pictures that show the project from start to finish. I intend to produce window-seat instructions and window-seat plans from the photos he took.
Kitchen Cabinets Sans Doors
If you need inspiration as to what kind of window seat you want, all you have to do is look at open bookcases, or small kitchen cabinets that typically can be found over a refrigerator. The wood window seat I just built resembles an open bookshelf or a not-so-tall kitchen cabinet that has no doors.
Keep in mind that the total height of a window seat can’t be much more than 18 or 19 inches. You can’t have too much open space when you consider the top, face frame, bottom shelf and a space for some baseboard.
Use Kitchen Cabinets
If you want the look of cabinetry with doors that conceal the things under your seat, all you have to do is buy some 15-inch-high kitchen cabinets! If you put these on top of a 3-inch-tall recessed toe-kick and then add a 3/4-inch plywood top, you're at the perfect 19-inch height.
If you've already built your own frame as I did in the photo above, then locate tiny cabinet doors similar to the ones you find over a refrigerator. You may want to locate the cabinet doors first and then build a frame that will fit the doors.
This can be problematic from a scale perspective, as you should make sure the doors are in proportion to the overall height and width of the seat. This is best left to a real finish carpenter. If I were you, I’d start with just an open-shelf window seat for your first project.
Birch Plywood Is Best
I used sheets of three-quarter-inch-thick birch plywood, 1x2 paint-grade solid poplar and a few pieces of common molding to construct my window seat. Go to a real lumber yard for these materials, not a home center. I doubt you’ll ever find 7-ply birch plywood at a big-box store!
Simple Tools
Believe it or not, I constructed the entire window seat with a circular saw, drill, framing square, measuring tape, hammer, a few squeeze clamps, a screwdriver and my trusty pocket-hole jig. The pocket-hole jig is an amazing tool that allows you to drill perfect concealed low-angle holes in finish lumber so that you can assemble them without glue.

This is the EXACT pocket hole jig I used. It's probably the best on the market and it's affordable. CLICK THE IMAGE NOW TO HAVE IT DELIVERED TO YOUR HOME.
The entire face frame of my window seat looks like a finish piece of custom furniture that I assembled in less than 30 minutes with screws and a screwdriver! Pocket-hole jigs are affordable and should be on every person’s workbench.
Test Existing Chairs
To ensure you end up with a comfortable window seat, you need to look at and sit in many of the pieces of furniture in your home. Find the most comfortable chair in your home and measure it. Note it’s height and the depth of the seat.
You’ll quickly discover that for maximum comfort your legs shouldn’t dangle off the edge of the seat not touching the floor. What’s more, if a seat is too low, your knees will uncomfortably point to the ceiling.
Build a seat that’s too deep and you won’t be able to relax using a wall as a backrest. Lots of thought went into creating the perfect chair in your home. Copy its dimensions.
Birch Loves Paint
Birch plywood makes for a perfect material for any number of reasons. First, the birch veneer makes for a magnificent surface for painting. Its fine grain makes for a silky smooth finish. You can stain birch plywood, but be sure the face-frame lumber has similar grain and coloration so the stain or clear finish matches.
Trim It Out
For a very custom look and feel, be sure all the trim that surrounds your window seat matches the trim and moldings in the room. If you have an older home, you can take a piece of your existing baseboard to a woodworking shop or mill. They have equipment that allows them to match the profile exactly.
Think About Flip Tops
Before you make the final decision on a flip-top window seat, understand that it makes storage of items a bit of a hassle. Things get stored on top of one another much like a chest freezer. If you’ve ever owned a chest freezer versus one that opens like a regular refrigerator, I believe you’ll agree that a chest freezer is not the best design. You’ll love the look of an open shelf on your new window seat!
Column 779
Tim built custom homes and did ultra-custom remodeling for 20+ years before launching his Ask the Builder media presence. He was selected as one of the Big 50 by Remodeling magazine in 1993. This award gave birth to Ask the Builder in October 1993. Tim also operates https://DrawPlumbingPlans.com. His @askthebuilder YouTube channel was the first home improvement channel on YouTube.
I would love to do this but, how do you deal with existing under window electric heating elements that cover the entire span of the window?
You'd have to relocate the heating strip to the front of the window seat where you see the baseboard in my photo above.
These heaters rely on air convection to work. You can't block the air flow.
I've got a low deck off my sun room and your window seat is what I basically put around my deck instead of railings. Makes for more room to sit without crowding chairs and gives the deck a panoramic view. I wish I had an appropriate window to put one in my house for plants.