Water Damaged Drywall
Water Damaged Drywall Doesn't Always Have to be Ripped Out
"Test the ceiling with your fingers. Poke at it. If it seems as hard as drywall that has not gotten wet, you may have dodged the bullet."
DEAR TIM: A water line burst in our home and created a significant leak. We were home and able to contain most of the water, but quite a bit got through the floor ruining the drywall ceiling in the basement. Is there an easy way to deal with water-damaged drywall? Can we just wait for it to dry and then repaint it? How do you make the determination as to whether or not you have to cut out the ceiling and start over? Susie W., Baltimore, MD
DEAR SUSIE: For over three decades I’ve been dealing with drywall that’s suffered the indignity of getting wet. Sometimes we’ve saturated the drywall with water on purpose at the job site to get it to bend, but most times a roof leak, foundation leak, plumbing misfortune or chronic condensation causes drywall to fail.
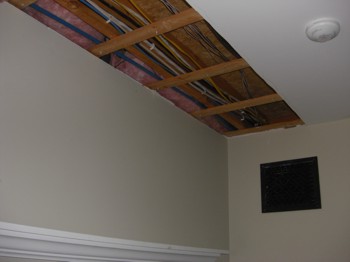
Water damaged this ceiling and the ruined drywall was cut out so that new drywall can be installed and finished. PHOTO CREDIT: Tim Carter
I can clearly remember past calls from shocked customers who’ve lost entire ceilings where, without notice, the drywall crashes to the floor. The weight of the water and loss of structural integrity of the gypsum core causes the drywall panels to tear away from the fasteners. It usually happens at the worst possible moment.
How Much Water Needs to Leak?
You may not feel much water leaked, but it doesn’t take too much to create a disaster. The first signs to look for with respect to the ceiling falling are depressions around the fasteners. You’ll see small dimples form as the drywall surrounding the nails or screws succumbs to gravity and starts to droop leaving an upside down crater. If you see this happening, move all valuables and furniture from the room in anticipation of a ceiling collapse.
What Does a Bubble in the Paint Mean?
If you see a bubble or droop start to happen in the drywall there could be ponding water on the other side. Use a nail or other punch to create a drain hole allowing the water to escape. Capture it with a bucket.
How Can I Test For Damage?
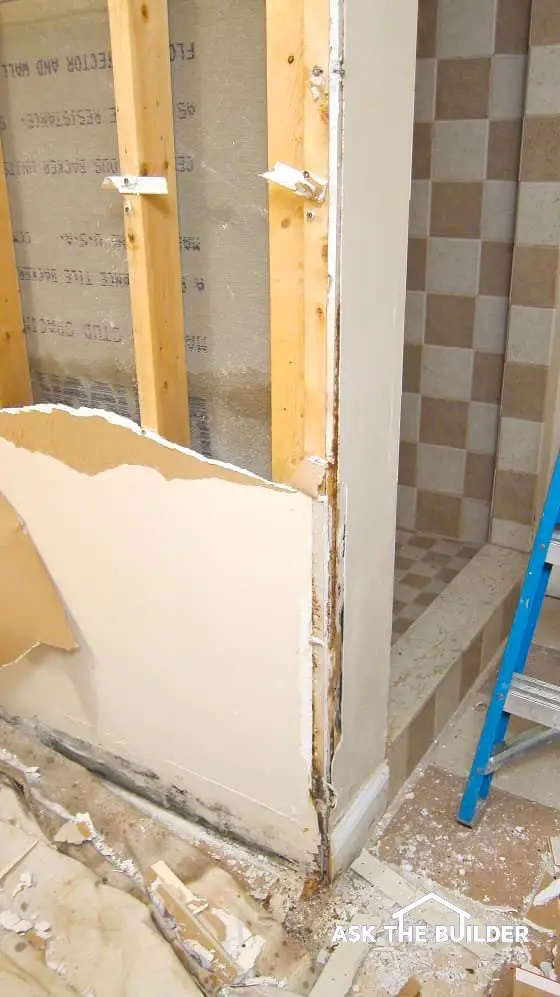
Test the ceiling with your fingers. Poke at it. If it seems as hard as drywall that has not gotten wet, you may have dodged the bullet. But if the drywall seems soft or spongy, you’re going to be best served by cutting out the damaged section before it sags and possibly falls. Cut carefully as all sorts of wires, cables, water lines, radiant heating pipes, etc. can be just on the other side of the drywall.
Is it Hard to Repair the Drywall?
Repairing water-damaged drywall is not too hard. Ceilings are absolutely the hardest if you’re not a professional. Working over your head is not easy, and getting the repair to blend in with the rest of the ceiling will be tough to achieve if you’re not highly experienced at finishing drywall.
What is the First Step to Repair the Drywall?
It’s best to try to cut out the wet drywall as soon as possible so that you minimize any mold growth. Mold spores are absolutely hidden in the ceiling, the temperature is perfect, and they have food. The only ingredient missing was water, and now it’s present. Mold can bloom within days if you don’t act.
Be sure to wear goggles or other eye protection as you remove the damaged drywall. The last thing you need right now is a scratched cornea from a nugget of gypsum that falls into your eye.
How Do You Cut Out the Old Drywall?
One of the biggest challenges in getting the ceiling ready for a new piece of drywall is cutting back the water-soaked drywall to the center of one of the ceiling joists. This is accomplished with any number of tools from a sharp razor knife to a reciprocating saw held at a low angle so the blade just cuts into the drywall and not the wood joist.
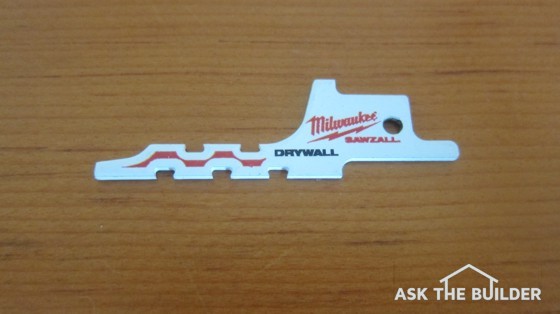
Here's a new drywall cutting blade that fits in an electric reciprocating saw. It's perfect for cutting holes in drywall on walls and ceilings but not the things hidden behind the drywall! CLICK HERE or photo to have these special blades delivered to your home.
You can also cut to the side of a joist and then nail on a scab or sister 2x2 that will be the lath catcher for the new drywall. Just be sure the bottom of the framing material is flush with the bottom of the existing joist. If it’s lower, you’ll end up with an unsightly hump in the ceiling.
What Should I Do With a Large Blister?
The leaking water can sometimes create a massive water blister in latex paint on a ceiling. You may mistake this for ruined drywall that has a bulge when in fact the drywall may not have to be replaced. Prick the large blister and let all water drain out.
The day after the leak, do the test with your finger to see how stiff the drywall is. If it’s solid, you may just have to repaint and not replace drywall. The key is to minimize the amount of water that saturates the drywall. I’ve seen many a drywall ceiling that dries out and survives. It’s not unusual at all.
If you’re worried that the drywall might fall from the ceiling at a later date, you can always install additional screws. If you’ve got one-half-inch-thick drywall, then use 1 and 1/4-inch coarse thread screws. Be sure the drywall screw is countersunk about 1/16th of an inch. If you go any further, you’ll tear the paper around the bugle-head screw rendering it ineffective.
Column 873
Tim built custom homes and did ultra-custom remodeling for 20+ years before launching his Ask the Builder media presence. He was selected as one of the Big 50 by Remodeling magazine in 1993. This award gave birth to Ask the Builder in October 1993. Tim also operates https://DrawPlumbingPlans.com. His @askthebuilder YouTube channel was the first home improvement channel on YouTube.
Would like newsletter
Thanks
Gail
Gail, Great! Sign up on any page, and be sure to click the Confirmation link I send out!
Hi,
I've just noticed something in my loft. It's definitely water damage. I don't know how long it's been there, and there looks to be something growing but it's solid and I did the poke test and just the paint chips off but the drywall is solid. Should I just scrape the paint off and re-paint or should I cut out of the drywall? I have pictures if you could please help me.
Katie,
You may have to do a 15-Minute Phone consult with me. Too much to discuss in comments.
hello,
we had a bubble in our dining room and we think the cause is the upstairs laundry as it is right above the damage. I popped the bubble and ran the machine (with no clothes) and didn't notice a leak. Do you think it is safe to repair the drywall or should i try to find the source of the leak?
Find the source of the leak. It could have been a one-time overflow!
I was wondering what does it mean when the nails under the drywall are black and you can see the boards they are nailed to also, those are also black. They go from the ceiling to the floor. I live in an apt/townhouse and our basement floods every spring from the melting snow. There is no neighbor on this wall so I'm wondering if it could be water or mold.
Ice and snow build up has caused a pretty bad water leak above the hot water tank and has soaked through and dripping into a bucket. I've removed the ice and snow, the water has stopped dripping, will it dry and be alright? If not what do you suggest I do?
water damage can cause so much trouble if not taken care of right away. You made a very good point in that a lot of damage can come from what you think is a small leak. It's always better to be safe than sorry and repair it, especially if you don't want the ceiling to collapse on you if it goes untreated! Thanks for the informative post.
I live in the desert, is mold possible from a one-time overflow? My ceiling drywall in my downstairs bathroom got wet from the upstairs toilet overflowing. I'm inspecting the ceiling drywall to make sure it doesn't need to be repaired, so far, the only soft spot is around an A/C duct where the water came through.
We recently had water damage from the second floor into the ceiling of the main floor. The dry wall ceiling feels just as hard as it always had but the nail pops that have been plaging the house since it was built a year ago are more noticeable. You can also see where they used tape to connect the pieces of drywall. Is it possible that the entire ceiling needs to be replaced? The contractor refused to fix the nail pops.
We live in an apartment complex and the wall in our bathroom above the sink and light fixture is soggy to the point where I can peel it off.
This continues up to where the wall meets the celing where I notice a slight soggy-ness but not as serious as the wall. We are on the 2nd floor with another apartment above us.
Really want to guage then savarity of the situation. I have a day off in a couple of days where I can be home to call the apartment to fix it, just hoping I can wait that long. We notice a dripping sound when the apartment above us is using their bathroom so we at least have an idea of where it's coming from
Last week, we had our roof replaced. The workers removed the entire roof, thus the Alabama rains came, and they came in full force. Part of our upstairs bathroom collapsed. The upstairs bedrooms' ceiling a almost full of water stains, but are still intact. Several large water stain are also on the lower level. The company partially replaced the upstairs bath ceiling, but not the bubbled spots. They want to prime and paint the remaining stains. The attic insulation is also drenched. I am concerned about mold and the future integrity of the ceilings throughout the house that have been damaged. The company is dragging its feet. My son has asthma and is high allergic to mold. There is no carpet in the house ~ all hardwood ~ because of his asthma. Please direct me to what we should so. There is no sense of urgency at the company. There are repeated no-shows and passing the buck. Can you proved some direction for us? Many thanks!
Simple.
ALL rain-damaged materials get replaced. You DID, as I suggest in many past columns here, get a COPY of the contractors general liability policy BEFORE he started work, right?
You DID ALREADY call the insurance company to file a claim haven't you?
Tell me you're not HOPING all goes well.
I'm sorry to be so tough, but I just don't understand why people are so trusting.
Water damage is water damage, but the first point before embarking on water damage repair is to make sure that the source of the problem has been repaired properly.Thanks for great posting.
Tim Carter my aparent just recently had a horrible leak through the attic from the roof. I had buckets in 4 spots and there's streaks going across my ceiling. My landlord does not think this is a big deal, however i just pushed on my ceiling like you had said and can almost push right through it, it's very soggy. All they want to do is repaint. I also had water coming out of the top trim in a doorway.. I am trying to get help for i have a one year old son. I am frightened to go to sleep in fear that the ceiling will collapse.. it is all right above our bed. Management told me to sleep in another room.. Should i take legal advice..? Please help me...
Great article you have presented here.I liked your tips that are really informative.There are some things you can do to combat water damage. Just make sure you act quickly! Letting walls stay wet for more than a day or two can mean having to start over with just the structural wood and studs, discarding all of your wet drywall. Your best bet for reducing water damage is to allow air in from outside. Air circulation will help to make your walls dry faster than they would on their own.Good share.
Our roof recently had a leak. There was a short narrow strip of a stain but no actual water dripped through. The roof was repaired and now the stain seems to be two toned which leads me to believe only the darkest area may still be wet.-- I'll have to get a ladder and test it soon since the ceiling is over 9' at the apex in our bedroom.-- where there used to be 3 small bubbles now there's what looks like Brail . Do you think this job will require someone to crawl through the attic and check for extensive wetness that could turn to mold and cut out the ceiling? do you think it can be patched up and repaired by a painter?
I was on vacation for a month only to come home to a huge leak in my roof from the (chimney mortar?) There is mold already in a 2' X 2' circle and some of the popcorn has dropped. The problem is, the roof repair guys can't come over and seal the mortar until it stops raining, and Joaquin has started. I have a fan blowing on the ceiling trying to keep it dry as much as possible. Stupid question, but is this the right thing to do? I've heard that mold is dangerous, but I can't just let it keep getting wet. Also, it's right above my bed, so I moved the bed a little to get the fan closer on a ladder. Yea, I know I'm supposed to replace the drywall after I get the leak fixed, but until then, any suggestions?? I hope you answer this fast, because I'm scared to sleep in there now after reading stuff on the internet. Thanks!
I live in a house that was converted into three apartments. When I first moved in the ceiling in my bedroom caved in due to water , the landlord said it was from the the upstairs neighbors kid spilling water everywhere in her bathroom. I didn't really believe that as the leak was four to five feet from where her bathroom is. Currently my downstairs neighbors have the same issue in her bathroom which is below mine. Landlord says the same thing that my kids are spilling water out but no one had any water on the floor. What can I do or who can I call to look at it? What can cuase this , seems to happen when it rains a lot?
My apt above (where the door meets the terrace) had a leak before and it took owner 6 months to be convinced that it was his problem. My ceiling was damaged and had to be taken out and put a new one.
Again there was a leak and I was told that he fixed the same issue again. However my tenant tells me there was lot of water damage and ceiling at lot of places look bad. It seems to be triple sheet rock since last time the guy had trouble cutting the old ceiling. Does this mean the water damage had been going for months and the ceiling inside is damaged? Do I need to replace the whole ceiling again.
We recently had our roof replaced. The roofers did not cover it at day end. Lots of rain that night. Water damage is obvious where seems are on ceiling. Insulation in ceiling was soaked. They removed a lot but not all. They are willing to come in and repair water damage cosmetically. My concern is mold. The colmpany is willing to do whatever we ask. We are unsure of steps that need to be taken in the attic to prevent future mold or mold Could mold already be growing. The health of our family is my biggest concern. We have a granddaughter with Leukemia that I care for in our home. Your advice is appreciated. Thank you!
How long does drywall take to dry out?
I recently had my roof replaced. The roofers got caught in the rain with the rafter out allowing water to damage upper and lower ceilings and walls. Insulation in ceiling was not checked. Two days later they painted the water damage stains using kiltz to repair cosmetically. My concern is mold. I am unsure of steps that need to be taken in the attic to prevent future mold. One ceiling was really dark but they painted over it. I have bad allergys and is high concern for my health. Your advice is appreciated. Thank you!
Please read ALL of my Mold columns. You should takeaway that it stops growing when water is cut off. If you need more help:
http://shop.askthebuilder.com/products/15-Minute-Phone-Conversation-with-Tim.html
We had a water heater that leaked and now joists under house are soaked. This is our little vacay place, built in 1947, 800 square feet. We don't get to go as much as we'd like but we're lucky in the sense that my husband did go on a particular weekend and discovered the leak and the inch of water in part of the house. He placed a dehumidifier under the sweet ole place but we're extremely worried, yes worried, since the joists and much more are water damaged. We had a new water heater installed. We were there this Labor day weekend and I heard a hissing sound from under the house. Hubuy checked it out; a pretty good sized leak spewing water. We called the plumber and he fixed it is hope. We are going to call a plumber again. But the question is, after all this, is what should we do about the soaked floor joists under the house? Any advice is extremely appreciated. Thanks, in advance.
Hi, I am a private tenant who suffered a unfortunate loo leak that went through the ceiling, my landlady says without checking ceilings or anything else that the dry wall needs replacing. I have had fans on the ceilings and it has been properly ventilated overnight and I have checked the ceiling to the touch and it is still rock solid. I believe she will still charge me for work that may not even need doing.
I am renting an apartment. One day over a week ago I got a call from my girlfriend saying the paint was falling off the wall. Once I got home I realized it wasn't just paint. The backing from the drywall is coming off too. It looks as if this has happened before and they just mudded over it and painted. If the water soaked through the drywall to the inside, shouldn't I be worried about more than the drywall? There is an apartment above us that has the same problem. I'm afraid the integrity of the whole wall will be compromised with the age of this building.
My sump pump malfunctioned and I had water in my brand new basement. In one room the water went 2 feet up the drywall, in the other room only about 6". Do I have to replace all the drywall?
Terri,
Cut 6 inches above the WATER mark in each room. That's all that needs to go. Do it ASAP.
The water heater leaked through the drywall and baseboard and soaking the carpet in my apartment. Macitence came in and pulled back the carpet and put blowers in the room. The first day they did a moisture reading and it said 40 in some spots and 19 in others. The second day the cane back and said the number was still high and everything was still wet so they left the blowers. It is now 4 days later and all they did was replace the foam under the carpet even though they state the floor board took on a lot of water. My question should the floor boards be replaced and the dry wall in that area as well ?
A leak that's caught fast like yours does not cause wood rot. The only reason wood should have to be replaced is if the wood is finished flooring and has warped because of the water.
The drywall must be replaced - that which got wet.
If my roof leaked and the drywall got wet on the corners and edges; how many feet down and out from the wet drywall would need to be cut out and replaced?
For example, if a home floods and the drywall at the base gets wet you are supposed to cut out 3-4 ft above the water line. Does the same apply for drywall that gets wet at the top edges and runs down corners of room?
how to deal with water bubble at midnight if it burst. what to do first?
Pop the blister. Get the water out of it as fast as possible. Peel the blistered paint off the drywall to accelerate the drywall DRYING.
I had a bathroom overflow which was contained within 1 hour. It left water stains on the ceiling. The painter/sheet rock guy tried to match the patterns first (we could have, retape, kilz first and repaint which would be have been an adequate fix). However the painter tried to get the pattern/stroke to match with existing after taping. In order to do that he pounded onto the ceiling with his "pattern brush" on multiple rounds. The ceiling became wet and soggy. A portion of the drywall could not hold up and created a much bigger problem when we started as the ceiling drywall before this was solid. After an irregular shaped hole was created on the ceiling, I see a cavity in between floors and can see the water pipe. My question is why was there not a moisture barrier above the back of the drywall below the water pipe? To properly fix the current situation, should we put a moisture barrier before we replace the drywall? Thank you for your input in this situation!
Where would the 10, 20 or 30 gallons of water go that would be on this mysterious "moisture barrier" that would be above the back of the drywall and below the water pipe?
Would it just eventually evaporate? Would it foster mold growth? Would it cause wood rot this standing water?
We don't put these barriers in for all the above reasons.
This is why you pay premiums for homeowner's insurance policies.
Hi
After a water heater leak in the attic was detected and stopped (probably leaked slowly for 12 hours from rusted drain pan), I pulled all wet insulation from the ceiling, toweled the wetted drywall and placed fans. The question is: after determining the the drywall is still good, should I spray bleach water on the affected areas now to avoid and mold?
No need for bleach unless you see mold growing. The key is to always blot dry the wet drywall ASAP and get a fan on it blowing air across it to dry as RAPIDLY as possible.
Go read all my MOLD columns to understand what's in play. Here's a link to them:
https://www.askthebuilder.com/search-results/?q=mold
My son was pouring a cup of milk and spilled nearly a gallon of it on the floor, right on the transition from the dining area into the kitchen. It leaked through the kitchen floor and down through our canned lighting in the basement. I cleaned it all up right away and after a few hours there wasn't any more milk dripping through the light. My husband is convinced we need to tear out the ceiling drywall and replace it because 1)it will stink and 2)he's worried about mold. There aren't any soft spots anywhere along the ceiling, and the source of the moisture has obviously been fixed and stopped. We just refinished the basement and are almost done renovating the rest of our house (with 3 kids and a newborn! Doing almost all of it ourselves!) and thinking about tearing it all up makes me want to cry. Is this necessary when there's no soft spots and no more water?
Rachell,
There's no need to tear out the drywall. Ask your husband if powdered milk smells.
The reason milk sours and smells in a container is because there's still water in the container to fuel the bacteria growth.
In your case, the water leaves the milk in hours and the bacteria can't grow.
If he wants to call and talk with me about this, you've got this option. Far cheaper than tearing everything out!
http://shop.askthebuilder.com/products/15-Minute-Phone-Conversation-with-Tim.html
I have a leak in the ceiling of my bedroom. A brown spot appeared in the ceiling after a rain fall. The landlord keeps saying it a plumbing leak. I disagree and I think it is a roofing leak because the problem only worsens when it rains. If it was a plumbing leak as I use the plumbing routinely wouldn't the leaking be continuous? Instead it only spreads and become increasing saturated when we get heavy rain.
Hello, I live in an apartment and I’ve had several leak issues. The first time the resident’s toilet upstairs overflowed and almost the entire ceiling was saturated and water poured into my bathroom from the exhaust fan. The property manager brought in a fan to dry the room for 5 days but three of those days the machine malfunction and quit working. They came in and painted anyway. The second time water from the upstairs shower leaked and saturated above my shower, soaking an area that was damaged previously. They brought another fan for not even two days and cut out and replaced a 3” by 3” square of drywall. Not even the entire area that was wet. This last time there was visible mold growing above my shower again in the same place and the ceiling and wall was visibly wet. They came and said the shower upstairs had a cracked tile and once that was replaced they would fix my bathroom. A week later the mold was worse and when I touched the wall the entire wall was so wet the water transferred to my hand. I told them about it and that I wanted the mold tested before they ripped anything out. They came the next day while I was gone and painted the drywall without me speaking to anyone. No tests were done, no fan was brought in and no drywall was replaced. This can’t be the right procedure for this type of damage. Any advice on what I should do?