Use Crown Molding to Make Decorative Shelves
Crown molding is a popular building material. Trust me, I know! Perhaps the most common use of the material is at the intersection of a wall and a ceiling. Crown molding really adds a nice touch to a room or hallway.
But this molding can also be used to create a nice decorative shelf to display trinkets, plates and other knickknacks. To easily accomplish this task you need a few special saws and a few hours of time.
Photo Essay
I say we get started building one of these shelves. The first thing to realize is how the crown molding fits in a miter saw in order to produce the correct mitered cuts. Look at Photo 1. The crown molding is actually upside down in the photo. This is correct.
| . |
|
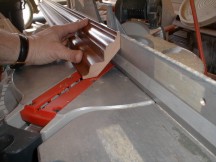 |
Why? The molding needs to be positioned in the saw the way it will sit on the wall. The table and fence of the saw simulate the 90 degree intersection of a typical wall and ceiling. The vertical saw fence is the wall and the flat saw table is the ceiling. Since the simulation is upside down you must hold the molding this way. |
| . | |
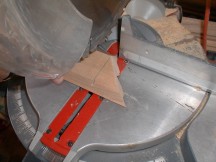 Photo 2 |
You cut your shelf so that the longest points of the shelf are the top of the molding. Look at Photo 4 to see an exploded view of a corner of the shelf. The molding is oriented top side up in this photo and you can see the small return piece that makes up the finished corner. |
| . | |
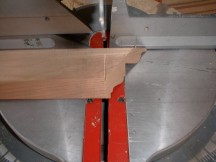 Photo 3 |
How do you cut that small triangular corner piece? Simple. You cut the crown molding as if you were going to run it around an outside corner in a room. But in this case you have to clip the small piece. Look at Photos 2 and 3. I have cut the miter for the return piece and now I have flipped the molding so it lies flat on the saw table. It is OK to do this for the final cut. |
| . | |
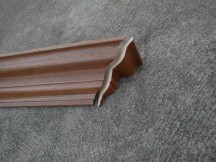 Photo 4 |
The saw cut in Photo 3 just kisses the intersection of the angled face and the back of the foot of the molding. If you cut past this intersection, then the small triangle piece will be too long. Cut into the angled face and you will have a gap. Cut a trial piece and you will see exactly what I mean when you dry fit the corner to the main piece of crown molding that makes the front of the shelf. |
| . | |
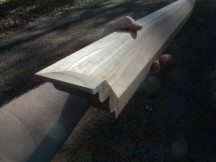 Photo 5 |
The Flat Top - Once you have assembled the two corners to the main piece of crown, you should have a semi-completed shelf similar to what you see in Photo 5. Note how the small triangle piece, once glued and nailed, is flush with the back foot of the main run. |
Your challenge at this point is to simply cut a piece of wood that will fill the void at the top of the crown molding. Look at Photo 6 to see what I mean. I have cut the piece and have held it out so you see that it can drop into the crown molding to make a flat top surface.
It just so happened that my molding had a 45 degree angle to the rear sloping face. This made it easy to cut my top shelf. I simply set my table saw blade at 45 degrees and cut the top rear shelf. The sides of this piece also get clipped at a 45 degree angle.
| . |
|
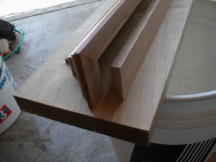 Photo 6 |
This top rear piece gets glued and nailed to the back of the crown molding. You can use small brad nails. |
| . | |
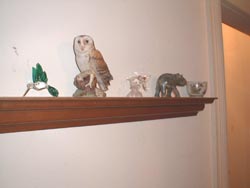 Photo 7 |
The final piece of the shelf is a small cleat that gets attached to the wall. This piece of wood might also have to have an angle cut depending upon the size of the molding you use. In my case I had to cut my wall cleat at a 45 degree angle. I nailed this to the wall and then set my shelf on top of it. Small screws were used to go down through the top rear shelf piece into the wall cleat. You can see the finished shelf in Photo 7. |
If you REALLY want to discover how to install Crown Molding, you need my Crown Molding eBook or Installing Crown Molding DVD..
Column B399
Tim built custom homes and did ultra-custom remodeling for 20+ years before launching his Ask the Builder media presence. He was selected as one of the Big 50 by Remodeling magazine in 1993. This award gave birth to Ask the Builder in October 1993. Tim also operates https://DrawPlumbingPlans.com. His @askthebuilder YouTube channel was the first home improvement channel on YouTube.