LED Lights
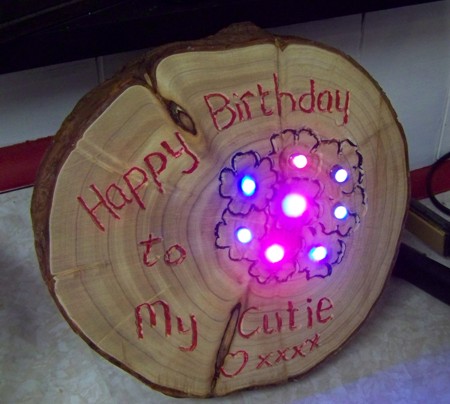
Finished LED Birthday card.
I am so fortunate to have newsletter subscribers that contact me about things they are working on. Here is a fantastic heart-warming love story about this wonderful man who lives way off the beaten path in New Zealand. I hope one day to meet Graham!
Hello Tim,
You mentioned your Dremel in your newsletter and I thought that you might find this project story amusing.
All the Best,
Graham Green, New Zealand
As a complete newbie to hobby electronics, I'm still childishly delighted when something works but when it not merely works but works perfectly to plan; sublime. When it works perfectly and digs me out of a deep, dark hole then, just for good measure, makes someone else happy, now that's what I call the full result.
Here's the story. I'm a cook and handyman living in rural New Zealand about 50 miles from the nearest anything. I only get to go into town about once in six weeks, generally when something has gone wrong and I need some parts or materials. Where I live makes Walton's Mountain look like Las Vegas. Anyhow, there was an unexpectedly early snow at the beginning of May which brought down a small tree which had to be cleaned up.

Cooks - Seagal and Green.
Mr. Stihl the chainsaw and I were beavering away when a black thought entered my mind. Although I had already received a mail order birthday present for her indoors I had no birthday card, and with just five days to go, no prospect of getting her one either. I'm old enough and wise enough to know that the 'no card' option is a sure and certain shortcut to a Spectrum-is-Brown situation, so as I cut away at the tree a cunning plan hatched, so cunning as would be most pleasing to a professor of cunning at the University of Foxbridge. This ingenuity and daring would deliver a home made handicraft birthday card fabricated entirely from trash yet would not compromise my hard man of short order cookery image. I like to think of myself as a cook in the same way that Steven Seagal was a cook in the excellent movie Under Siege. See picture - spooky eh!
The key ingredients of this recipe were: one piece of tree, one broken cordless carpet sweeper, a handful of LEDs and a Dremel.
The tree bit was easy, I cut about a 2 inch thick segment from the upper trunk to form a round about 9 inches in diameter. For the next few nights, I stealthily cooked the round in the cafe oven - very slowly, 24 hours at 100 Celsius. Each day I hid it away from the prying eyes of her indoors, but I couldn't hide the smell. Everything smelt like the inside of a sauna. Whilst not unpleasant, it wasn't the right smell for a cafe. Still, needs must when the devil's at the wheel. I took the bark off with a soft grinding disc and belt sanded the face.
I found a suitable piece of clip art and mucked about with the size until I had a suitable template for carving. Using a carving tip on the Dremel at medium speed, I carved the outline of what I imagined might look a bit like a bunch of flowers. I had looked for something that would feature 8 flowers for reasons that will become clear later. I printed the clip art out and just taped the paper to the wood then just cut through the paper pattern into the wood.
I had a whole bunch of LEDs that I imported from Hong Kong (we have no duty on Chinese stuff here) about six months previously. From everything that I had read, I expected these LEDs to be just cheap and cheerful, I figured that I'd get a lot of failures and early dropouts but not a bit of it. I bought 300 of 5mm LEDs; water clear lens, RGB slow change 5,000 mcd, RGB flash 5,000 mcd, plain white 10,000 mcd and I haven't had a single one fail - at 12 cents NZ a piece including postage - I am made up. I used the RGB slow change ones that gradually cycle through their rainbow. They have a maximum forward voltage of 3.6V, 30mA which fits in very well with the electronics salvaged from the broken cordless carpet sweeper. The sweeper had broken before the battery had been recharged more than 50 times. When I took it apart there was one gear stripped and the pinion was shattered so no hope of reasonable repair (I've still got the motor and it has a lot of torque). The battery pack was a 7.2v NiCd or 6 'C' cells strapped together depending on how you look at it complete with a little charging circuit.
The maximum LED voltage (3.6 volts) divides nicely into the battery voltage so the LEDs are wired in 4 pairs. The battery pack voltage will sag quite quickly so the LEDs wind up running at just about a perfect voltage for quite some time. In fact, I subsequently found that the whole lot run on giving some light for over 5 days on a charge. These RGB slow change LEDs cycle through the primary colours and all the ones in between giving a pretty cool effect.
I treated the wood to some furniture oil and finally finished soldering the 'card' together about 2 a.m. - it worked first time and looked great. So I set it up and went to bed. Let's face it, a lovingly hand crafted card has just got to say more than a shop bought affair and indeed her indoors was tickled pink. So that's my rechargeable, recycled birthday card even the hook up wire is stripped out of old telephone cable (hence the odd colours). Everything is glued down with hot melt or screwed on. Total cost - about $2 plus 10 hours sneaking around.
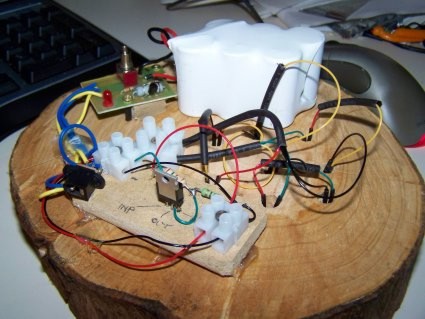
Back view of LED wiring project.
The picture also shows some additional circuitry that I added later to regulate the voltage as the battery sags. The wood still hasn't split after 2 months in the warm and dry, so I'm quite hopeful that the cooking process may have been successful. In any case, I had to do something because it was just too green to sand down.
All photos courtesy of Graham Green.
His story was featured in my July 15, 2008 Newsletter.
Tim built custom homes and did ultra-custom remodeling for 20+ years before launching his Ask the Builder media presence. He was selected as one of the Big 50 by Remodeling magazine in 1993. This award gave birth to Ask the Builder in October 1993. Tim also operates https://DrawPlumbingPlans.com. His @askthebuilder YouTube channel was the first home improvement channel on YouTube.