Concrete Foundation Patch Repair
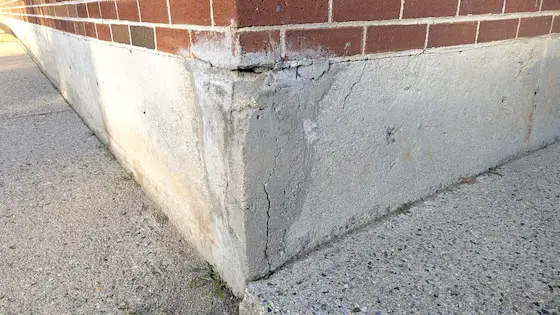
The person who tried to patch this concrete foundation either didn’t care and/or didn’t bother to research how to achieve professional results. Copyright 2026 Tim Carter
Concrete Foundation Patch Repair
Several nights ago, I helped launch a floating paper lantern with my granddaughter, my daughter, and my lovely wife. It was just after sunset with a slight chill in the air. We were at the north end of Lake Winnipesaukee in central New Hampshire. Hundreds of others were there lighting small squat candles in their cedar-plank lanterns. A gentle breeze carried the lanterns out into the lake. It was a perfect night to create a memory.
We found a place to park at the local post office. I backed into a parking space so I would have great visibility when pulling out in the dark. I noticed a botched patching job at the rear of the post office. Cement was smeared on the face of three red bricks that sat on top of the cast concrete foundation.
Some contractor, or postal maintenance employee, had botched the repair. The workmanship was so bad, I wondered if my toddler granddaughter could have produced a better result. The corner of the foundation had fallen away, and the contractor tried to do his best to add new material to re-create the corner.
You may have a similar job to do or some other task where a hole or divot needs to be filled. I was taught decades ago by an elderly concrete mason a magic trick that ensures the repair patch will last for fifty or more years. I’m happy to share his wisdom with you, hoping you have success as I have had countless times.
The repair process starts by removing all loose material. This includes all dust and any organic debris, dirt, etc. This is one job where a pressure washer excels.
The next step is to assemble the materials you need. You can purchase small bags of pure Porland cement from a home center or hardware store. You’ll need sand and some gravel. Sand and gravel come in different sizes, shapes, and colors.
Match the Sand
It pays to take a close look at the finished surface of the concrete you’re trying to patch. It may have a sandy texture. Look closely at the sand. Sand is nothing more than very small pieces of rock. Look at the shape and color of the sand. Try to obtain sand that has the same blend of both particle size and color. This will pay off in spades a month from now.
Gravel is what gives concrete its strength. Gravel also comes in different shapes and colors since it’s also rock. My favorite gravel is pea gravel. It derives its name because the small rounded stones would pass for tasty green peas if you painted them a vibrant green!
Use the Correct Gravel
The size of the gravel used in your patching material depends on the thickness of the patch. The diameter of the gravel should never exceed 1/3rd the depth of the patch. For example, let’s say the depth of your patch will be just under one inch. This means no piece of gravel should be greater than one quarter of an inch. Many rookies don’t adhere to this important repair axiom.
You only need four things to create the repair compound: Portland cement, gravel, sand, and clean water. The ratio of the ingredients is very important. Realize that the cement is the glue that bonds the sand and stones in your mix together. The cement also bonds to the concrete you’re patching.
I like to blend 3 parts gravel, 2 parts sand, and 1.5 parts cement to make my mix. I mix all three together in the dry state until it’s a homogeneous mix in color. I then add just enough water to create a plastic mix that resembles a chunky chili or oatmeal. Should you add too much water, the resulting patching compound will not be as strong as it could be.
Secret Cement Paint
The old concrete mason’s secret was cement paint. This is hard-earned knowledge that’s transformed from history, to legend, to myth. Cement paint is just a mixture of Portland cement and water. You mix the two together until they resemble a thin paint. You don’t need to mix much, but you need to mix it just before you intend to use it.
Mist the concrete you’re about to patch with water. Use an old spray bottle. Just get it damp. Brush on a thin layer of the cement paint. Immediately cover the cement paint with your patching mixture. It’s best to avoid working in direct sunlight or on a windy day. This causes the cement paint and patching compound to dry to quickly. Overcast weather with temperatures in the 60-70℉ range is best.
Use a wood or magnesium float to smooth the patching compound. If you’ve not worked with one, I suggest you practice first. You can also watch countless concrete finishing videos on YouTube.
Thirty days after you finish the job, you can acid wash the repair. This extra step will help make your patch look like the original concrete. Use muriatic acid for this task. Mix one part acid to ten parts water. Read all the safety instructions on the acid container! The acid will wash away the fine cement paste at the surface of the repair, allowing you to see the sand. If you did a great job of matching the sand and gravel colors, your patch will look superb.
I’m available to help answer any questions you have about patching concrete. Just use this link to set up a phone call: https://go.askthebuilder.com/coaching
Column 1683

Tim built custom homes and did ultra-custom remodeling for 20+ years before launching his Ask the Builder media presence. He was selected as one of the Big 50 by Remodeling magazine in 1993. This award gave birth to Ask the Builder in October 1993. Tim also operates https://DrawPlumbingPlans.com. His @askthebuilder YouTube channel was the first home improvement channel on YouTube.