DIY Cabinet Building
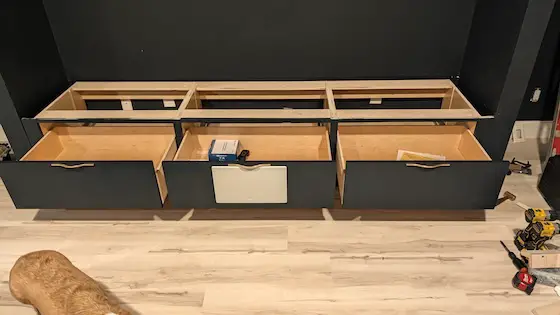
These home-built cabinets will be under a large flat-screen TV. The drawers will hold all of the electronic components. The center drawer sports a built-in high-fidelity speaker. Copyright 2026 Tim Carter
DIY Cabinet Building - If My Son Can Do It, So Can You
Imagine this scenario. You need three 19-inch-high, very simple painted cabinets. These cabinets need to fit inside a 9-foot-wide alcove that’s 2 feet deep. They’ll hold all the electronic devices, hidden speakers, and connections for a large flat-screen TV that will hang on a wall above them. Each of these cabinets will have a single drawer. The only problem is they’re all a non-standard size.
You’ve got limited carpentry experience, so you decide to get estimates from local cabinet shops. Your significant other uses smelling salts to revive you after you open the bids. The lowest quote is $6,000.00 and the highest one is just below $9,000.00. What’s your next move?
This is the exact situation my son found himself in just three months ago. He decided that he would build them himself using my tired jobsite table saw, a track-saw kit, a simple nail gun, and a few clamps. He had lots of time since he’s single. He also hired me to be his helper. I was paid with some delicious chili, a few smashburgers, and two or three chocolate malts made with mocha chip ice cream. I lost count from the resulting pleasant coma I was in.
My son was fortunate to acquire some of his grandfather’s genes. My late father-in-law was a medical doctor. He was an avid DIYr having grown up during the Great Depression on a rural Ohio farm. He shared that on cold winter nights, the blanket on his bed would be covered with a light frost when he climbed the ladder leading to the loft.
He and his brothers and sister had to help their mother survive the poverty when his father up and left them one day. This experience forced him to be self-reliant in many ways.
Many years ago, I came to pick up his daughter, my future lovely wife, for a picnic date on a Saturday afternoon. He was in the driveway working on his car. The hood was up, and he was taking off the cylinder heads of the huge V-8 engine. I was in awe of his courage and skill.
When he retired, he jumped into woodworking. He made a crib out of solid cherry wood for my wife and me for our first child. He made detailed framed mirrors, a small table and chairs for our kids, easels with dry-erase boards, a small clothes wardrobe for my daughter’s American Girl doll, and many other things. He did all this working in a crowded 13 x 15-foot basement workroom with a 7-foot ceiling!
I share this because I know for a fact that you can create all sorts of simple cabinets with even the most basic tools. You can do it in your garage if need be. Some cities have communal workshops equipped with all the tools. You can purchase time to gain access to both the tools and a place to assemble what you create. You may even soak up knowledge and tips from others whom you meet there.
My son built his custom cabinets in just a few eight-hour days. Step one of the process was to create a cut list of the 3/4-inch 7-ply plywood used to build the cabinet box. He decided to use 3/4-inch plywood for several reasons.
He wanted to create a dado channel in the sides of the cabinet that would accept the cabinet bottom. This channel would be half the thickness of the plywood. He felt that had he used 1/2-inch plywood, the channel might create a structural weakness.
He also felt the thicker plywood would be less susceptible to warping over time. I agreed with that.
Using his precise measurements from the plans he created, we used a track saw to make very accurate cuts on the large 4 x 8-foot sheets of plywood. I made sure we used a 0.5mm mechanical pencil to mark the measurements. The end result was spectacular. All the pieces of the cabinets were perfect. If they were off at all, it was less than 1/64th of an inch.
He purchased a 3/4-inch dado blade set that fit my table saw. We used it to cut the channel in the sides of the cabinets. You could just nail or screw the bottom into the sides, but a dado channel acts just like a column that supports a beam in normal construction. It’s a very solid connection.
The cabinet boxes were assembled using yellow carpenter’s glue and finish nails driven with a nail gun. Nail guns are very affordable, and electric ones don’t require an air compressor or hoses.
The drawers were built using 1/2-inch 5-ply plywood. These were very simple to build using half-lap joints. He chose to use drawer fronts that were flush with the cabinet frame. This is a harder detail to pull off for a rookie. A drawer front that extends over the opening on the front of the cabinet is much more forgiving.
Soft-close drawer hardware was used. He procured that online with little effort. The finished product was remarkable. The drawers glide in and out with no effort. The paint job was accomplished with an affordable electric sprayer. I’m here to tell you it looks like a professional built them. The total cost for all the materials was less than $1,000. I figure he saved about $6,000.00. That’s not bad pay for three Saturdays of work.
You may be hesitant to start a project like this. I decided to help you by creating a list of books that have high-quality plans, so you don’t have to figure anything out. The books also contain excellent step-by-step assembly tips. CLICK HERE to look at the books:
Column 1691

Tim built custom homes and did ultra-custom remodeling for 20+ years before launching his Ask the Builder media presence. He was selected as one of the Big 50 by Remodeling magazine in 1993. This award gave birth to Ask the Builder in October 1993. Tim also operates https://DrawPlumbingPlans.com. His @askthebuilder YouTube channel was the first home improvement channel on YouTube.