DIY Boiler Service

owner's manual boiler in background

DIY Boiler Service - Have you taken the time to read the maintenance section of your owner’s manuals? Trust me, you should. You’ll save thousands of dollars. Copyright 2026 Tim Carter

DIY Boiler Service - Easy if You Have the Tools

Several days ago, I found myself without heat and hot water at 6 PM just as I was washing dinner dishes. My propane-fired modulating combi boiler, which does double duty, heating the house and my hot water, decided to stop working. It’s still chilly in central New Hampshire, where I live. The fan that sucks in combustion air and blows out exhaust gases stopped spinning. The sensors and internal computer lock out the boiler burner when this happens.

It could have been much worse. It could have been 15 degrees F outdoors instead of 50F. I was stunned that the next morning, I couldn’t locate a replacement fan assembly in all of New England. I was prepared to drive 250 miles one way to get the part. The closest business that had it was in Illinois. I had the replacement fan in my hands within 24 hours. Thank you to all the UPS employees who made this possible. It was well worth the $140.00 overnight delivery fee.

It turns out there are only two moving parts in my boiler - this fan and a valve that shunts hot water to the sink faucets or the heating loops. I can assure you that I’ll now have both of these parts on a shelf in my mechanical room should I have another issue.

What’s the teaching moment here? There are several, in my opinion. First, I feel you should have a good feeling about the availability of parts for your critical systems in your home. How many residential boilers do you think are in New England? The number has to approach one million, maybe more. Can you imagine my shock to discover that not one of the major parts distributors stocked this fan assembly, knowing that it’s one of the two moving parts in a very common boiler?

Have Parts Onhand

You might want to have a discussion with your HVAC technician, plumber, or electrician to discover if you’re in a situation as I found myself. You may live where air conditioning (AC) is required for many months of the year. If so, I recommend you discover what size start-up capacitors provide the power to get your compressor working. Have those parts in a plastic bag hanging on your electric panel for when you’ll need them.

Heat, air conditioning, and hot water are basic creature comforts many depend on. I know my sweet wife loves a hot shower each morning. She also doesn’t want to feel like an ice cube when exiting the shower.

There was little I could do to prevent this fan failure. There were no odd noises or squealing bearings to indicate the fan was having trouble. The fan just locked up. That said, there are many things you and I should do each week, month, or year to keep our mechanical systems in great shape so they rarely fail.

Preventative Maintenance a Must

Have you ever taken a few minutes to read the maintenance section of the owner’s manual for all your equipment? You should. Here’s just one thing from my boiler manual. My boiler has a condensate trap. The manual says to clean it out every year. It’s very simple to do. You don’t need to be a technician.

However, if you fail to clean it out and the drain line gets clogged with tiny bits of sediment, the boiler will malfunction. It’s so simple to set up reminders on your electronic calendar to receive a notification when to do the task. The calendars are so sophisticated that you can match up the exact day to when you know you’ll have the time to do it. The repair bill, should you forget, could be hundreds of dollars, maybe even thousands.

Whole-House Water Filter

Here’s another story of mine. I have well water. It’s smart to have a whole-house filter to capture tiny flakes of rock that might otherwise end up in my faucet aerators or the toilet fill valve. The paper filter needs to be changed every six months. It’s easy to do. You don’t have to be a plumber.

Should you forget to change the 5-micron filter, your water pressure drops, nasty rust stains appear in all your toilets, and the water is unhealthy to drink. Once again, I use my electronic calendar to send an alert every six months. I even have a pre-alert set up. This alert says, “Hey Tim, you MUST change the water filter in a week.”

You should do the same if you have a forced-air heating and cooling system. Change your filters as it states in your owner’s manual. You should check your exterior AC compressor to ensure the cooling fins are clear of all debris. Leaves, dirt, etc. that clog the tiny spaces between the fins can cause premature failure of this very expensive machine!

Clean Refrigerator Coils

How about your refrigerator and freezer? Do you clean the cooling coils on those every three months? Once again, lean on your electronic calendar to let you know. Appliance repairs are expensive. It costs hundreds of dollars just to get the repairman to show up. The price of parts will take your breath away. Keeping the coils clean will allow your refrigeration equipment to run at peak performance.

The same is true for your clothes dryer. Dryer fires are very common. You must clean the lint filter after each load. Even if you do that, lint still can clog the exhaust pipe. What’s more, tiny pieces of lint that do escape to the exterior of your home can be a problem. If you have the fresh-air intake near your dryer exhaust vent, lint can be pulled into your tankless water heater, furnace, or boiler intake pipes!

Much of this is common sense. You can do almost all of the things required to keep all your equipment in top order. You just have to take the time to read the owner’s manual and set up the calendar alerts. Good luck!

Column 1664
Why is My House So Cold

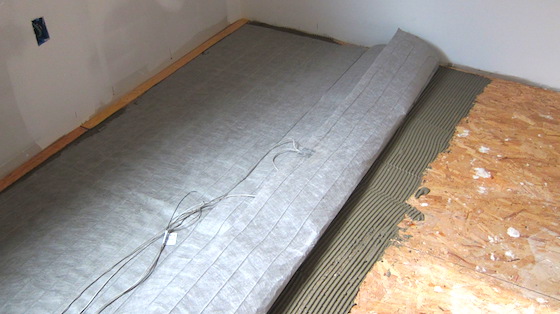
electric radiant floor mat

Why is My House So Cold? This is the electric radiant floor mat that's heating my man cave ham radio shack. It's a great DIY project. CLICK HERE or the photo above to order your own NuHeat Electric Floor Heat Mat.

Why is My House So Cold?

Tell the truth. Are there days in the winter when your heating system can’t provide the heat you need to keep you comfortable? What about your AC system? Are there blistering, hot summer days when you feel like a simmering sausage in a skillet?

You may not want to hear this, but it’s normal for this to happen. Your heating and cooling contractor may not have told you the truth, so I’ll be his proxy.

Several weeks ago, I was on the phone with a man who lives in the Midwest. He purchased one of my short consult calls. He wanted to know why his condominium was cold and drafty when it was below zero Fahrenheit.

He mentioned a cold draft of moving air in his kitchen. It turns out he’s got three very large windows in the room. I explained that the moving air was a convection current where the room air was hitting the cold inner pane of glass. This chilled air then fell down to the floor, much like water flowing over a waterfall.

A Waterfall of Cold Air

He wasn’t feeling the outside air infiltrating through the windows. Stand in this pathway, and it will feel like a breeze. The cold air pushes warmer room air back up to the top of the windows. Try to picture a sideways, invisible merry-go-round in your home.

I shared with this man that heating and cooling design in residential homes is by far the most complex aspect of home building. A true professional HVAC contractor will enter all sorts of data about the wall insulation thickness, window sizes, compass direction of the house walls, door sizes, total exterior wall surface area, attic insulation thickness, etc. into a computer program. The software will then spit out heat loss and heat gain results in BTUs per hour. This should be done on a room-by-room basis.

The contractor has to tell the software where the house is located and what the desired interior temperatures should be. This is because two identical houses in different cities can require very different furnaces and AC units. A house in northern Minnesota requires much more heat per hour on a given day than the exact same house in Alabama.

Don't Oversize HVAC Equipment

I know what you might be thinking. You’ll just tell your contractor to oversize the furnace and AC unit so you’re always comfortable. It’s a mistake to do this because the equipment would short-cycle. In the winter, the blast of hot air coming out of your supply ducts would fool the thermostat, telling it that the room is warm enough when, in fact, there is still cold air in the room.

An AC system that short cycles doesn’t run long enough to remove enough humidity from the air. You then end up with a house that’s cold and clammy.

My advice to the homeowner was simple. The easiest thing to do is to wear more clothes on the coldest days. I do that in my own home. I often wear long underwear, a knit hat, and a hoodie sweatshirt that keeps my neck warm. While it may seem odd, I can tell you I’m toasty warm on those bitter winter days.

I then shared that he could purchase affordable portable oil-filled electric radiators. These would create additional heat to offset the heat loss in the cold rooms he’s occupying.

Radiant Floor Heating is Amazing

If you're remodeling or even building a new home, you might want to consider adding radiant heat mats under bathroom flooring. This heat will not only help make the room nice and warm, but your bare feet will touch a soothing, warm surface instead of you doing a dance trying to get onto a throw rug as you step out of the shower.

The ductwork that supplies the heated and cooled air must also be designed and installed with great care. Each room must have enough heat and cooling to offset the heat loss and heat gain for that room.

The rooms farthest from the furnace must have air flowing from the supply duct as strongly as the room closest to the furnace. This is achieved by maintaining the same static pressure in the duct system along its entire length.

Don’t assume everything will be done correctly when you build. I urge you to have a conversation with your builder and include the HVAC contractor if possible. Discuss everything I’ve shared above and see if you get any pushback from the builder or HVAC contractor.

It’s very difficult to remedy ductwork that’s not sized correctly once a house is built. You get one chance to get it right. This is why the Ask the Builder motto is “Do it Right, Not Over!”

Column 1654

A Beam From the Annie Hodges Schooner?

A Mystery Beam From the Annie Hodges Schooner?

Publisher Note: The following content was generated and contributed by Ms. Margaret Acquarulo and her son. Margaret reached out to me after reading a column I wrote. The column topic dealt with old tradesmen who were so proud of their work that they signed it. CLICK HERE to read that column.

The Writing in the Living Room

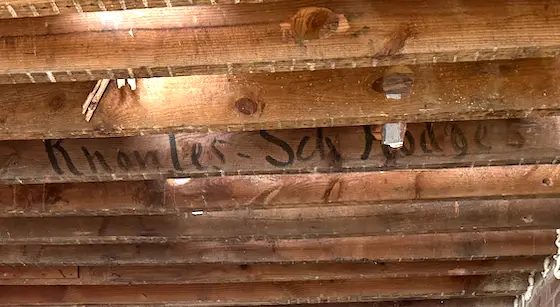
When the workers on a rowhouse renovation on E. Clement Street in Baltimore removed the ceiling, there was some cryptic writing on one of the old beams:

Knowles – Sch Hodges

old floor joists in Baltimore home

You can see the script on the floor joist. No normal carpenter would go to this trouble unless it were a special piece of timber.

After unsuccessfully searching for schools (Sch?) with the names Hodges or Knowles, an article in the Baltimore Sun provided a clue as to what this might mean. Ships coming into and departing from the port were routinely listed in the newspaper at the time the house was built in 1875. The abbreviation for a schooner was “Schr,” and there was in fact an oyster schooner called “Annie Hodges.”

Ship Building in Baltimore

Baltimore was a center for shipbuilding throughout the 1800s. The Inner Harbor was lined with shipbuilders and dry docks. Most of the streets in the area went directly to the water. Just a short walk from E. Clement Street, there was a shipyard on the northeast side of Federal Hill where the Ritz Carlton and Harborview communities are today. The Key Highway shipyard began when brothers Jeremiah and William Skinner Jr. -- boat builders -- came to Baltimore from Dorchester County, Maryland, in the 1820s. In 1845, William sold his interest in the company to his brother and purchased his own yard on Cross Street. William’s boatyard became famous for its sailing ships and probably built Baltimore’s first clipper ship.
When William died, his brother and sons took over the business and renamed the company the Wm. Skinner and Sons Shipbuilding and Drydock Company, eventually growing it into a 35-acre complex. The company continued to prosper during the Civil War by meeting the greater demand for all types of sailing vessels.

There is no suggestion or evidence that the Skinner shipyard built the Annie Hodges; yet it is certainly possible. It was the closest shipyard to E. Clement Street, and the builder of the house may have sourced some of his materials from shipbuilders.

Key Highway shipyards 1968
The Annie Hodges

The schooner Annie Hodges was built in 1872 in Baltimore, three years before the house was built. A schooner is a sailing vessel with two or more masts; on a two-masted schooner, the shorter mast is forward. The Annie Hodges measured 61 feet in length, 21.8 feet across the beam, and 6.1 in depth. Its weight was 47.75 gross tons and 45.36 net tons.

The Annie Hodges’ initial home port was Baltimore until 1903. It was next based in Crisfield, Maryland on the Eastern Shore from 1904 to 1909, then it ended its life based in Bridgeton, N.J. from 1909 to 1913. After 1913 it is no longer listed in the Merchant Vessels of the United States annual publication. Regardless of where it was based, however, it was a merchant ship and would have spent most of its time sailing up and down the Chesapeake Bay.

Various news articles provide a look at the life and activities of the Annie Hodges:

  • On September 22, 1876, Charles Wacker and R. N. Dobon, owners of the Annie Hodges, were issued a license to dredge for oysters. Two years prior, then captain John M. Grey had been fined $50 for oyster dredging on Cooks Point, Great Choptank River, without a license.
  • In 1885, a news article listed the owner of the ship as C.D. Walker. From at least 1878 to 1899 its captain was R.N. Dolbow. Dolbow had an interest in at least one other vessel, the schooner Agnos, which he and C.W. Simpkins bought from P.C. Struven in 1881.
  • Reuben N. Dolbow, who was born in New Jersey in 1843, drowned in the Patuxent River on January 10, 1890. One source claimed that the death occurred when the oyster schooner, Annie Hodges, sank off Cove Point, Maryland. Captain Dolbow was 47 and had lived in Baltimore for 25 years, leaving behind a wife and four children.
  • On February 9, 1891, the new captain of the Annie Hodges, T.E. Dougherty, saw a large whale off the Thimble Light.
  • Mike Krigger, a member of the Annie Hodges crew, accused the mate, Joseph E. Lawrence (or Laurence) of assault by hitting him in the face. Lawrence testified that Krigger was one of several crew members who cursed him and refused to go to work. Lawrence claimed that he merely shoved Krigger away; the case was dismissed on October 27, 1898.
  • The Annie Hodges made national news on February 21, 1899 when some of its crew members were feared dead. After approximately 50 ships left Baltimore on January 23, they were hemmed in by ice in the Patuxent River. When a blizzard arose, fuel and provisions were low, and the captain, whose name was Watson, put the crew ashore to make their way to Annapolis. They were given shelter at the Annapolis station house, but four of the group had frozen to death on the way and were left in the snow. The owner of the ship was listed as Struven & Wacker.
  • William T. Hooper of Hooper’s Island, Maryland was featured in an article in 1981 about his life as a waterman. He had signed on as the cook of the Annie Hodges – one of three crew members – in 1902 when he was 17. He noted that the ships traveled from Baltimore to Philadelphia carrying freight in the late summer and early fall and did most of their oyster dredging in the winter and spring.
  • A lawsuit was heard on February 26, 1914, launched by then master and owner Sherman Hager. The Annie Hodges – described as a fishing and oyster vessel – had been damaged in a collision with the tug Prudence and barge Dorothy the night of June 18, 1912. Hager was trying to recover an amount for damage to his ship. This may have been the event that retired the Annie Hodges.

Origin of the Beam

The connection between Knowles and the house or the Annie Hodges is unknown. It was a fairly common name in the area at the time. Knowles may have been involved in the building of the house or of the ship. Two possibilities for how this beam came to be in the house are:

  • It was a beam meant for the ship when it was built three years before the house but deemed not sturdy enough. The strength of the wooden beam of a ship was crucial for the ship's stability and ability to carry cargo. Beams were tested during the building of a ship through a visual inspection for cracks and by tapping or probing with a screwdriver to detect decay. If this wooden beam failed its test for the ship, it may still have been useful for a house. The 21.8-foot beam of the Annie Hodges was more than long enough to span the 12-foot width of the house.
  • The beam was removed from the ship and repurposed after the ship suffered some damage. The Baltimore Sun reported on January 17, 1885 that the Annie Hodges incurred $250 in repairs from the loss of both masts in a strong wind while bound down the Chesapeake Bay on January 12. This, of course, was ten years after the house was built, but it raises the possibility that other damage could have occurred earlier.

Types of Construction Defects

fresh concrete slab being troweled by a worker

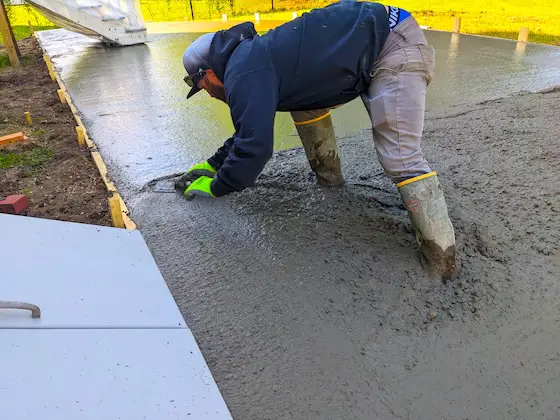
Types of Construction Defects - This concrete mason is doing an excellent job of placing and finishing the patio at my son’s house. No extra water was added to the concrete at the jobsite. Copyright 2026 Tim Carter

Types of Construction Defects

This column is all about types of construction defects and misplaced hope. You can lose thousands of dollars, and sometimes tens of thousands of dollars, should you make this mistake.

I do at least five short consult calls each week. The common denominator in almost all of the calls is that the homeowner trusted that the contractor was going to do the job the right way. I get it, believe me, I do. I trust the mechanic is going to fix my truck when I take it in for service.

Furnace Exhaust Pipe Disconnected in Attic

I was on a very serious call two weeks ago. The homeowner lives in the upper Midwest. He had a new roof installed two years ago. This man went up to his attic about a month ago for the first time since the roof was installed.

He discovered that the roofers disconnected his furnace exhaust pipe, which used to exit the roof. The roofers then patched the hole and installed shingles over it. The furnace exhausted into this man’s attic for two years.

The entire underside of the roof sheathing was pitch black with mold and mildew. It covered the roof rafters. Months of toxic condensation dripped down the rafters and saturated the fiberglass insulation. It was a miracle that the homeowner and his family didn’t die from carbon monoxide poisoning.

The owner of the roofing company had no idea this happened. His crews didn’t tell him. He and his insurance company are in the process of repairing all the damage. This homeowner dodged the bullet.

How could this have been avoided? If the entire roof is visible from the ground, the homeowner could have taken his own before-and-after photographs. If the roof was not visible, the homeowner could have asked the roofer to take before-and-after photos. A video-equipped drone could have been used by the homeowner to record before-and-after videos.

The homeowner could have also poked his head up into the attic before he paid the roofer. He might have spotted debris on the insulation, the disconnected vent pipes, and other issues. He didn’t because he trusted the job was done right.

New Concrete Patio Spalls and Crumbles

I had another consult with a woman who lives in upstate New York. She had a new concrete patio and two sets of concrete steps installed just six months ago. The concrete is spalling and deteriorating. This woman is heartbroken. The contractor said he can try to repair it, but with no guarantee.

I have no less than twenty past columns on my website about how to install concrete the proper way so it doesn’t deteriorate for over 100 years. This woman could have read all those columns before she signed a contract with the contractor. She would have known exactly how the concrete should have been mixed, placed, finished, and cured to ensure it would not crumble or spall.

Instead, she trusted the work would be done correctly. She hoped everything would work out well and that the contractor had her best interests at heart. You must vet contractors before you sign contracts to ensure they know what to do. Many contractors today don’t have the same mindset as the contractors of old.

You have to realize the height of the bar to be a concrete contractor is so low that a mouse could jump over it with ease. There’s no proficiency testing required. You can go out yourself and have business cards printed up saying you’re a concrete mason even though you’ve never placed and finished one square foot of concrete.

I hate to admit it, but it’s become very easy in the past two years to do the research about how things should be done. This is one instance where artificial intelligence (AI) shines. I’m not a fan of AI, but it does do this job well for the time being.

This woman could have gone to grok.com and typed: “I live in upstate New York. I want a contractor to install a new concrete patio and steps. I don’t want them to spall or deteriorate. I want them to resist damage from deicing salt. How should the concrete be mixed, placed, finished, and cured so cold weather is not an issue?”

The AI engine, in seconds, would have given the woman the exact strength the concrete should be, how to place it without adding extra water, and how to finish and cure it.

She could have also received personal one-on-one advice by chatting with me on the phone. I beg you to stop placing hope in contractors. Research how a job should be done, how the materials should be installed, etc., before you even call a contractor to get bids.

Column 1653

Spackling and Caulking Tips

spackled finish nail holes in wood door trim

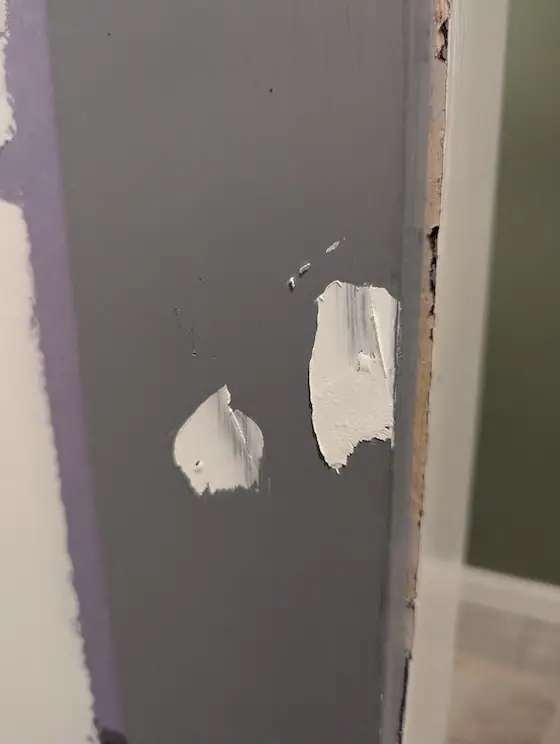
The two white spots are finish nail holes covered with far too much spackling compound. Material has been wasted, and extra sanding will be required to get ready to paint. Copyright 2026 Tim Carter

Spackling and Caulking Tips

I’ve been sharing with you the wonderful saga of my son’s basement remodeling project in past columns. Together, he and I have transformed 1,100 square feet of bare basement into five large rooms and a full bathroom. We’ve done all the work ourselves, and only work on Saturdays.

It’s now time to paint the baseboards, door trim, and the doors. All of that material came primed from the factory, so that saves us a step.

That said, hours of work need to be invested before we pop open the can of semi-gloss white paint we’ll use. We have to spackle hundreds of finish nail holes, and we have to caulk hundreds of feet of tiny cracks along the trim to achieve professional results.

This preparation work requires much more skill than what the average person might think is necessary. A few days ago, I witnessed what happens when you don’t take the time to do things right.

I try to keep my golf swing in shape over the harsh New Hampshire winters. I do that each week by playing a round of golf on an advanced simulator at my local course. The owner is doing extensive remodeling of the interior of the building before the season opens in April.

A new door and trim were installed at the Men’s restroom entrance over the past two weeks. Days ago, a worker spackled the finish nail holes. It looks like to me he applied the paste with a snow shovel instead of a 1-inch-wide flexible putty knife. Extra spackle was left all around each nail hole, and he didn’t fill the nail holes completely.

I also saw an amateur attempt at applying caulk where the trim touches up against the new drywall. The caulk was smeared with all sorts of excess caulk left on both the trim and the drywall. It was a mess.

The process of applying both spackle and caulk requires a pinch of hand-eye coordination mixed with attention to detail. I’ve come to the conclusion that many who work with these materials have never been trained. I feel they’ve not been taught the steps required to achieve professional results.

Spackle is fairly easy to apply. Premixed spackling compound is much like drywall joint compound. It’s the consistency of cool cake icing. I feel you get the best results working with a small, flexible putty knife when spackling small finish nail holes.

You should use a non-shrink spackle compound. These water-based products are available at most home centers and high-end paint stores. Your goal is to apply just enough spackle to fill the nail hole.

I use the following technique. I use the putty knife to get about 1/4 teaspoon of spackle from the container. There’s no need to load up the putty knife with lots of excess spackle.

I then press the spackle into the nail hole by flexing the putty knife blade. I try to force the spackle in as far as possible. There is excess on the trim at this point. I then remove the excess with a stroke that’s perpendicular to the direction I applied it. The goal is to have no excess spackle on the wood trim. This makes sanding much easier once the spackle is dry.

I always use a sponge-filled sanding block to sand the spackled holes. Use one with the finest grit so you don’t leave scratches in the wood trim. Brush off the dust before you paint.

Caulking is more difficult than spackling, in my opinion. It’s critical you apply the perfect amount of caulk to the crack. This is done by controlling the size of the hole in the tip of the caulk tube, and regulating the rate of fill by the amount of pressure applied to squeeze the caulk from the tube as well as moving the caulk tube along the crack. Move the tube too fast along the crack, and not enough caulk is in the crack. Move too slow, and excess caulk oozes out around the tip. You also need to hold the caulk gun/tube at a low, oblique angle.

I should also mention there’s a big difference in the quality of caulk guns. The cheap ones cause the plunger to push into the caulk tube too fast. These guns typically have notches on the plunger rod. I use a gun that has a smooth plunger rod. The plunger only travels a very short distance as I slowly squeeze the gun handle. It’s a dream to use.

Your proficiency can rise to the level where there is no excess caulk to wipe off with your finger or a smoothing tool. That’s your goal. It can take many hours of practice to achieve results like this. You’ll probably have some excess as you wipe your finger across the fresh caulk. Don’t allow the excess to wrap around your finger. Pull your finger away and use the excess to fill the crack that’s yet to be caulked.

Once you’ve smoothed the caulk, you now wipe the joint with a damp grout sponge. You want to remove all traces of caulk except for what’s in the crack. Don’t press too hard, or you’ll dig out caulk, creating a recess.

My recommendation is for you to practice caulking before you advance to the trim you just installed at your home. Glue a few pieces of scrap trim to a scrap piece of drywall. Practice filling the cracks where the trim ends on the drywall. Soon you’ll get the hang of using your gun and the sponge.

Column 1652

Drone Home Inspection

drone photo of new home wood walls

This is a new home being built in Altadena, CA. The original house succumbed to the Eaton wildfire in January of 2025. A video-equipped drone allows the owner to track and curate construction progress. Copyright 2026 David Werntz Wings by Werntz

Drone Home Inspection

Thirteen months ago, my very good friends Steve and Karin were going about their daily lives in their wonderful home in Altadena, California. Several years before, I had visited for a week. Steve and I plowed through a long honey-do list. I donated my time to Steve to help pay back all the work he does to maintain my Ask the Builder website.

Our improvements, along with the magnificent house, were destroyed in the Eaton wildfire. Steve and Karin only had 30 minutes’ notice to evacuate. Red-hot embers were swirling all around their house. Everything that couldn’t be crammed into their two small cars was consumed by the voracious flames. This is what flying embers look like at nighttime:

I’ll never forget the next day when Steve sent me a photo of what remained of his home. A neighbor was able to sneak past the blockades to capture the devastation. Steve could only muster up two words for the photo caption: “Not good.” I was heartbroken to say the least. More than fifty homes in this subdivision burned to the ground.

house destroyed by eaton wildfire altadena ca

This is the rear of Steve's house. The Eaton wildfire took no prisoners.

The good news is that the rebuilding process started in earnest about two months ago. Twenty-four of the 50+ homes that were consumed by the wildfire are being rebuilt by one builder/developer in an assembly-line fashion. Steve and Karin's house is in this group. The construction, once started is progressing at a frenzied pace. Within two weeks of Steve's slab being poured, his house is almost ready for roof trusses. Look:

new home framing drone photo altadena ca

The builder has an experienced crew framing Steve's new house. The daily progress is almost unbelieveable. Photo credit: David Werntz Copyright 2026

. Many houses in the subdivision survived the flames. One of them is owned by Dave, a close friend of Steve’s. Dave’s house is but 300 feet from Steve’s. Dave is a small-plane flight instructor and also flies drones as a hobby. Visit his website Wings by Werntz.

Dave has been keeping Steve up to date on the construction progress by flying his drone up to the construction site. Steve is living in a rental house about fifty miles away. I get to see all the photos and videos created by the high-resolution camera on the drone. I’m stunned by the clarity and how Dave can pilot the drone down close to capture very small details. The drone technology is almost unbelievable.

You can use a drone to help you keep in touch with those parts of your home you can’t inspect without violating the laws of gravity. I used to have little fear of climbing ladders and walking on roofs. Those days are over as I’ve lost my nerve to a very large degree. An accident is bound to happen if you no longer can maintain your balance or doubt your motor skills when up on a ladder.

A drone can inspect any building. One can even do masonry buildings. The drone’s video camera can focus on the mortar joints as well as the brick or stone. You can spot crumbling mortar within minutes. There’s no need to scale a dangerous, tall ladder.

I’m about to invest in a drone for my own use. With a small amount of practice, I know I can use one to inspect my roof for missing shingles. The drone would allow me to look at the flashings around plumbing vent pipes, my chimney, and skylights. My feet would be planted safely and firmly in the grass as the drone performs the dangerous work.

You can use a drone to do all of the above. It gets better. Imagine not having to wonder if the last big storm caused damage you can’t see from the ground. The day after the storm, you could have your drone up in the air looking for problems on your roof. The drone could let you know if any of your siding or fascia boards were damaged by flying debris.

The current Federal Aviation Administration (FAA) requirements are pretty simple. If your drone weighs less than 0.55 pounds and you fly the drone for recreation, you don’t have to register it. Drones that weigh 0.55 pounds or more must be registered at the FAADroneZone website.

That said, if you’re a recreational flyer, you must complete the Recreational UAS Safety Test (TRUST) and carry proof of completion while operating your drone. You should visit the FAADroneZone website to read all the rules that apply to recreational flying. You can’t just buy a drone, charge the batteries, and start flying it legally without complying with the FAA regulations.

READ THE AUTHOR'S NOTE BELOW

You may be tempted to start a tiny business doing inspections in your neighborhood or town. This commercial use of a drone requires you to comply with Part 107 of the FAA drone requirements. You’ll have to take an in-person test, much like you did years ago to get your driver’s license. You’ll obtain a Remote Pilot Certificate once you meet all the Part 107 requirements.

Small drones equipped with high-resolution video and photo technology are very affordable. You can purchase one for just a few hundred dollars. I plan to survey my Ask the Bulider newsletter list for help before I buy one. I’m sure many of my subscribers own and operate drones. The survey results should be a great help. My subscribers will make sure I end up with a drone that’s reliable, high-quality, and is easy to operate.

You can get lots of this information from drone groups on social media. You may even have an in-person drone group that meets monthly in your city or town. Investing time in talking with other drone operators will allow you to make a great informed decision should you decide to purchase one.

Author's Note:

On March 15, 2026, David Drake who lives in Baltimore, MD sent me this additional information:

"Not a question, but a correction to your article about drones. To inspect your own roof, flashing, etc., you need to have your Part 107. The requirement isn't whether or not you receive payment for the flight, it's based on the flight's intent. Most people aren't checking their gutters for recreation. Your friend Steve, for example, should have had his Part 107. People also need their Part 107 if they post video on YouTube or similar platform and it promotes a business, even if it's not drone related. For example, if you own a roofing company and include a drone photo of a job you just did in an ad, you need a Part 107. I have my Part 107 and this topic gets debated all the time on drone subs in Reddit, but it all comes down to the flight's intent."

Column 1651

DIY Wood Preservatives

sugar shack with charred wood siding

Those black blotches are not mold and mildew. The owner used a large propane-fueled blowtorch and charred the siding. Charred wood resists insects, rot, and ultraviolet light damage.. Copyright 2026 Tim Carter

DIY Wood Preservatives

There’s a very good chance you own something made of wood that’s exposed to the weather. It might be a fence, a deck, a dock, patio furniture, wood siding, a shed, etc. Wood is a marvelous material. It’s favored by many because it’s easy to cut, shape, and install. Wood can also be quite affordable because it’s nothing more than a crop, just like corn or blueberries. Timber companies often plant one or two new trees for each one they harvest.

The downside of wood, when used outdoors, is that it requires maintenance. Some wood species require much more maintenance than others. Redwood and Western Red Cedar are two species grown in the USA that require minimal maintenance. Both have a substantial amount of natural preservatives locked into the wood fibers. Even so, you can’t expect them to resist weathering like you would a structure made of stone or a roof covered in slate.

Water and sunlight are the two primary enemies of wood. Water triggers wood rot. Water that soaks into untreated wood causes it to swell. When the wood dries, it shrinks. This movement creates cracks, much like when you bend the aluminum tab back and forth on an aluminum soda can. Repeated wet/dry cycles cause the cracks to get bigger and bigger, allowing water to penetrate deeper into the wood.

UV Light = Cruise Missiles

The ultraviolet (UV) rays in sunlight mimic miniature artillery shells. The UV rays that strike untreated wood break apart the lignin in the wood. Lignin is the glue that holds wood fibers together.

You may have witnessed this UV damage after you’ve pressure-washed an outdoor deck. The previously smooth wood becomes fuzzy once it dries. The fuzz is sun-damaged wood fibers that are still barely hanging on.

UV rays add further misery by changing the color of your beautiful outdoor wood. New teak is a rich, deep brown. That same teak left outdoors with no protection soon becomes battleship gray.

Paint is Great But...

Knowing what you’re up against, you’re tasked with stopping water from getting to the wood, and applying some sort of sunscreen to prevent UV damage. Paint fits the bill. Paint is nothing more than a colored glue. Some glues (resins) are much stickier than others. Think of the simple white glue kindergarteners use versus strong carpenter’s glue or epoxy.

I’ve found that paint that has a urethane resin component can bond well to wood for decades. I painted my redwood siding almost thirty years ago. Not only does it still look great, but it’s also not peeling. Keep in mind my redwood was squeaky clean, and I painted the siding employing all the best painting practices.

Should you decide to paint your outdoor wood, you should paint each piece on all sides and edges. This is not practical in many situations. That said, when you do an autopsy on peeling paint, you’ll often discover water was able to find its way to the unprotected surfaces, soak in, and then cause the wood to swell. This movement often exceeds the holding power of paint, and it peels and blisters.

Penetrating Non-Film-Former Sealers

You can choose to use penetrating sealers to protect wood. The best ones, but they’re almost impossible to find, are ones that are made with synthetic oils, and are not film formers like paint. Film-forming sealers eventually peel. They become a maintenance nightmare as you need to sand off the old sealer or use chemical strippers to achieve a stunning, new perfect finish.

Avoid sealers that contain natural oils. Tung and linseed oil are examples of these natural oils. These products are scrumptious food for both mildew and algae. Sealer manufacturers often add mildewcides to their sealers to prevent this growth, but the chemicals can and do leach out or break down over time.

You can also coat exterior wood with copper napthenate. Copper is a natural biocide. It helps to ward off wood rot, mildew, and algae. The issue is that this liquid produces a greenish cast on the wood. It’s a great product to coat the cut edges of treated lumber.

Japanese Wood Char

I’m intrigued by what the Japanese builders have done for centuries. They use fire to char new wood. This technique creates a natural surface that requires a minimal amount of maintenance.

The charred layer at the surface is identical to the black leftover log from the night before in your campfire ring. Have you ever noticed that charred log never seems to rot? You don’t see algae growing on it either. This is because the charring removes the food component of wood that fungi, mildew, and algae eat!

A homeowner just a few miles from my house used this method to protect the new wood siding on his maple-syrup sugar house. Five years ago, I watched him use a propane-fueled large blowtorch to char the new wood siding.

He was very wise and made sure the wood closest to the ground was charred the most. Water splashing up from the ground gets the wood closest to the ground very wet. The charring was not uniform, and you could see lightly charred wood in many areas. It created a very unique look, in my opinion.

I stopped by this sugar house just a few days ago to inspect it. I couldn’t find any signs of wood rot or algae growth. It turns out the Japanese are very clever to have observed what happens to burned wood and use that basic technology to protect the siding and trim on new houses!

Column 1650

Bring Back Vocational Schools

floor trusses installed in the winter

Vocational Schools - Artificial Intelligence (AI) will not be using a nail gun when it’s 20F outdoors. AI will not be soldering copper tubing either. Encourage all you know to enter the trades. You can switch jobs now and have a fulfilling career as a plumber, electrician, or carpenter. Copyright 2026 Tim Carter

Vocational Schools - Create Master Craftsmen/women Again

I need your help. You’ll be helping your children, any grandchildren, friends, neighbors, etc., too. You may not realize it, but there is a severe shortage of workers in just about every residential construction trade. Here’s another reality: Over 70% of the U.S. population hires people in the trades to perform construction and maintenance tasks on their homes.

A shortage of workers leads to higher labor costs and often longer wait times for quality work. It’s time to bang the gong and let young students and young adults know that a life-long vocation as a plumber, electrician, carpenter, painter, drywall finisher, etc., is both fulfilling and respectable.

I think we’re about to go full circle when it comes to respect and reverence for the trades. Back in the late 1800s, when disease was undeniably linked to sanitation, plumbers were on the same platform, and maybe the next one up, as physicians! This history, which is rapidly becoming legend, is one of the reasons plumbers are among the highest-paid tradespeople. A great plumber helps you stay healthy.

Jobs Used to be Vocations

It was common back in the early 1900s for tradespeople to develop a love for what they did each day. Some were so proud of what they produced that they signed their work! Years ago, I uncovered the signatures of carpenters up in attics where they had signed and dated the roof ridge board they had installed minutes before.

I’ve discovered bottles with handwritten notes in them in the walls of old homes I’ve worked on. They were left by plumbers just as you might stuff a note in a bottle and toss it into the surf. I didn’t realize how valuable these were and discarded them. How I wish I had photographed all those signatures I discovered hidden inside homes!

You can help bring back this pride and honor by adding your voice to the conversation. Are vocational schools still part of your public school system? Vocational schools in many cities and states have slowly disappeared over the past decades. My deep cynicism thinks this was a diabolical plan to herd young people towards expensive, and somewhat useless, college degrees. Layer on top of this the inescapable student-debt loan that crushes their spirit and bank accounts.

I was born and raised in Cincinnati, Ohio. I had the good fortune to come to know an instructor in the construction technology track at a local vocational school. He asked if I’d be willing to speak several times to his students about real-world challenges and opportunities in residential construction. It was a magical experience for me to be surrounded by young folks who sucked up construction knowledge like water disappears into a dry sponge.

The vocational schools in the greater Cincinnati, Ohio area are still churning out energetic young tradespeople. These students have high-paying jobs waiting for them. Go to the Great Oaks Career Campuses website. You’ll be dazzled by all the vocational study tracks they offer. Your school system should mimic this. You can help make it happen by doing two things.

Write a Letter to the Editor

Step one is to write a simple letter to the editor of your local paper. Perhaps you can tell personal stories about how it’s difficult to locate professionals to do work at your home. Share any examples of how you’ve seen a decline in quality and professionalism. You can touch on how jobs in the trades are beyond the reach of artificial intelligence (AI). AI is the new warm-and-fuzzy buzzword, but many don’t realize it’s going to gobble up thousands of jobs. I don’t know of a plumber or roof framer who’s worried about AI taking their place!

Mention in your letter how vocational schools can be an incubator for fostering pride, steady employment, and personal fulfillment. I used to feel immense satisfaction when I installed a valley jack rafter that was cut so perfectly, you couldn’t slide a piece of paper between it and the actual valley rafter. Can you say you feel the same emotion in any of the tasks you do at your job each day? I doubt it.

Speak at School Board Meetings

Step two is to attend your local school board meetings, assuming your school system abandoned vocational training. Once again, share stories about how the need for skilled tradespeople is growing, and that your school system should be part of solving this conundrum.

Try to recruit others who feel like you do to attend these important school board meetings. It’s all about pain relief. School board members are like the presidents of companies. If they don’t hear complaints, then they feel everything is okay. You need to voice your complaint about the lack of vocational training.

I feel this vocational training should start in middle school. There should also be crosstraining. I wish that when I was a young lad, I had been forced to sew on a button, learn how to run a sewing machine, cook a full meal, and bake bread from scratch. I feel young girls should be exposed to home repairs, welding, basic auto maintenance, etc.

While we’re at it, let’s campaign for all life skills to be taught in middle school and high school! Personal finance, investing, business principles, etc., should be discussed with young, fertile minds. These topics may create a spark in a young girl or boy, allowing them to have a fulfilling career they didn’t even realize existed.

Column 1649

Labor Cost to Install a New Front Door

handwritten front door installation cost

Labor Cost to Install a New Front Door - This is the quick long-distance estimate I created for Irene to help her understand why it costs thousands of dollars to install a new front door and repair water damage. The bid assumes $80 per hour for labor. The estimate was produced in January, 2026. Copyright 2026 Tim Carter

Labor Cost to Install a New Front Door - Many Small Numbers Add Up

I talked with Irene on the phone a few days ago. She lives in Connecticut and used my affordable phone coaching service. She needed to make sure the bid she received to repair wood rot next to her front door was reasonable. Irene was about to have a new front door installed. Irene said at the end of the call, “Oh my, investing in this phone call was the best thing to do. I now feel comfortable that I’m not getting ripped off!”

I believe you’ll understand why I recommended Irene, and I, talk after you read what she sent to me in an email: “I'm getting a new front door, but before it can be installed, I'm ashamed to say that there's been water damage under the tile right when you enter the foyer through that door.  Overall, the area where the tiles need to be removed/replaced, and new plywood installed, is around thirty square feet.  A contractor gave me an estimate of $4,300.00, not including the cost of the new door. I went to ChatGPT, and it says that his number is too high. What would you say about this?”

I replied to Irene that we should talk on the phone. She placed the order for the call within an hour. I decided to produce a detailed breakdown of the costs of this job. I did many such jobs for customers, and knew that there’s no one aspect of the job that’s a big number. The trouble is, all the small numbers add up to a big one.

I discovered, quite by accident, forty years ago, how to sell more jobs to my customers. This is why I knew my phone call with Irene would put her at ease. Creating the detailed breakdown of her job would only take me a few minutes. It was a fast exercise to see if the contractor’s bid was realistic, too low, or higher than kite flying at the beach.

Here’s why I closed more deals than all my competitors years ago. It was my secret weapon. I was asked to bid on a room addition project for a homeowner. Business was slow at the time. I had scads of time to do an accurate takeoff, obtain tight bids from my subcontractors, and time to make sure each and every cost item was covered.

I was very lucky to be the last contractor to make the presentation. Inside my briefcase was a fat folder that contained all my material takeoffs, the bids from subs, and a dot-matrix printout of a basic spreadsheet showing all of the costs along with the total cost. It was normal practice at the time for me to just share the total job cost. There was zero transparency. No one got a look inside my magic folder.

I shared my number. The homeowners’ cheery red faces transformed to pasty white. My number shocked them. The temperature in their dining room seemed to fall ten degrees. You could hear a pin drop. I said after an uncomfortable pause, “My number is high, isn’t it?”

The husband cleared his throat and said, “Yes, you’re the highest bidder of all three contractors.” I was desperate for the job. I could feel that they wanted me to leave. Their body language spoke volumes.

I said, “I can prove that my number is accurate, and that the other two contractors just guessed at the price. If you award the contract to one of them, I guarantee you’ll be hit with change orders, and the total cost will exceed what I just quoted you. Would you be willing to give me just ten minutes to prove this to you?”

They exchanged glances, and the wife said, “Sure.” I opened up my briefcase, removed the folder, and spread out all my documents on the table. They were immediately shocked by the amount of detail. The transparency was like a warm ocean breeze blowing through their home. You could smell the salt air!

Within minutes, they discovered that no one aspect of the room addition was that much. They could clearly see that the total of all the costs, plus a reasonable profit and overhead, added up to my quote. The transparency short-circuited the bum’s rush from their home.

Thirty minutes after sitting down at their table, I had a signed contract in my hand. I adopted this full transparency approach in all my subsequent presentations. My closing rate went from 25% to 60%. From that point forward, I was booked out nine months in advance, never worrying about how I was going to pay my bills.

Here’s a quick snapshot of Irene’s front-door job. Each and every one of these tasks has to be accounted for: demolition, temporary weather enclosure since the door must be taken out, replace the rotted wood, install the new wood floor, install the new flashing under the door, install the door, install the tile, grout the tile, install all the door trim, and paint/stain all the trim/walls.

All of the above are what I call hard job costs. Most homeowners are unaware of the soft job costs. These happen away from your home. Examples of soft costs are: time spent bidding, time spent looking at your job before the contract, picking up materials, going to the dump with refuse, loading and unloading the truck before each day, etc.

There are more soft costs you’re unaware of. Self-employed contractors pay double what you see taken out of your paycheck for Social Security and Medicare. You probably don’t realize it, but your employer matches what you pay. Contractors like me have to pay for both parts!

Think of what it costs to operate that 3/4-ton truck the contractor drives. The current cost per mile is somewhere between 80 cents and $1.00 per mile. The 2025 IRS allowance, which is always low, is 70 cents per mile. A contractor might travel 30 miles each day to get to your house and then go back home. That’s $150 a week in costs just for his truck!

A contractor needs to charge you for wear and tear on his tools, insurance, Workman’s Compensation payments, etc. All of these costs, which are invisible to you, must be accounted for. You want your contractor to make a small profit so he stays in business when you need him again.

My quick cost estimate for Irene showed she was getting a great deal from her contractor. I estimated the total cost for the job, not including the cost of the front door, to be just under $5,000.00.

If you need my help to make sure a bid you get is fair, I’m happy to do for you what I did for Irene. Just go here to set up our phone call: http://go.askthebuilder.com/talktotim Be sure to type go followed by a period in the URL.

Column 1648