Bridges – Building Tips
Simple Bridge Tips
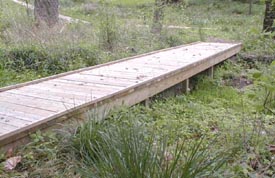
The bridge in this photograph - depending upon its length - can be built by one person in less than 20 hours. It will take at least 4 days to complete the job. The work will happen on the first and fourth days with the other two days spent at the pool or golf course. Here is why:
The first day will be spent digging the trench and pier holes, setting the forms and pouring the concrete. It is not as hard as it sounds. The key thing is to dig enough dirt out of the way so you can easily set the forms for the grade beam. If you give yourself 6 inches of clearance around the grade beam you will be fine.
Use a round point shovel for your initial digging work. Switch over to a flat spade to trim up the sides and bottom of the trench. Do not over-dig. If you go to deep, don't add fill dirt. You simply will have to mix more concrete.
Grade Beam Alignment
The top of the grade beams needs to be level from side to side. The two beams don't have to necessarily be at the same height. In other words, if your bridge will be sloped, they will not be at the same elevation above sea level. However, if you don't get the beams level from side to side, the bridge surface will be a helix and all twisted. It will really look strange! Before you drive the final stakes that will secure the forms before the concrete is poured, check them for level and string a line from form to form to make sure the top of the two forms are in the same plane. If the tops of the forms are not in the same plane, you will have some problems with the sill plate and the bridge joists. The joists will not sit flush on top of the sill plates if the tops of the grade beams are not in the same plane.
The Piers and Steel
Before the forms are set you need to use a post hole digger to create a pier at each end of the grade beam. A 6 inch diameter hole is fine. Dig until you hit the frost level in your area. Try to widen the last foot of the hole if at all possible. This helps prevent frost heaving of the piers. Be sure to include two pieces of 1/2 inch reinforcing steel in each of the grade beams. Look at the plan for the black dots!
The sill plate will be attached to the grade beam with 1/2 inch anchor bolts. Make sure the threaded part of the bolt sticks up 2 inches above the top of the grade beam. Place the bolts at 32 inches on center and start the first bolt at 8 inches from one end of the grade beam. By installing the bolts in this manner you will avoid problems when setting your floor joists. The bolts will fall directly in the center of the joists if you begin your joist layout from the same side of the grade beams as you did for the anchor bolt placement! Don't get confused when you do each grade beam!
Tim built custom homes and did ultra-custom remodeling for 20+ years before launching his Ask the Builder media presence. He was selected as one of the Big 50 by Remodeling magazine in 1993. This award gave birth to Ask the Builder in October 1993. Tim also operates https://DrawPlumbingPlans.com. His @askthebuilder YouTube channel was the first home improvement channel on YouTube.