Cracked Block Foundation Repair
Block foundation repair is more common than most people realize. Concrete block foundations that are about 8-feet tall have a history of developing horizontal cracks about 4 feet up from the floor. You rarely see this happen in cast or poured concrete foundation walls.
Concrete Block = Hollow Walls
It's important to realize the reason the cracks develop. Rarely are concrete block walls filled solid.
The average concrete block that measures 8 inches high, 8 inches thick and 16 inches long has two giant void spaces inside the block. There's a center web that connects the two flat faces you see on either side of the block. Two additional webs are at each end with ears that end up creating a narrow void space between two touching blocks.
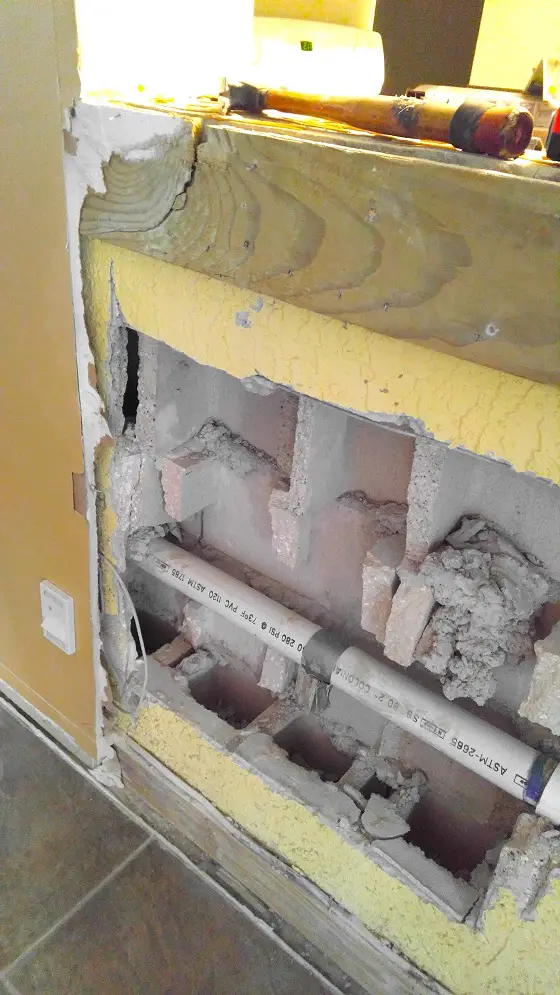
You can see the hollow cores of concrete block under the horizontal PVC drain pipe. It's a far cry from a poured concrete wall! Copyright 2017 Tim Carter
Another key point is the only thing holding the block together is a thin 3/8-inch mortar joint.
Mortar Has Strength Issues
While the concrete block may have been made well and is very strong if cured and there's enough Portland cement in the mix, you can't say the same thing for the mortar the block masons used.
The mortar could have these defects:
- too much sand was used in the mix
- mortar partially set up before being used
- mortar was re-tempered by adding water weakening it
- mortar froze before it cured
The bottom line is the mortar is the weakest link and you only have a narrow 1-inch strip of it to resist horizontal pressure from the soil pressing against the wall.
If you’re interested in learning more about cost estimates for foundation repair I have an article here.
Related Links
Repair Crumbling Concrete Block
Free & Fast Bids
Stronger Poured Walls
A cast or poured concrete foundation wall is solid. It's usually 8 inches thick. It takes far more horizontal pressure to crack or snap a wall like this.
To repair a hollow concrete block foundation, one of your options is to transform it into a solid wall every 24 inches on center.
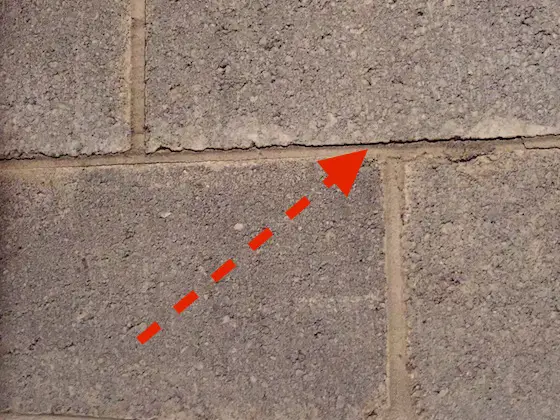
Here's a typical block foundation wall in the early stages of failure. The red arrow is pointing at a crack in the horizontal bed mortar joint between two courses of block. Pressure on the other side of the wall from the soil is pushing the wall inwards. The result is a bending force much as you'd snap a twig or thin saltine cracker in two. Copyright 2017 Tim Carter
Block Foundation Repair Using Peas
The easiest thing to do is to fill the void spaces with concrete when a new block foundation is being built. In addition the concrete must contain small stones no bigger than a green pea.
This gravel is commonly called pea gravel for the obvious reason. It could have been called jaw breaker concrete too as that hard candy I remember as a kid was about the size of a larger green pea. But I digress.
It's easy to fill the voids and it doesn't take long if you can spot a ready mix concrete truck around the foundation. If you can do this building new, you want to fill all the void spaces with the pea gravel concrete.
Doing this, your concrete block wall now is as close as possible to a poured or cast concrete wall.
Steel Rebar In The Block Cores
Insert a 1/2-inch piece of rebar down into the wet concrete every 24 inches on center to get the strongest possible wall. It's best if this steel has a connection to the poured concrete footing. This would require steel rods being installed in the footing when it was poured.
It takes great skill to put these steel rods exactly where they'll end up in the center of the concrete block void spaces. The steel rods project up about 2 feet from the top of the footing. The rods that are installed in the block overlap these shorter rods.
Repairing an Existing Block Wall
Do the same thing to repair an existing concrete block wall. The problem is it's much harder to accomplish because the top of the block is covered by the house structure.
Block foundation repair starts on the outside. Every 24 inches you have to break into the concrete block to expose the void spaces between the webbing.
You then create some sort of funnel to pour the pea gravel concrete into this hole. It's not easy. You should also install the steel rod, but you may find it far easier to use a #3 bar that's only 3/8-inch in diameter. It will be easier to push down into the void spaces at an angle.

There's lots going on in this photo. The red lines represent where you'll find the hollow cores in regular block. The blue ovals are where you'd break into the block on the outside so you can fill the voids with the pea-gravel concrete. I only put in two ovals. You'd need to crack into the block every 24 inches. The dashed yellow lines are the most common locations where you'd see the foundation start to fail - the horizontal bed mortar joints between 3 and 4-feet up from the basement floor. Copyright 2017 Tim Carter
Junior Steel Beams
There's another method engineers use to repair bowed block foundation walls. You can install vertical small I-beams that support the bowed block walls.
You need to break into the concrete slab in the basement to hold the bottom of the beam. The top of the beam is held in place by a small angle iron that's bolted to the underside of the floor joists.
Soil Anchors
A point often overlooked are giant steel plates inside the foundation. This system resembles a massive washer you might put behind the head of a bolt.
A giant steel rod passes through the wall and is buried in the soil outside. The end of the steel rod indoors has threads on it.
The long massive bolt connects to a massive steel anchor in the ground. Tighten the nut on the end of the rod to pull the block tighter against the soil outdoors
Watch this video to see how soil anchors are installed.
These work best if you excavate the soil outside the foundation wall and put in the anchors. There's less pressure against the anchors and plates if you do this.
If you go to all this work, you may as well clean off the block wall, put in excellent waterproofing like Tuf-n-Dri as well as a great foundation drain tile.
Tim built custom homes and did ultra-custom remodeling for 20+ years before launching his Ask the Builder media presence. He was selected as one of the Big 50 by Remodeling magazine in 1993. This award gave birth to Ask the Builder in October 1993. Tim also operates https://DrawPlumbingPlans.com. His @askthebuilder YouTube channel was the first home improvement channel on YouTube.
I have a cracked, bowed block wall crawl space foundation I need fixed. Instead of I beams what do you think about the newer carbon fiber sheets being attached to the inner foundation? Are they really better? Thank you for all of your great articles.
I've not seen this method. It seems it's completely dependent upon some magic adhesive. Kenny Chesney wrote a song about this:
Listen CLOSELY to the lyrics:
https://www.youtube.com/watch?v=7FYOeDuesjo
It's Ken again: I fully agree with you about anything new: Only time will tell. I too prefer tried and proven techniques. That is one of the main reasons I prefer your techniques over others. There is a famous PBS show that twice I followed their advice and realized that the procedures weren't perfected and only time will tell (and the length of time was only hours not years). Thanks for your reply.
The sheets to which you refer can be very effective if installed properly. My sister had this procedure performed on basement walls 10 years ago. It was part of a basement waterproofing project that included a pair of sump pumps, new drain tiles,pipes, etc. and some remediation on the outside of the foundation to help divert water away from it.
The clay in soils in some areas soak up the water like a sponge and exert pressure (normally a seasonal issue) which pushes the wall halfway up horizontally so it appears as a bulge in he basement..
Before the procedure the gap in the mortar joint (primarily) was 5/8 of an inch. After the remediation, it closed up and was never more than the thickness of a dime. It stayed that way regardless of the seasonal shifting of the soil.
The key is in the install and the placement of the mats. The cinder blocks must be scoured bare (no paint remaining) with a wire brush attachment. The mats are like 30x60 inches or so and are spaced that way as well min between. They are not used in the corners. Then, as Tim refers, there is a magic catalyst that makes the entire mat rock hard in a couple of days. I think it also causes a small contraction which helps to pull the wall back together.
In many years of viewing (and measuring) I have not seen the wall shift more than noted above (one thin dime's worth). The mats have not shown any signs of compromise either.
This may or may not be a DIY process however to perfect the plan. However it holds (if installed correctly) as good as steel if not better.
Tim - pea gravel is usually too round to use in concrete as it cannot develop strength equivalent to the cement. Preferably, one would want an angular aggregate that helps complement the strength of the cement by giving something that the cement can lock into. The aggregate still has to be as small as peas to allow good flow into the CMU blocks.
Pat
Pat,
You need to make a field trip to Cincinnati, OH - actually any city within 80 miles would do. ALL of the gravel used to make concrete for ALL projects uses rounded gravel. I've used it my entire life and had to break it apart with a 90-LB jack hammer. Trust me, the cement paste crystals have no issues interlocking to the tiny crevices in the aggregate no matter their size.
If you have links from the PCA that speak to the shape of gravel and final achieved PSI strength with all other things being equal, that would be interesting to see.
If you can't access the outside of the house to drill hole for pouring concrete (if it's covered by a large patio for instance), can you instead drill from inside of the house and thread the re-bar from inside as well?
If you develop a way to somehow do this with the 8-foot bar just 10 inches from the subfloor, tape a video so we can all see it!!
you can cut the rebar in 2 parts or dig a hole inside were you are putting the tile 🙂
Hi tim,
I have a home with basement slab on grade using a block frost footer, recently found Some of the blocks below grade have failed. They you deteriorated and opened enough i can fit my hand in, obviously an issue with how water getting in.
I noticed inside at slab level, the paint flaking Off the wall in 2-3 spots of same wall (water inside block?....more deterioration?
Could one expose//verify issue and where present, form hole shut and slurry a soupy mix in to the wall. from inside?
i have a foundation wall 1/2 exposed wall is pushed in a little. maybe 3/8 at bottom center of wall. zero at ends. im not worried that the structural aspect of the wall is threatnend. im sure thisnwas caused by water and freezing/gutter and foundation drain issue. its on a hillside and is garage wall under house. but i need to stop water from seeping in. can this be dug open and re parged, or would sealing it without re parging be ok? built in 70s
plan on redoing drains and regrading slope. but worried as reparging would require getting all old sealant off which will be a nightmare.
Hi Tim,
I am looking at a house that has two separate I beam systems installed on opposite walls of the cinder block wall basement. The one side appears to have been done a few decades ago and shows no obvious sign of movement. The other side was done in the last couple of months and appears to be done well. Both walls show at least a couple inches of bow in the middle with the top and bottom being relatively nominal. My question is how do you feel this type of repair holds up over time. With proper water diversion and crack maintenance, would you expect this problem to be under control?
-Corey
Hi Tim
I have a house with cider block basement walls. The row along the top have developed long horizontal cracks, almost in the whole wall. In some areas there are two cracks and broken cinder block exposing the very rusted re bar. What should i do to repair this problem? Do I need to remove a cinder blocks one at a time and replace or chisel out at cracks and re mortar?
Hi Tim, I live in a 1927 bungalow that has a gritty concrete patch above the cinder block. This stuff is between all of the joists in the basement and it is constantly shedding grit. What should I use to seal up this concrete? Paint or a commercial sealer. There is no issue with water, just the grit dropping on everything.
Thanks so much for the excellent information. Really appreciate that you covered multiple repair methods so when I interview contractors to do the job I can compare their solutions to the available methods