How to Build a Custom Firewood Shelter
Quick Column Summary:
- Need a firewood shelter
- Don't cover with a tarp
- Airflow keeps wood dry
- Put a roof over firewood
DEAR TIM: Winter is fast approaching. Last year I goofed up. I stacked my firewood outdoors like I see others do, but it rained on the wood, it froze up and then it snowed on the woodpile. When I did chisel out the pieces to burn, they were damp and produced a poor fire. I want to build a firewood shelter that matches my home style and will allow the wood to be dry as a bone. Help me Tim, you're my only hope! Theresa P., Essex, VT
DEAR THERESA: It must be a New England thing to store wood outdoors with no protection. I see it done all the time as I drive around New Hampshire, Vermont and Maine. I simply shake my head and wonder why.
I've seen many people cover woodpiles with waterproof tarps much like they'd wrap a sandwich for a picnic. This method can trap moisture that seeps from the ground and cook it into the split pieces of wood. After looking at several friends' firewood storage solutions, I believe I've come up with a practical firewood shelter that's easy to build and it does an amazing job of keeping firewood nice and dry.
Many years ago a business partner of my father-in-law gave me some very good advice about how to store and dry firewood. At the time, I was just out of college and had no experience with firewood having grown up in the city. There was no wood-burning fireplace in the house I grew up in.
Carl taught me it's all about air. You need lots of air passing through the firewood to dry freshly split wood and to dry out wood that may get a brief sprinkle or rainshower on it. He showed me a way to stack the wood to maximize airflow, although this method can eat up space in the wood pile.
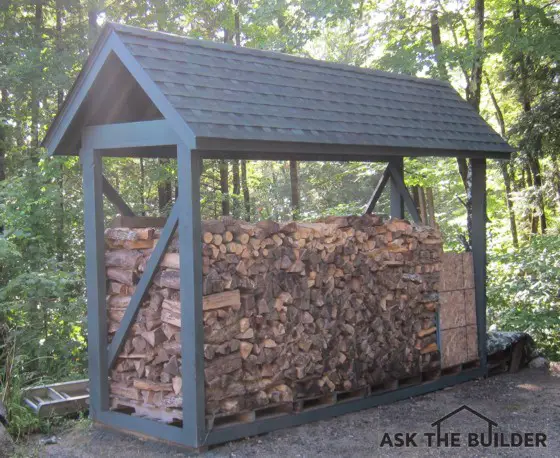
This firewood storage shelter matches the house perfectly. It was constructed in just a couple of days. Photo Credit: Tim Carter
The shelter I just recently built to protect my firewood from the rain, snow and ice here in New Hampshire looks like a simple table with a slanted roof. I took the time to make sure the roof pitch of the shelter matches that of my home. I painted the shelter the same color as my house trim and the shingles on the shelter match those on my home. Anyone looking at it would feel the home builder constructed it at the same time the house was built.
The legs of the shelter are simple treated 4x6 timbers. They sit on top of a frame made from treated 4x4s that measures exactly 4 feet wide by 16 feet long. I built it this dimension so that four standard oak shipping pallets could sit on top of the frame keeping the firewood well off the ground. The open nature of the pallets also allows plenty of air to pass under the firewood.
There's a center 4x4 in the bottom frame that's also 16 feet long. The three long 4x4s provide plenty of support for the pallets so they don't crack or sag under the tremendous weight of four cords of split firewood.
The top beams that support the roof of the shelter are just regular lumber 2x8's. The roof load, even with snow, is very minimal so the 2x8's over the 16-foot span don't have any sag at all. The simple roof rafters are cut from 2x4s.
I didn't worry if the ground was level where I built my shelter. In fact, in the long dimension the ground drops nearly 9 inches. I did make sure the shelter was level across the narrow 4-foot width. That's easy to do at each end.
I made sure the roof beams were level by lengthing the two 4x6 posts on the lower side of the shelter. I felt it would look odd if the roof ridge line was out of level. I notched the tops of all four posts so the roof beams would rest on the solid lumber. Nailing the posts into the notched part of the 4x6 posts also helped stiffen the shelter against racking. Diagonal 2x4 braces nailed into the vertical 4x6 posts also help ensure the shelter does not collapse.
The roof overhang at each end and along the long run of the roof is 9 inches. It's all about scale. If you have too much roof overhang on a small structure, it looks odd. Nine inches will protect the wood in all but the strongest wind and rain storms. Even if the lower rows of the firewood get damp from the rain, they'll dry out in a matter of days when the rain stops.
I discovered some heavy galvanized corner connecters at my local lumber yard that I used to screw into the bottom of the posts and into the 4x4 base frame to secure the shelter legs. This ensures the shelter won't blow over in a heavy wind so long as you keep at least one cord of wood in the shelter at all times as a counterweight against the small amount of wind load on the roof.
Where the rain runs off the roof, I've made sure I have a thick layer of crushed stone that doesn't have any sand in it. I want the rain runoff coming from the roof to enter into the gravel with minimal splashing so it keeps the wood on the bottom rows as dry as possible. Since the wood is stored up on the pallets, the bottom row of firewood is a good 8 inches up from the ground.
Column 1055
Tim built custom homes and did ultra-custom remodeling for 20+ years before launching his Ask the Builder media presence. He was selected as one of the Big 50 by Remodeling magazine in 1993. This award gave birth to Ask the Builder in October 1993. Tim also operates https://DrawPlumbingPlans.com. His @askthebuilder YouTube channel was the first home improvement channel on YouTube.
Well Tim I like the fire wood shelter that you built and I watched the video on the paint sprayer, I see in the video the wood shelter was behind you, did you use the sprayer to paint the wood shelter?
Yes. I used the sprayer to paint the shelter. Worked great!
Are there plans for the Custom Firewood Shelter?
Thanks,
Chris
There are no plans. Only four people expressed an interest and I abandoned spending that kind of time for $25. Sorry.